Monday 20 December 2010

Technical Experimentation

This post is by way of an experiment, trying out Picasa's "Blog This" function.

The image is one I did a while ago in Photoshop (or maybe Painter.... or both), when I was going through a many-eyed-many-tentacled-blob phase. I still like the good old M.E.M.T.B. when it comes to terrorizing parties of cocky PCs, but I haven't drawn one for a while.
Posted by Picasa

Saturday 18 December 2010

Hobgoblin


This is a hobgoblin figure I got years ago and just got around to painting; I don't recall the manufacturer, but possibly Citadel or GW. It came as one of a set of three, each with identical bodies but different heads, with two bows and one spear.

The sculpting is a bit variable. The hands are very crude, while the facial features are really pretty good. It took a lot of bending to get it to hold the spear in both hands.

Sunday 12 December 2010

Project of the day


Today I made myself an ancient copper scroll case. You can never have too many ancient copper scroll cases lying about the place.

This particular ancient copper scroll case is actually made out of a couple of toilet rolls and some paint; I'd like to be able to make one out of actual copper, but my soldering skills have never been all that great. Also, I don't own a proper soldering iron, just a little thing sold as a pyrogravure.

I like to have props handy for gaming purposes, but the real reason I made this thing is so that I can take a bunch of brushes about the place in my bag without mangling them — you can see it in all its disassembled glory to the right. The Lancaster bomber is unrelated; it's a Corgi die-cast toy I bought at the Omaka aviation museum.

Pictures, as usual, may be clicked upon to gigantify them.

Wednesday 8 December 2010

House rules update

I have updated my house-ruled version of the Swords & Wizardry Core Rules, incorporating such things as
  • sub-class add-ons to the core classes
  • d10 initiative
  • 3d6 characteristic rolls
  • armour and encumbrance based DEX penalties
  • hit-point and CON point damage
  • changed and added some spell decriptions, e.g. Feather Fall
and no doubt some other stuff that I've forgotten to mention.

In order to get the page-count down to a manageable size for stapling (68 pages) I haven't included any of the DM-specific stuff, such as monster stats or treasure/magic item descriptions.

If you feel the urge to take a look at it, you can download the PDF right here (it's about a 2 meg download) or you can go to my S&W page and poke around there.

Sunday 5 December 2010

WW1 in SPAAAAAAACE!

Click to embiggen
I can't say I'm a big fan of Games Workshop's sculpting style overall, but I do like these guys — I guess for the same reason I like the rivet-and-plate clanking land-dreadnaughts of the inter-war period. They were very quick and easy to paint once I (finally) got around to them.

I don't actually know which range these figures come from; I bought them years ago because I liked the look of them, and I've never seen any more of the same ilk locally. I imagine I could find out if I was prepared to put in twenty minutes of internet research, but frankly I can't be bothered; the price of GW figures has always been high and these days are reaching ludicrous heights, so I'm unlikely to buy any more unless I spot them in a cut-price clearance lot.

Thursday 2 December 2010

Old 15mm and modern 30mm - scale comparison


I've placed some of the 15mm figures I've been working on with some of WOTC's Star Wars plastic pre-paints to give an idea of scale. They're all sitting on my home-made stencilled 1" hex cloth (the red lines are 10" hexes, overlaid on the base hex grid to ease counting longer ranges).

Tuesday 30 November 2010

F***ing magnets, how do they work?

 
This is why I mount all my figures on steel magnets these days. This cheap plastic storage box has had a magnetic sheet stuck into it with double-sided tape; it holds the figures securely enough that they'll stay in place with the box up-ended. They don't rattle around against each other, chipping off all the paint applied with so much sweat and heartbreak. It won't hold the figures down against a severe jolt, but for normal handling, or for sitting in the back seat of a car for example, it's fine.

I got the magnetic sheet from a signwriter. It's the same stuff used for fridge magnets, or the temporary signs used for car doors and the like, and it's pretty cheap — if I recall correctly, I paid about $20 for a square metre of the stuff.

And that's the lot


These are the last three of my old 15mm Traveller minis, all painted up and ready to go. Nearly. Now I have to give the whole lot of them a couple of coats of varnish and mount them on 15mm steel washers so that they'll stick to a magnetic mat for storage.

The space-assassin on the left was problematic; I find it very difficult to paint black so that it doesn't just become a featureless blob, but also so that highlighting doesn't make it look grey.

Monday 29 November 2010

Nearly there


Just three more left to paint. It was two, but then I found another one. I rather like the hugely-muscled brute on the right; he could fit into all sorts of RPG genres.

Sunday 28 November 2010

And still more


The next group, from various packs. The guy on the left is from the Crewmen set; crewmen clearly have no taste or colour sense when it comes to dress.

Saturday 27 November 2010

....and again

Here's the next batch of those RAFM 15mm Traveller figures. These ones are from Infantry Pack #4, and by the looks of them they could have been modified from masters for WWII US infantry. I've painted them in more or less WWII colours, except that the weapons are in the same green as helmets etc. — I've assumed they'd be made mostly of plastics and ceramics rather than wood and steel.


15mm Traveller minis - the next batch


OK, the next batch. The three on the left are robots of course, and I felt that I had to do the humanoid one in C3PO gold. I like the left-most one a lot; it's described in the RAFM catalogue as a "Security Bot" and comes in a pack of ten. I may have to get some. I don't care that much about either of the other two 'bots; they're OK but they don't really float my boat. They're from the Support Staff set.

The two figures on the right would be useful PC figures; the woman in the virulent green jump-suit is one of the Space Vixens set*, the armoured guy is from Infantry Pack #3. Players will move heaven and earth to get their hands on heavy combat armour, so I can see this figure being a popular one.


* Seriously? Space Vixens? Good grief.

Friday 26 November 2010

Old 15mm RAFM Traveller figures

RAFM 15mm Traveller miniatures — click to embiggen
 I've had these figures knocking around in my collection for a good long time — 20-25 years easily, though they're a little older than that. In their day, they were easily the best 15mm figures available in any genre; 15mm wargaming figures of the time tended to be pretty basic. For many years, these were the only 15mm sci-fi figures available, and I think they were originally marketed under the FASA banner.

These days, 15mm figures have improved enormously, and there are plenty of manufacturers to rival RAFM in terms of sculpting quality. These guys are still right at the top of the field when it comes to character though; they're just oozing with it. RAFM have re-released them, and I'm sorely tempted to buy some more now that at long last I can.

I've just got around to thinking about painting them, after all these years. My friend Joffre is planning to run a space-opera-ish sci-fi campaign in a few weeks, and I thought it might be useful to have to figures ready and waiting for the fun to start. I think 15mm is ideal for modern/sci-fi gaming; they're large enough to be identifiable, but small enough to accommodate the longer ranges at which combat tends to happen — fantasy games tend to concentrate a lot more on hand-to-hand stuff, so the larger figure scales aren't as problematic. I've tried using WH40K Epic 6mm figures in the past, but they're just too tiny to be manageable as single figures.

The rest of them — undercoated, awaiting paint. Also embiggenable by clicking.

Tuesday 23 November 2010

New dice! They're shiny!

The Lou Zocchi Gamescience dice I ordered some considerable time ago (back in the middle of August) from frpgames.com have finally arrived. Or perhaps, to be more accurate, some substitutes for some dice that I ordered from frpgames.com have finally arrived. I can't say that I'm terribly impressed with frpgames; my order was delayed and delayed because the dice I had ordered, though shown as in stock on their website, weren't actually in stock. I got a lot of messages saying that they would be "getting new stock in any day now, don't worry, everything is under control".... but the new stock of the dice I had actually ordered never turned up. After months of waiting, I eventually lost patience and got them to substitute some other dice that I didn't like nearly as much, just so that I could get the bloody order sorted out at long last.

I don't think I'll be buying (or rather, trying to buy) anything from frpgames.com again.

Just while I'm in the mood for bitching, let me voice my loud complaints about the US Postal Service. A fair part of the waiting time I had to put up with was due to their incredible slowness, and for that "service" they charged an arm and a leg. It cost me about $US18.00 to get a 2 ounce package from the USA to New Zealand, which is about five times what it costs me to get a similar package all the way from the UK, on the other side of the world. I thought at first it was just the vendor, racking up the purchase price with nasty hidden fees, but a quick look at the official USPS website confirmed that they are in fact a bunch of bloody pirates and charge like an angry rhino.

Dice, lovely dice my Precious!

Well anyway. I eventually got three sets of white dice for myself, and some coloured and transparent gem dice for my beloved, who is attracted to shiny, sparkly things. I personally don't care for the gem dice at all; they're pretty, but they're a real pain in the arse to read. The problem would be mitigated somewhat if I'd actually got the dice I originally ordered though.... grumble grumble.

When I got my first Zocchi dice, back in the distant past, I had to colour the numbers with paint — which was a royal pain, let me tell you. These days, a white gel pen and a microfine Sharpie makes the job a real breeze. Hoorah for progress! Now, if only I could find somebody who stocks them in New Zealand.

Wednesday 10 November 2010

A13 re-paint

OOP Battlefront 15mm A13 Mk.IV
I have a few of Battlefront's old out-of-production early-war AFV models, from back in the distant past, courtesy of a couple of friends. One of them is this A13 Mk.IV cruiser tank, the immediate ancestor of the Covenanter (which never saw action, as far as I know) and the more numerous and famous Crusader series.

I painted it some time ago, but the scholarship of Mike Starmer forced me to eventually admit to myself that I was wrong, wrong, wrong with respect to my colour scheme, so at long last I bit the bullet and re-painted it as you see here to the right.

The original paint-job
was more suitable to
late-war British vehicles
It looks a bit clean and tidy for my usual taste, but then not that many of the vehicles that went to France in 1940 lasted long enough to get very battered before they were either destroyed or abandoned.

The new range of early-war vehicle models from Battlefront looks very nice indeed, and I shall certainly have to get myself some to add to the teetering skyscraper of unassembled, unpainted models that chokes up my workroom.

Unfortunately, if Troy "Ritterkrieg"'s experience is anything to go by, the same can't be said for the infantry sculpts. I'll reserve judgement until I've seen some in the flesh, but it may be that the situation will redound to the benefit of companies like Peter Pig (who, by the way, have one of the ugliest websites I've seen in some time).

Tuesday 2 November 2010

Khaki Green #3 in Vallejo paints

The Mix

Swatch Board
click on it for a much larger version

Mike Starmer, grognard and maven par excellence of WWII British vehicle camouflage and markings, has come up with a mix for Vallejo ModelColor paints to replicate the early-war base vehicle colour, Khaki Green #3.

It consists of 1 part 822 (German Camo Black Brown), 1 part 888 (Olive Grey) and 7 parts 921 (English Uniform).

I've painted a swatch board with the base colours and the resulting mix, and I've included a small swatch of 887 (Brown Violet), because it's the VMC colour that Battlefront recommend to represent K.G.#3. Seen next to the K.G.#3 it's clearly too green.

Mike recommends straight 888 (Olive Grey) for Dark Green #4, the primary disruptive colour used until its replacement by Norton's Tarmac Grey (in  about '41, I think). So far, he hasn't made any decision on how to make Light Green #5, the secondary disruptive shade, since he doesn't have access to a sample of the original, but it seems to have been very little used so I think I can live with that for a while.

Personally I trust Mike's scholarship, when it comes to WWII British vehicle colours. He works from primary sources rather than from hearsay, though he seems to be fighting an uphill battle when it comes to convincing modellers that their paint colour choices are wrong.

Friday 29 October 2010

La Recherche du Temps Jeux Perdu

When D&D3e arrived on the scene in 2000, I was both pleased and excited. I cut my roleplaying teeth on AD&D when I started university in 1981, and ever since then the hodge-podge high fantasy AD&D milieu is what I imagine when I think of fantasy roleplaying.

I played lots of other games of course — Traveller, Empire of the Petal Throne, Runequest, Space Opera, MERP, Call of Cthulhu, Champions to name just a few. But AD&D was always the core of my roleplaying experience for some years, until a wargamerish frustration at the limitations of the system drove me to convert all my campaigns to Champions (later to turn into the Hero System, as I will refer to it in future). I've written before about my attraction to Hero's unified point-based character construction mechanics, and being able to use a generic system across roleplaying genres appealed enormously — no more having to learn a whole new system for every game.

Shelf 1: The D&D Shelf - post-earthquake, semi-stocked
Anyway, as I said, it was the systemic limitations of AD&D, not the game milieu itself, that drove me away, and much of my time as a Hero GM was spent trying to replicate that milieu with the Hero System. When D&D3 appeared, it seemed to me to have achieved most of what I was trying to do — a game that provided systemic freedom with the feel of D&D. (How wrong I was; as a friend once remarked, D&D3 is still a straitjacket, it just comes in a range of attractive colours).

I immediately started buying D&D3 material hand over fist. I spent literally thousands of dollars on it. After our earthquake last month, I had to put all those books back on their shelves, and I became slightly depressed that I will probably never use any of those books again. I might possibly convert a monster or two, but even that is somewhat unlikely.

After a few years of playing D&D3, I once again became disenchanted with various features of the system — the byzantine complexity of the Feat Tree, for example; the agonies involved in creating an NPC higher than about 3rd level were really grinding me down. I decided to retreat back to the Hero System, and in characteristic form, start buying Hero stuff hand over fist. And again, I spent thousands on it, over time.

Shelf 2: The Hero Shelf
As I've written before, the mechanistic structure of the Hero System eventually palled, and I started GMing using Swords & Wizardry, which was easier to GM, faster to play, and generally (for me at least) more fun. But again, I was looking at my sad, abandoned shelf of Hero stuff and got a little depressed that I'd quite likely never use any of it again. I'm probably even less likely to use it than my D&D3 stuff.

I suppose I could sell it all off, but when I've done that in the past I've always regretted it. Every single time. I don't particularly need the money (though a little free cash would be nice), and I don't particularly need the space, so they'll probably sit there until I die.

But maybe not. If I've learned one thing about myself, gaming-wise, it's that I'm fickle.

Monday 11 October 2010

The Problem of Hit-Points

The issue of hit-points, and exactly what it is that they represent in D&D, is something that has troubled me over the years.

Not that it's troubled me much, you understand — I certainly haven't ever lost any sleep over it.

Anyway, what are these "hit-points"? To what extent do they represent actual physical damage, and how much is luck, fatigue and so forth?

  • Clearly, they largely reflect a level-based increase in defensive skill, luck, the protection of the gods, or whatever. It's ludicrous to think that an experienced warrior would be able to absorb ten or twenty times as much physical damage as an inexperienced one. Granted, physical training and combat experience does bump up one's ability to soak up the smacking, but not to that sort of extent.
  • Clearly, the loss of a single hit-point must mean that the character (or critter) has taken some physical damage, however slight. Otherwise the venom/poison mechanisms wouldn't work, and would have to be extensively rejigged — and frankly, bugger that for a game of soldiers.
  • Clearly, they have little to do with fatigue. If they did reflect fatigue, a heavily armoured knight wielding a greatsword should take more hits per successful attack than an equally fit but unarmoured yokel with a knife. Also, if hit-points were some sort of fatigue mechanism, the character's fighting ability should decrease as hit-points are lost (i.e. as fatigue builds up). That isn't the case; a character fights as well at one hit-point as they do at full health (although they do gradually become easier to kill, I suppose).

I'm sure you get my point; I won't belabour it any further.

Anyway, the point of all this preamble is really just to introduce the method I intend to introduce for rationalizing hit-points and damage. Note that this method is hardly startling or original; I'm sure there are dozens of systems that do something like it.

THE METHOD:

Hit-points primarily represent luck and defensive ability. The loss of a hit-point does indicate some slight physical damage (so that venoms still work), but it is confined to largely irrelevant scratches and bruises. Apart from making it easier for the next blow to kill you, the loss of hit-points has no mechanical effect. Hit-points are easy to heal.

A character's actual physical resilience is represented by their Constitution, and actual physical damage is taken directly from CON. When a character reaches zero CON, they die. CON damage is hard to heal.

Such situations include:
  • When attacked by surprise in a back-stabbing situation — you'd get a saving throw to take the damage as normal hit-point damage instead.
  • If you are attacked when completely helpless (the old dagger-through-the-visor-of-the-paralyzed-knight trick)
  • When you have no hit-points left. This would be the most common situation; damage is taken point-for-point against CON. If you have 3hp left and take 6 points damage, you'd take 3 points of CON damage.
  • When you take falling damage — damage is determined normally at 1d6 per 10' fallen to a maximum of 20d6; if a die shows a 1 it does no CON damage, 2-5 does 1 point of CON damage, and a 6 does 2 CON damage. This system could also be used when immersed in lava, or doused with acid, bleeding from a Sword of Wounding, or whatever.
This list is not by any means exclusive.

With this method, high-CON characters do get a double-bite at the cherry since they not only get more hit-points, but can also take more below-zero hits without dying. Personally, I don't care about that. So having CON is good, so what?

This system still doesn't address the deleterious effects of fatigue, but meh, shrug. If it's relevant, it's a simple matter to apply a progressive penalty to all die rolls.

Friday 8 October 2010

The New Order

I've completed the new cardboard paint-rack I was working on, and used the opportunity to reorganise my modelling bench work-space a bit.


It doesn't look much more organised than it did before, but believe me, it is. Not only because I have a new paint rack, and not only because I've tidied up a bit, but because my friend Gold gave me one of these kitset MDF tool racks. He didn't have the construction instructions for it, so putting it together was a bit like working out one of those annoying 3d jig-saw puzzles, but I eventually managed to figure it out.

I've been making (very slow) progress on painting some of the HäT plastic 20mm British Peninsular War infantry I mentioned a little while ago. I've been finding it a bit of a hard slog; the painting method (working up from a black undercoat) is new to me, and I spent a bit of time floundering about to find a decent way to do the white uniform trousers decently — a Vallejo Iraqui Sand undercoat did the trick; grey looked too dark and harsh.


This is as far as I've got in the last month or so, at this rate it will take quite a while before I have an army's worth of figures painted and based. I am getting a little bit faster though.

I've always been a metal-figure man, and I still think metal figures are more tactilely satistfying as well as having generally sharper detail, but I have to confess that plastic figures have some significant advantages. They're much, much cheaper for a start, and that's no small consideration when it comes to building large armies. They're light and durable — again a big advantage when it comes to large armies; humping hundreds of lead miniatures around can be a groin-straining exercise, and metal figures are notoriously fragile when they clatter around against each other.

And one last thing — they make basing easier. That may seem a small thing, but disguising the stands of metal figures with putty and what-not can absorb a surprising amount of time and effort. With plastics, I can just use a small soldering iron to melt the figure stands out, merging them with the base material (I'm using 3mm MDF here). You can see the raw, unpainted, smooshed-out basing in the stand on the left; the other two have been painted over. I'll probably flock the bases, but they would serve quite well in paint just as they are.

Saturday 2 October 2010

What I'm up to right now: Organisation, that's what

Tiers of Vallejo
I have a lot of Vallejo paints, and I'm getting more all the time. It's my favourite paint system; the ginormous range of colours available, the convenience of the little dropper bottles, the high pigment density and the good quality acrylic medium all float my nerdly boat. It's made me quite lazy about mixing shades though; with such a huge range available there seldom seems to be much need to put myself out in that respect.

Whenever I get a new bottle, the first thing I do with it is to paint its label and cap with some of the contents, so that I can see at a glance what the colour inside the bottle actually is, and what it will look like dry — an important consideration with acrylics, because they often alter substantially in tone between wet and dry.
The shambles that is my workspace


Anyway, a side-effect of having a vast number of individual shades is that one really does have to take thought for organisation, or else one spends most of one's time sorting through the mass to find the exact shade one wants. To that end, I'm in the process of building myself a rack to organise and display all those little dropper-bottles.

I made a stepped stand for them a while ago out of corrugated cardboard (you can see it in the image to the left) and that works well enough except that the steps have no lips or sides, so bottles can fall off quite easily. Also, I made the steps higher than they need to be, so I can't fit as many bottles on there as I want or need. Clearly improvements are necessary.

The new rack is more compressed, and will hold about 60% more bottles in the same space. I'm building it from Whakatane Board, which is a thick (4mm), coarse, stable cardboard, pale grey in colour. It's not quite as strong as MDF, but on the other hand I can cut it with a craft knife, and it's easily strong enough for this sort of thing — in fact it's a bit over-engineered for the purpose, but never mind. It glues well with plain old PVA.


It's going together pretty well, and I'm looking forward to being able to transfer all those dropper-bottles to their new home. The old tier can have some light card lips and sides added, and be used to store all sorts of other paints and glues and what-not.

Before you know it I'll be completely organised.

It could happen.

Thursday 23 September 2010

GHQ A9 - tester

This is a test-paint on one of the 1:285 scale A9 cruisers I bought from GHQ. I've finished it in the Khaki Green No.3 (VMC 887 Brown Violet) and Dark Green No.4 (VMC 888 Olive Grey) disruptive pattern suitable for the Battle of France, 1940. Its been washed with Citadel's Devlan Mud and Badab Black, and dry-brushed in VMC 988 Khaki.

It's taught me a couple of useful lessons:

First, in this scale the K.G.3 and D.G.4 disruptive pattern is even more pointless than it was full size. It's barely discenable, and at gaming distances it will be completely invisible. Just doing a base Khaki Green No.3, washed and dry-brushed, will be perfectly adequate and will also cut down on painting time.

Second, the rusty-metal browns on the tracks and exhaust will need to be exagerrated a bit if I want them to be seen at all. The understated brown I've used just fades into the Khaki Green background.... that's not neccessarily a bad thing of course.

These models from GHQ are exquisitely detailed (as they bloody well should be for the price!) and respond really well to the wash-and-drybrush method.

Note: VMC = Vallejo ModelColor

Wednesday 22 September 2010

Skytrex micro-scale WW1 aircraft


Some years ago (quite a few years ago, actually) I became interested in WW1 aerial wargaming, sparked by playing a friend's copy of Knights of the Air. In fact I became so enthused with the game that I laboriously hand-made my own copy, taking a ludicrous amount of labour to do so (after which we played it maybe half a dozen times – bah!)

Knights of the Air is played with counters, but I thought it would be more visually pleasing with models, and I scratch-built a few from wood and cardboard, but I thought it would be easier to let somebody else do all the hard modelling work so I ordered some 1/300 scale metal aircraft models from Skytrex.

When they arrived, I was frankly disappointed in their quality, and two of them (the Albatros D-III and the SE5a) came with the wrong wing pieces — the Albatros was supplied with an upper plane for a Fokker D-VII, and the SE5a was given one for a Sopwith Camel. The wings, fins and tailplanes are all very thick, and the modelling is pretty crude. I thought that I could do a lot better myself, and put them in a drawer where they've stayed for the last twenty years or so.

The models do bear some resemblance to the original machines though, and recently I dragged them out and decided to see how they'd paint up. These two — the Fokker Dr1 on the left, and the SPAD VII to the right — are the results. Although they're not masterpieces of miniaturization, they certainly look better with some paint on. I used piano wire for the inter-plane struts; a process that I would describe as fiddly to the point of torture, but once done it does give the models considerably more strength, an important point when dealing with models intended for wargaming.

Having finished these two models to what I'd call a reasonable wargaming standard, I'd give Skytrex's micro aircraft a rating of adequate. Barely. I'm not impressed, but they're not so bad as to be unuseable.

I've since learned that Heroics & Ros also produce 1:300 scale WW1 aircraft, but have yet to see any in the flesh. C-in-C also make some in 1:285 scale, and I do have one of theirs: a Halberstadt CL-IV, which is really stunningly good, and not too much more expensive than Heroics & Ros. Unfortunately C-in-C's range is pretty small, but they do seem to just cover the main bases.

By the way, here's a photo of the masters I built after getting the shipment from Skytrex. I never did get around to molding or casting them though.

Sunday 19 September 2010

Slow couple of weeks

GHQ A9 Cruiser Tank — barrel replaced with 0.4mm steel wire
Gaming and modelling has slowed down fairly dramatically around here, partly because quite a lot of my home town, Christchurch, has fallen down recently. Fortunately my own house got off reasonably lightly, just losing its chimney and a bunch of vases, and things are gradually getting more or less back to normal.

I just received an order from GHQ — some 1:285 scale early WWII British armour (A9, A10, A13 and Vickers light tanks), which I'll be getting on to re-barreling and painting pretty shortly. GHQ stuff is bloody expensive, but I have to say they do make a very fine teensy-tiny toy tank.

Tuesday 7 September 2010

Experimental block painting

These are 20mm plastic HäT Peninsular War British troops. I've been experimenting with a style of painting for wargames figures I've seen around quite a bit, but which I've never actually tried myself. I don't really know much about Napoleonic uniforms; these guys have just been painted to more or less match the picture on the box they came in.

The one on the left (I'll call him Figure A) has been block-painted and then shaded with one of the Citadel washes — Devlan Mud in fact. This is the method I've been using on my WWII figures, and it works well enough for that. The method has the virtue of speed, and it doesn't look absolutely terrible (OK, it does look fairly terrible) but it does look rather flat and the wash has muddied the colours a bit. It's a process that really needs the sharper detail of metal figures to work well.

The one on the right (Figure B) is the New Method (that's the Old Method to many, many figure painters). He's has been painted solid black, and then blocks of colour added over the top, leaving black outlines between and to denote creases and the like. The flesh and trousers have also had some highlights painted in. It is slower than the block-and-wash method, but not cripplingly so, and the results are a lot crisper and the figures look better at arm's length (tabletop distance) than the other. Close up it looks pretty messy, but after all wargames figures aren't diorama figures, and the exaggerated shadow and highlight works well for the purpose.

I like the results of Figure B a lot, and I think I'll do more of it. I'll have to practice my creases though; I tend to guess a bit about how fabric falls rather than referring to live or photographic references.

Note: You can click on the picture to see a larger version of course, but the small thumbnail shown is closer to what the little 20mm figures look like in real life.

Sunday 5 September 2010

Acrylic thinner

In many of the modelling articles and discussion groups I've read, Americans have extolled the wonders of Windex Blue as a thinner for acrylic paints. I've never been able to find Windex here in New Zealand, but what I have found is this: ArmorAll Windscreen Wash. I've tried it with Vallejo ModelColor acrylics, and it works a treat.

It, like Windex, has ammonia in it, plus (I assume) a bunch of surfactants and detergents and what-have-you. The ammonia helps thin the paint without granulating or blobbing, and the surfactants act to lower the surface tension, working like an acrylic flow-enhancer. You need to use very little to get the paint flowing nicely, much less than you would need plain water, which is advantageous as it means the pigments are less diluted and there is less loss of opacity.

I've found it works best as a thinner for airbrushing. It works very well with brushing as well, but it does have a tendency to create lots of tiny bubbles if you get too vigorous with your brush action, especially if you've over-thinned the paint (as I did the first few times I used it). The bubbles do usually dissipate as the paint dries, but it's not guaranteed, so it's best not to take the risk.

At my current rate of use, this bottle should last me until about 2050. I myself will think myself lucky if I last until 2030.

Note: If you use technical pens or dip pens with indian ink, this stuff should work well as a cleaner for them, though I admit I haven't actually tried it yet. Indian ink cleans up pretty well with ammonia-based cleaners.

Tuesday 31 August 2010

Those paper ruins again

These are a couple more in the series of paper micro-wargaming buildings I mentioned in my last post — I thought it might be useful to see how they look in their raw state.

I've printed them on a light tan 160gsm card, so that any bits I may miss with my paintbrush will look brickish, rather than a screaming bright white. In retrospect, a darker coloured card would probably be even better.

As you can see, the original line work gives you a sort of "colouring book" base to work from. I've cut out some of the doors, window-shutters and what-not and glued them back in place skewed, to enhance the ruinous aspect of the finished models.

The card bases will be glued down on to 0.5mm steel before groundwork and painting begins.

Microruins

These little buildings were my first attempt at terrain modelling in many, many years, and my first ever in micro-scale, and I'm pretty pleased with the way they've turned out.

They're just made out of painted cardboard, with rubble made from railway modellers' ballast. Being such small scale, ordinary 160gsm card designed for the inkjet printer is quite sturdy enough for the purpose.

The designs are some black-&-white line-drawn things I found on the internet somewhere; I'm afraid I don't remember where, but some guy was making available some old out-of-print stuff from the early 1980s that he had (with the original publisher's permission) scanned and uploaded for the world to enjoy. All I did really was decorate them with paint and crap. For mass-production, I'd probably get the original line drawings into Photoshop and pre-paint them; then all I'd need to worry about is the groundwork and tinting the cut edges so that they don't stand out like dog's bollocks.

NOTE: The bases are, like those of my infantry, made of 0.5mm mild steel, which both gives the cardboard model some weight and stability, and allows the models to be transported on magnetic trays.

These ruined versions were supposed to have non-ruined versions slipped over the top, to be taken away as if by magic when the buildings get the crap blown out of them, but my semi-elaborate basing makes that unfeasible. Since you have to make two models in any case, it's not a big deal to just replace a non-blown-up model with a blown-up model, and that's what I'll do. I guess the non-ruined slip-covers would be more useful if one were making large, elaborate terrain boards with the buildings permanently mounted in place.

The two larger ones are just the right size to slip a squad base of infantry or a tank into, while the 2-storey one will fit a small machine-gun or sniper base on its crumbling floorboards. Perfect.

Now to make about a hundred more.

Friday 27 August 2010

Whining, moaning and complaining - that's how I roll

Battlefront, makers of the Flames of War WWII toy soldier game and my favourite range of 15mm WWII wargames figures and models, have finally, after many years, got around to re-releasing stuff for the early part of the war. They've had a little bit of early war stuff available, but really only for the North African desert campaigns; now they've re-released stuff for the Polish and French campaigns of 1939-40.

As seems to be standard practice these days, all the special rules for this period have been packed into a high-quality, colour illustrated hardback book. That's fine and dandy, but being a high-quality hardback book means that it will cost near enough to a hundred eighty-five bucks. The information actually needed to play FoW in the early war period could fit easily into a 24-page saddle-stitched booklet; the ratio of fluff to crunch in these volumes seems to be about 10:1. Never mind, hopefully I'll be able to find some sucker to pay for it so that I can take a look through it and jot down the few snippets I need.

More irritating — much more irritating — is the way they've gone about the re-release of the figures and models for the period. They're available (for the moment) only in large boxed sets, costing about $300 each. I have no idea why they're not releasing the models individually, like their other inventory, nor do I have any idea how long it's going to take to get around to it. I've been waiting for years to get my hands on this stuff, and now it looks like I'm going to have to wait even longer.

I'm disgruntled.


Postscript: It would appear, from the news given on their website, that it will be another couple of months before they start dribbling out individual models; they give no indication of which stuff will be set free first, or any sort of release schedule at all apart from the fact that there will be those first two months in which only the boxed sets will be available. Looks like I will just have to wait, and wait, and wait.

Postpostscript: I suppose I could always get most of what I want from other manufacturers, but I haven't found any 15mm stuff I like as much as the stuff modelled by Battlefront.

Boss! Boss! Ze planes!

Etrich Taube
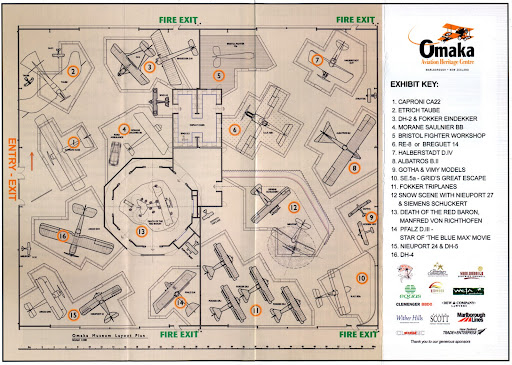
Annette and I went up to Nelson for a couple of days holiday recently (it was great) and on the way back, we dropped in to the Omaka Aviation Heritage Centre a few kilometres outside of Blenheim.

I only heard about it a short time ago; I had no idea we had anything like this in New Zealand. It's just jam-packed with a galore of fantastic WW1 aviation dioramas as well as display cases showing related artifacts like some of von Richtofen's trophy cups, one of Rene Fonck's uniforms, and stuff like that.

I took a lot of photos, though not nearly as many as I would have liked, and unfortunately I didn't have my tripod with me so I couldn't get as many long-exposure detail close-ups as I wanted.

I include here a scan of the exhibition brochure, which shows a plan of the hall with the locations of the various exhibits. Click on the image below to see a larger version in which it's actually possible to make out what's what.

Exhibition layout pamphlet
I can't recommend this place too highly for anyone with even the slightest interest in WW1 aviation. It's fantastic.

Note: unfortunately Annette counts as someone with the slightest interest in WW1 aviation; she loyally went once around the displays with me and then went out for a coffee and sandwich. I would have stayed much, much longer, but I suspect she might have started to get a bit bored sitting in the cafeteria after the first couple of hours.

Wednesday 25 August 2010

Vickers Medium - painted

This is the 15mm Vickers Medium Mk.II from QRF that I reviewed in an earlier post, all painted up. I wanted it in the pre-war overall Deep Bronze Green, but dry-brushing to heighten the detail has lightened it over-much and I may have to re-do it.

Also, that nubbin to the rear of the hull side should have a machine-gun sticking out of it — a Vickers gun, in fact. That will need to be taken care of too.

Saturday 21 August 2010

Aiee! My wallet, my poor wallet!

I went to buy some of Lou Zocchi's Gamescience dice the other day. They're my favourite dice; I like my edges sharp, thanks very much. I really don't much like the rounded Chessex style at all. Unfortunately, nobody here in Christchurch stocks them, so I resorted to the internet for my dice-fix.

A set of un-inked dice, like the ones shown here, cost about five bucks — that seems to me to be quite reasonable. I followed the "buy" link, which took me to Amazon, and ordered five sets. Twenty-five bucks, right?

Then Amazon added postage and handling.

Near enough to THIRTY-FIVE DOLLARS! Just for shipping! Bloody hell!

What would five sets of dice weigh? Maybe a hundred grams? They wouldn't even make a very bulky package. I think that Amazon are gouging more than a trifle on their shipping fees, and if not, then the US Postal Service is. I've been stung before with shipping fees from Amazon, when I bought some second-hand science fiction books. This experience indicates that it's not a rarity, so screw Amazon. I won't be shopping there again.

As it happens, I went elsewhere, to frpgames.com, for my dice. The shipping still stung a bit, but it was half what Amazon wanted to charge me.

Review: QRF 1:100 scale Vickers Medium Mk. II

I've been interested for a while in skirmish gaming the Inter-War period, and to that end I bought myself a troop of three of these Vickers Medium Mk.II tanks from QRF (£4.50 each plus about 5 quid postage to New Zealand). Inter-war tank models in 15mm scale (or any other scale really) are very, very thin on the ground.

These come in four white-metal parts each, the hull and turret being hollow. The turret is mounted by means of a long, sturdy peg through a hole in the hull top. In the model shown in the images above I've replaced the soft white-metal 3 pounder gun with a sturdier one turned down from a brass nail.

They're nominally 1:100 scale, for 15mm gaming, but the models are rather too small, measuring out at about 1:115 scale. That makes them too small for 15mm gaming and too large for 12mm.

Detail is fairly soft, but acceptable for wargaming purposes. Rivets are represented by indentations rather than standing proud of the surface, which is a pity but does at least give an indication of their presence. The exhaust pipe, which should run along the port-side track guard under the hull access hatch is missing, though the muffler cylinder is shown. All of the models suffer from a "slump" in the hull-top just forward of the turret, where the metal has not properly filled the mold. The gun is modelled with a reciprocator (or something similar) below it; that's not something I recall seeing in any photographs of the Mk.II.

A particular disappointment to me is the representation of the turret hatch. The semi-flush split disc shown here wasn't unknown by any means, but much more common was a raised "bishop's mitre" hatch, as seen in the photo to the right. It's not a difficult thing to scratch-build, but I would have much preferred not to have to.

In summary, the models are acceptable wargaming pieces but the scale issue alone makes them worthless from a scale modelling perspective. They're priced fairly competitively with models of the same scale from other manufacturers, though nobody else (that I know of) makes a Vickers Mk.II in this size.

Thursday 19 August 2010

Land-dreadnaught ahoy!

Soviet T-28 — medium tank (1:100 scale)
I've always rather liked the multi-turreted land-dreadnaught tank designs of the 1920s and 30s. My favourites are the British Independent and the Soviet T-35, both of which are ludicrously huge and steam-punkish, and both of which were actually pretty crap as fighting vehicles.

This is my latest effort, a Soviet T-28. It was the T-35's little brother, a medium tank design built in the '30s. It saw service against the Finns in both the Winter War and Continuation War, proving itself to be a mediocre tank at best. More were lost to mechanical failure than to enemy action.

This model is a 1:100 scale (15mm) wargames model from Battlefront. I'd have liked to have added a horseshoe aerial around the turret, but my eyes and fingers are getting a bit ricketty for that sort of modelling these days.

Hordes of the Things (2nd Ed.)

As the second edition of the Hordes of the Things rules are currently out of print, Sue Laflin-Barker has kindly made them available as a free pdf download at http://www.wrg.me.uk/

Go the the 'History of WRG' page; the link to the file can be found there. Depending on whether or not its been fixed yet, you may also need to download a separate file for page 23 (the Combat Results tables). If you have a copy of Acrobat then you can insert the errant page back into its rightful place; if not, then you'll have to print it separately. (I do, and I have).

Wednesday 11 August 2010

Arcanobibliovore

Warning: the players of wizards will probably hate you forever for including this sort of thing in your campaign.

This creature — or magic item — or whatever it is — appears to be a large book like those used to record a magician's repertoire of spells. If scanned with appropriate spells or senses, it does radiate a magical aura, and it does have a life-force that could conceivably be detected if the means are to hand.

The arcanobibliovore feeds on stored magical energy, such as that in scrolls and spellbooks, and will attack and eat them if it can. It can "smell" the presence of such things within about ten metres.

Although it is capable of active hunting, moving about on hundreds of tiny centipede-like legs that fringe its "covers" (they lie flat when the creature is in "ambush" mode), its usual tactic is to allow itself to be "discovered" by a magic-user and to display a few enticing spells on its interior pages, in the hope of being stored with its prey. If left alone with a spellbook or scroll, it will tear it to pieces and eat any pages containing spells. It will target the richest food supplies first — that is, the highest-level available spells, leaving the low-level spells until last. The rate at which it eats is up to the individual GM, but I would suggest about 1-4 pages per minute.

The arcanobibliovore stores the spells it consumes as food reserves, and it gets fatter the more spells it consumes. It uses the energy slowly, using up about one spell-level a week. If it ever runs out of stored spells completely, it dies. It can be semi-tamed by supplying it with a reliable food supply.

The spells it consumes are not immediately destroyed, and the arcanobibliovore can make them available for study if it wishes. However it is not very intelligent, and cannot distinguish well between the individual spells held within its pages, so the spells it displays will be randomly chosen from all those in its reserves. On any given day, if it is in a good mood it can be induced to show 3-12 spells which can then be learned as if from any other spellbook (assuming they are of a level appropriate to the viewer).

Determine the arcanobibliovore's mood as follows: roll 1d6 and add +1 per spell-level of spells it has been fed by the supplicant within the last week; a score of 6+ indicates that it is in the mood to show its contents.

Note: Remember that the repertoire of spells available from the arcanobibliovore will change as it eats and/or digests its food. The GM can decide for him or herself how best to sort out what spells are still available on any given day.

Thursday 22 July 2010

Theatre of the Absurd

The Amazing Inflatable Trotsky!
Tonight, in our sort of pulpish, kind of steampunkish game set in amidst the chaos of the Spanish Civil War, we made an inflatable Leon Trotsky to lure away the NKVD from our area of operations, so that we could sneak on board a Russian freighter by means of a mad scientist's untested submersible, launched via a mile long underground railway running beneath the streets of Barcelona.

That's one of the things I really love about roleplaying games. You can create the most amazingly ridiculous scenes that, in the context of the game, are a perfectly rational response to circumstances.

Maybe not rational. But fun.