Monday 26 December 2022

Emplacement/Entrenchment Components (15mm)


After working on a 3d-printed gun emplacement recently, I realised that for the most part I would have been better off with printed components that I could assemble with traditional modeling methods into emplacements or entrenchments. So I got to work in Blender and whipped up some basic pieces that I can print and work with.

The main revetments are 60mm long by 12mm high, for use with 15mm figures, and they can be pretty easily cut up, either digitally or physically after printing, to create shorter runs if need be. They're fairly period-agnostic; I think they could be appropriate for any cannon-using wargamer from the 1600s onward.

I assembled them into a complete emplacement that would fit most medium guns, and I'd fill out the glacis with foam and plaster and what-not. The 3d printing just takes care of the fiddly bits. The individual components would be more flexible, but the pre-assembled print is less trouble if what you want is a 60mm square.

I think that for entrenchments, a fire-step piece might be useful, though it might just get in the way of placing figures.


The STLs are available at https://www.wargaming3d.com/product/emplacement-components-60mm-x-12mm-revetments/

I think it likely that I might add to them over time, as I find new bits that I'd like to have.

Saturday 24 December 2022

Gun Emplacement


I think I found this 15mm gun emplacement on Thingiverse. It was some time ago, a couple of years at least, but I've just got around to printing it on my Ender 3.

I doubt very much that 3d printing it saved me any time over modeling it in traditional media, though it did save me a bit of effort by providing the basic forms. I still had to add some ground texture so that the lip of the emplacement didn't look too smooth and regular, and to apply and paint the dirt and vegetation flock.

The gun, a German 10.5cm howitzer, was printed a while ago on my Mars Pro. Somewhere I have some Peter Pig 15mm artillerymen to crew it, but right this moment I have no idea where they are.

The emplacement cavity is 75mm in diameter, the whole thing is 130mm.

Friday 23 December 2022

Blacksmith's House (28mm, WiP)


I have no memory of where this model came from; I suspect it was a Humble Bundle I went for a few years ago. I printed it a year or two ago on my Ender 3, and it's just been sitting around waiting for me to do something with it.

Now I've primed it and glued it to a bit of MDF, and started the groundwork with sawdust and dirt. Where I'll go from here I'm really not sure. It's a bit uninteresting just as it is.

To be honest, I'm not quite sure why I printed this in the first place. I have no real use for it for tabletop gaming. Still, it's something to do from time to time.

Saturday 17 December 2022

Crusader I


I thought, since I was doing Crusaderish things anyway, I really ought to do a model of the first of them all, the Crusader I.

In many respects it's very similar visually to the II and III versions, but it does differ in many details. The two pounder uses an internal mantlet, the same as that seen on some A13s and early models of the Valentine. The long-run sand shields are absent, with the Mark I having deep shields only at the rear. Early production vehicles had the wheels covered with flat steel discs, which were usually removed (or not supplied) on later ones. There are differences in the configuration of the exhaust mufflers. And so on.

The Mark I was terribly unreliable, especially in desert conditions. When it was working, it was very speedy and had a hard-hitting gun (for its time), but there would be a pretty good chance on any given day that it wouldn't be working.

The STLs for this model are available at https://www.wargaming3d.com/product/a15-crusader-1/


Test Print

I've done a test print and primed it in Vallejo Parched Grass surface primer so that I can actually see what's going on — the raw resin is white and slightly translucent, so it's very difficult to make out any detail on it. Overall I'll call the test print a success, though it's not absolutely perfect by any means.

The commander is a plastic BF figure that I bought a few years ago.

I'm tossing up whether or not to paint it in Caunter — not many of them were, but I have (finally) found some photographic evidence that some were painted in that scheme for Operation Battleaxe. I do like the Caunter scheme aesthetically, but it is a huge pain in the balls to paint, especially in teensy 1:100 scale.


Next Step

Next step(s): panel-shading over the Parched Grass surface primer with Portland Stone, which is pretty pale and bright. By leaving less paint in the hollows, and by painting in each panel separately rather than giving it an even all-over coat, it starts to give the model a bit of volume.

I've also painted in the tyres and tracks in mid-grey and mid-brown respectively. The brown is just the base colour for the tracks; they'll change considerably with weathering layers, and become a lot paler.

I could leave the whole tank overall Portland Stone, or from here I could go on to add the Silver Grey and Slate Grey areas for Caunter. I still haven't finally decided.


And now, finished

I elected in the end not to go for a Caunter scheme, mainly because I just liked the look of the model in the pale Portland Stone. For a change, instead of painting the unit markings, I used some BF decals, and as always when I do that, I kind of regret it. It made life easy, but honestly, BF decals are pretty crap when it comes to colour registration.

Thursday 15 December 2022

Crusader II


Continuing with my Crusader fetish, this time it's the Crusader II, also in 1:100 scale for 15mm gaming. This version mounted the 40mm 2 pounder gun, and was originally fitted with a bow machine-gun turret, though these were often removed since they were basically worthless. The commander figure is one from a set I bought some years ago from Battlefront.


Speaking of Battlefront, I found that I'd also bought one of their resin and metal Crusader II models years ago, and completely forgot about it. That's it on the right of this photo. It's broader in the beam than my model, but I've double and triple checked my measurements, and I'm pretty confident that I'm right and they're wrong.


I printed my model some time ago in FDM on my Ender 3, before I got my Mars Pro, and at the time I thought it was an okay wargaming model. I guess it is really, since it does look like what it's supposed to be, but since I started printing models like this in resin my quality expectations have risen quite a bit, and now I hold it in contempt — I probably won't even finish painting it. It's like when you go to drinking proper wine out of bottles instead of el-cheapo plonk out of boxes; it's a bit painful to go back once you get used to it.

Tuesday 13 December 2022

Crusader III


This is the British Cruiser Mk.VI A15 Crusader III, the last in the Crusader line. It mounted the excellent 6 pounder gun, replacing the 2 pounder of the Crusader I and II. The 2 pounder had been a very good gun in its day, but by 1942 it was no longer sufficient to deal with the newer German armour. The Crusader III also replaced its old engine with the "Liberty" engine, which solved most of the reliability issues the earlier versions had suffered from.

The model is 1:100 scale for 15mm gaming, and is my own design (you can get the STLs here, or the Crusader II here). This one has been printed in resin on my Mars Pro, but the models have been designed with FDM printing in mind.

The Crusader is one of my favourites of all the British tanks of WWII, for all its shortcomings.


Sunday 11 December 2022

Retro Pig-Faced Orcs


About a year ago I sculpted these two retro-styled pig-faced orcs, based on the aesthetics of the ancient Minifigs orcs of the 1970s. And now, at long last, I've got around to painting them.

I've painted them in a very simple "toy soldier" style, and then slathered them in Army Painter Quickshade (oil-based, dark tone).

I originally intended to do a range of different weapons for them as well; the original Minifigs range basically used the same body and just changed the weapons, so that would have been pretty straightforward. Things like archers would need a whole new figure sculpted, though I could reuse a lot of elements quite easily. If I recall correctly, the officer figures just added cloaks and helmet crests, so again, no big deal there.

However, that burst of enthusiasm has passed, and I never got around to doing any of that. Maybe some day.

Note: these are much too large to fit in with the genuine white metal figures of yore; they'd need to be rescaled to about 60% or thereabouts. These ones are designed to scale with massive modern 32mm "heroic" figure sculpts.

Thursday 8 December 2022

Desert Lizard


This is the Guy Lizard ACV, a British armoured command vehicle of WWII. It preceded the more famous AEC Dorchester, and was neither as spacious nor as comfortable. Most of them were lost in the retreat from Dunkirk, but a few made it out to the desert. I've painted it in the early-war Caunter scheme.

This is a 1:100 scale (15mm) design of my own, printed on my Mars Pro.

I've printed this before in FDM on my Ender 3, and painted that one as it would have appeared in France in 1940.


Tuesday 6 December 2022

Chi-Ha


This is a 1:100 (15mm) Chi-Ha Shinhoto, the later version with the long 47mm gun, that I designed a while ago for a commercial client, though I don't believe they've actually produced it (yet).

Since I printed it, a few months ago, both the turret and hull have developed some pretty bad cracking, and I'm not sure why. Both components were printed solid, and it may be that the innards have not cured properly, or else maybe the outer layers were over-cured... but really, I'm just flailing in the dark. It could be any number of things.

Tuesday 29 November 2022

Cromwells


Here's a troop of 1:100 (15mm) Cromwells, the standard British-made medium tank of the British army after D-Day (though they were outnumbered in British service by the American-made M4 Sherman). By the time they went into active service, they'd had their original 6 pounders reamed out to take the same 75mm shell as the M4, which gave it considerably inferior anti-tank performance but a much better infantry support weapon.

These models were printed some time ago in PLA+ on my Ender 3 FDM printer. The design is from the excellent Mr. Bergman again, and about all I've done to it is add some nubbins around the edges of the tracks to suggest some link detail.

Compared with tanks like the Panther, Tiger II or T-34, the Cromwell looks quite archaic with its boxy shape and prominent rivets, but I think that's why I like it so much.

Wednesday 23 November 2022

Long-Term Error


I have just realised, after all these years, that I've been painting the 7th Armoured "Desert Rat" jerboa insignia wrong. I've been painting it with its tail curled up around its back, not under its feet.

Fortunately, in 1:100 (15mm) it looks pretty much like a red squiggle inside a white circle, and nobody is very likely to notice unless they look at it through a magnifying glass, but I'll know my secret shame.

The photo is of a PSC 15mm M3 Stuart.

Tuesday 22 November 2022

Onitama (again)


When I made my original Onitama set, I came to realise that I could have made it considerably more compact if I just used the storage box as the game board.

I 3d printed a small set, suitably sized for travelling, but I designed the box for that before I learned that lesson. So I made a new box/game board for those pieces out of a rimu off-cut. The 3d-printed game pieces have steel washers glued to their bases to give them a bit of weight and a lower centre of gravity.


The box-board is basically just two solid blocks of rimu hinged together, with a cavity carved out of one of them to store the playing pieces and cards.

The dimensions of this one, closed up, are 118x90x45 mm. It'll slip easily into a satchel or jacket pocket.

Wednesday 16 November 2022

Comets


I wanted to paint some Comets in the peace-time Deep Bronze Green livery that the British painted their tanks and things when not actually being shot at. I did them partly to distinguish them visually from the Cromwells, but mostly because I just wanted to.

I found a couple of bronze green Comets, freshly painted for the 1945 Berlin victory parade, in amongst the Armoured Acorn stuff. There was no top-down view, so I couldn't see if the star was painted on the engine deck or turret top, but I've assumed that since air recognition was no longer an issue it probably would not have been.

These two were printed some time ago in PLA+ on my Ender 3 from a slightly modified Bergman model.

Friday 4 November 2022

The Tortuous Hell of Social Interaction


I absolutely detest being put in the position of having to interact with NPCs when I'm playing in a TTRPG. I'd say that I'm not wholly unintelligent, and I'm capable of the occasional flash of wit in real life, but require me to come up with something to say to an NPC to convince them to go along with the wishes of the party, and my brain just disappears.

I know that some people just absolutely love this sort of thing, and more power to them, but I find it actively unpleasant, and it destroys any enjoyment I may be having in the game at that moment. It may be lame of me, but when it comes to this sort of thing I'd much rather just rely on whatever social skills (or lack thereof) are written down on my character sheet and roll some dice.

When it becomes really irritating to me though is when the games master just ignores the character's supposed abilities. If I have a character with a high charisma, or a whole bunch of levels in skills like persuasion or intimidation or just plain outright fibbing, I expect to be able to get some benefit from those stats. Otherwise, why have them at all?

Thursday 3 November 2022

Centaur Mk.IV


This is a 15mm (1:100 scale) Centaur Mk.IV with the 95mm howitzer. I've painted it in the brown SCC2 colour scheme, simply because I hadn't done that before and wanted to try it out. It was superseded by SCC15 Olive Drab, but there were plenty of vehicles still in SCC2 alongside the new colour after D-Day.

I did the targeting graduations around the turret rim with a croquil mapping pen and some acrylic ink. They're not very precise, but they do get the idea across in an impressionistic manner.

The turret has developed quite a bit of post-cure cracking, so it looks like I didn't wash out the interior as well as I could have. In retrospect, I probably should have just printed it solid, and if I have to replace it I will do that.

Friday 21 October 2022

Old Sherman, New Paint


This is a Sherman I I printed on my Ender 3 FDM printer a couple or three of years ago.

I believe that with the turret bustle and sand skirts it wasn't used in this configuration by the Americans, and in fact I originally printed it for my North African Brits. However, I wanted to try out a test paint for US olive drab, and I created the markings with masking tape instead of decals.

It's an okay enough model for wargaming purposes, but even so the layer lines are apparent enough that I don't print vehicles in FDM any more, and reserve that printer for terrain and utility bits and pieces. Vehicles and figures I now print in resin on my Mars Pro.

Monday 17 October 2022

Challenger (finished)


Here's the WWII British Challenger 17-pounder gun tank in 1:100 scale that I posted a WiP for earlier.

I tried a new (to me) three-layer method of painting mud and filth, with which I'm fairly happy. I first painted a couple of layers of loose, sloppy, thinned blotches of VMC Earth all over the running gear, and on the hull where I wanted mud splashes, before washing the whole model with Citadel Agrax Earthshade. Then, over the top of that, I sponged speckles of VMC German Camo Beige. I also sponged it, very very lightly, on other places on the hull and turret.

Saturday 15 October 2022

Challenger (in progress)


Next project is a 15mm (1:100) Challenger. Not the modern Challenger, the descendent of Chieftain, but the WWII Challenger, the 17 pounder variant of the Cromwell. Once again I made the gun barrel from a length of 2mm brass rod, tapered down and provided with locating pins on my cheap (and fairly pathetic) little mini-lathe. I would have liked to have been able to turn the muzzle-brake in place rather than having to glue on a separate piece, but my lathe isn't anywhere near that precise.


I have printed this model by the estimable Mr Bergman before, in FDM, but at that time my Ender 3 printer was in the process of crapping itself, and I got a bit of layer shifting. I've thrown this print away now.

As it turned out, while I was looking for the Cromwell (below) I discovered that I'd printed another FDM Challenger more successfully, and completely forgotten about it, so I've got a couple of Challengers available on the very small chance that I'll ever need more than one for any game I'll be playing.


I wanted to see how the Challenger looked alongside the Cromwell, in this case a 1:100 PSC plastic kit. It's certainly quite stretched out, and it's tall compared with the Cromwell, but it wouldn't be any taller than a Sherman Firefly, the Brits' other 17pdr gun tank option at the time.

I've primed the Challenger model with Vallejo British Bronze Green surface primer.

The Challenger was intended to work with Cromwell troops, and by being built on what was essentially a lengthened Cromwell chassis, to minimise the logistics impact of having two different types working in the same unit. Also, the Cromwell was a pretty speedy tank, and the Firefly would have had quite a job to keep up with them. Not to mention that a Firefly would stand out to enemy observation even more in a Cromwell troop than they did with other Shermans.


The next stage is to apply the top coat, ready for markings and weathering.

The colour I use for late-war British stuff is VMC Russian Uniform, and it's applied by airbrush one panel at a time. I'm not aiming at even, solid coating, but rather apply the paint in a sort of mottle pattern from the centre of each panel out to near the edge, building it up in thin layers until it looks okay.

The panel edges are then highlighted by dry-brushing with VMC Buff.

Decals and/or markings will go on before any further weathering, so that they don't look too bright at the end of the process.

The finished piece can be seen here.

Saturday 1 October 2022

Sherman's Bendy Barrel


An issue that arises all too often when printing models in resin is warping of components. Gun barrels are especially problematic in this way. I don't know if the issue is with the resin itself, or my printing settings, but resin prints don't seem to have the dimensional stability that FDM has. I assume it's probably the resin layers shrinking microscopically while curing.

I printed this M4A3E8 a few days ago, and I've just started painting it. I don't know if the warping of the gun barrel has actually got worse, or whether it's just preying on my mind, but in any case I've decided that it just can't be borne any longer.

I have some 2mm brass rod, and a little cheap mini-lathe that I got from AliExpress — it's basically just a Jacobs chuck attached to a little electric motor on an aluminium frame — so I've decided to have a go at replacing the gun barrel with a nice straight brass one. The 2mm rod is out of scale for the 76mm gun, but it's the same size as the barrel as designed, so at least I can be sure that the muzzle brake isn't going to suddenly look too hugeous.

The new turned barrel (a bit out of focus) is sitting in front of the model. Cutting off the muzzle brake and barrel should be straightforward enough with a razor saw; I'll just have to be a bit careful with the drilling for the brass tenons to slot into.

Something the lathe doesn't have is any kind of tool holder, so it all has to be done with hand-held tools. Not ideal, and it makes getting crisp, straight, square angles a bit tricky. Hey-ho, needs must as they say.

Later on...


Well, at least it's straight now

I see from the photos that there are a bunch of tiny supports in the running gear that I overlooked, so I guess there will be more disruption of the paintwork than I'd hoped. I'll start again from the beginning I guess.


A few days later...

This is about where I give up trying to paint it any more. I was trying for a tank that looked well used, but without all the chipping that tends to be splattered all over tank models these days (and of which I am as guilty as any).I've ended up with a bit of a mess, but it will do okay at tabletop distances I think.

The decals come from Skytrex, and they seem pretty good to me. They respond well to decal softener without becoming so fragile that they fall to bits, and the multi-colour ones I bought (German crosses) are printed in good registration, unlike any of the Battlefront decals I've had.

Wednesday 28 September 2022

Ostwind 37mm Flakpanzer


This is a 1:100 scale (15mm) German WWII  Ostwind 37mm Flakpanzer, printed on my Mars Pro from a model by M. Bergman (I think).

I'd normally add some crewmen in an open-topped vehicle, but the fighting compartment of this one is too tight to get any in there. I think I would have to add them digitally and print them in place.

Sherman bits


 Zac Kavulich (TigerAce1945) released some time ago a pack of various marks of Shermans for WWII 15mm printing. Unlike Bergman's models, Zac's models were presented with separate running gear and hulls.

I took one of his track modules and decided to up-detail it a bit — not a lot, just enough to satisfy my 1:100 scale wargaming model sensibilities.


I got this far along when I realized that

  1. it would have been easier, and I would have been better off starting modeling from scratch, and
  2. I'd come far enough that stopping now and starting again would feel like a huge waste of effort.

So I kept going.


This is the end result. There's absolutely no detail on the far side, as my aim is largely ease of printing, and I thought a completely flat rear face would also make it easier and stronger to glue to the hull.

There's more that I could have done, but this seemed to me to be sufficient detailing for my purposes. Fortunately, an STL can just be mirrored in the slicer, so there's no real need to make separate models for something like a port and starboard track run.


The test prints worked out okay, but this is why I don't much like printing components separately in resin. It's just not very dimensionally stable, and I always get warping of pieces like this, to one extent or another.

Fortunately the warping here isn't so extreme that I won't (probably) be able to keep them flat against the hull with glue. Fingers crossed. They were certainly easier to print than they would have been had I done them as a single piece with the hull.

Sunday 11 September 2022

Modeling U.S. Olive Drab — harder than I expected


WWII U.S. Olive Drab should be simple, but it's really not.

It was composed of just two pigments: ochre and black. However, the word "ochre" is not a precise one at all.

In his Military Modelling magazine article back in 2002, Steve Zaloga went into the subject in reasonable depth, and the pre-mixed colour he recommended above all others back then was Tamiya XF-62, with no others even coming close to the WWII-era paint chips he was comparing against.

I figured that mixing it from VMC acrylics would just be a matter of getting the right proportions of yellow ochre and black, but all of those mixes ended up much more grey than the sample swatch of XF-62 I sprayed, which has a perceptibly warm brown cast. Of them all, the 3:2 yellow ochre : black mix seems to be closest in tone, but as I said, it's too grey.

The Vallejo surface primer described as "US Olive Drab" is actually much closer to the 5:1 mix, which is a long way from XF-62, and a long way from WWII colour photographs I've seen.

The search continues.


A bit later...

I found a bottle of VMC 889 USA Olive Drab, which is much browner than the Tamiya, more like a burnt umber. However, it might do okay as a base coat, with panel shading airbrushed over the top in 887 Brown Violet, which was recommended to me. The 887 is pretty good in hue, though it's considerably lighter in tone, which is probably a good thing when it comes to scale effects and the general effect of dust and sun on the paint.


Even later...

I tried a base coat of 889 Olive Drab, highlighted with the airbrush with 887 Brown Violet, and it gave me a result I quite like. So I think this will be my process for US equipment, which might come in handy for  Battlegroup:Westwall when it finally appears.

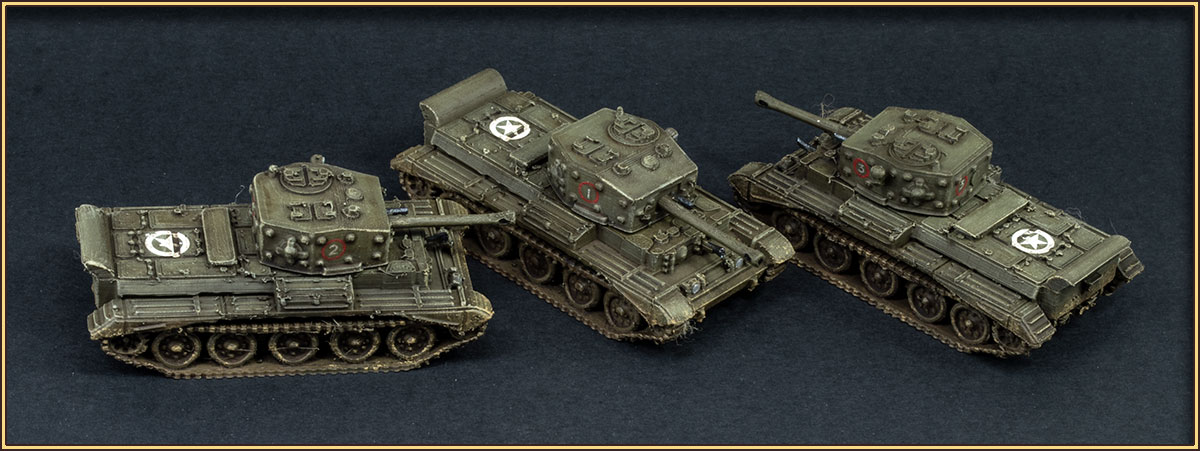
I did the stars with Tamiya masking tape, laboriously cut out with a scalpel, and if somebody was to provide sheets of die-cut masking tape stars and roundels, that person would get my money. Oh yes they would.

The model is actually a British Mk.I with sand shields and turret bustle, so not 100% right, but it'll do me for testing purposes. When I need them, I'll print some proper Yank tanks.


Much later....

It's probably a bit pointless, since I've found some pre-mixed paints that work for me, but I thought I'd try a mix with a different ochre and see how that turned out.

In this case, I used Maimeri Polycolor (gouache acrylic) Raw Sienna and Black, and got tones that seem a lot less grey than those I got with yellow ochre. The proportions are quite tricky to manage with tube acrylics though, especially with small quantities of paint.

The left-hand swatch is roughly 1:1, but the others are all rather indeterminate. I think the right-hand one is around 4:1, but I'm really just guessing.


And even later...

I've discovered that Vallejo already do a pre-mixed US Olive Drab in their ModelAir range (#71043 Olive Drab) which is just about perfect.

And not only that, but I already had a bottle of it in my Big Pile O' Paints.

So, that was a whole lot of wasted effort.

Saturday 10 September 2022

Marmon-Herrington MTLS 1GI4 (15mm)

 Here's a fairly obscure little WWII tank — the Marmon-Herrington MTLS 1GI4 in 1:100 (15mm) scale.

This is one of those projects I started and then forgot about, so it's taken a very long time to finish.

I've put the STLs up at https://www.wargaming3d.com/.../marmon-herrington-mtls-1gi4/