Showing posts with label aeroplane. Show all posts

Sunday, 17 November 2024

Sopwith Triplane (1:200)


This was (I think) a CapnAhab design. I added a pilot and some engine detail, but that's all, and I printed it on my Mars Pro at 1:200 scale.

The model has no wing-rib or control surface detail at all, and I've just painted some in. The effect is fine, for a gaming piece, and having smooth surfaces instead of ribbed certainly does make applying decals a bajillion times easier.

I've messed about with a range of scales for WW1 aerial wargaming — 1:300, 1:200 and 1:144. The most satisfying from a modelling point of view is 1:144, and for maximizing table space of course 1:300 is best. But I think 1:200 is a very good compromise between the two; big enough to be able to see, and small enough to make the best of available space.

Tuesday, 23 July 2024

Aichi D3 "Val"


I've been working for the last little while on a 1:144 scale digital model of the Japanese Aichi D3 "Val" dive bomber of WWII. They were extensively used by the Imperial Japanese Navy, both from carriers and from land, against both naval and land targets.

Now that it's finished, and test printing has successfully completed, it's up online at https://www.wargaming3d.com/product/aichi-d3-val-dive-bomber/

This is a model intended for wargaming, so panel detail is minimal, and underneath it is entirely absent. I've put a socket in the bottom of the fuselage for a flight stand.

Thursday, 27 June 2024

Mitsubishi Zero - WiP


Inspired by a guy I know (digitally) I dug out an STL of a Mitsubishi Zero, tidied it up and printed it.

I don't know who designed the original STL, but I suspect, from its characteristics, that it might have been CaptainAhab for his 1:300 range of aircraft. I disassembled it and smoothed out all the facets.

The white one was printed in FDM on my Ender 3, the grey one in resin on my Mars Pro. There's not realy that much to choose between them; the resin print is a bit smoother, but as often happens, its wings warped slightly in printing — probably not noticeably on the tabletop. They both took about the same time to print.

CaptainAhab (if it is indeed he) designs his aircraft at 1:100 scale, for the user to rescale to their preferred size. I use 1:144 scale aircraft for my 15mm WWII gaming, so I rescaled the STL to 1:112. Of course. I cocked it up.

In truth, it probably doesn't matter all that much, as the models are really just aircraft markers for my Battlegroup all-arms games, and generally aren't in direct visual comparison with other aircraft. However, if I ever want to use it for a dogfight game with any of my existing models I will have to reprint it at the right scale.

Saturday, 23 December 2023

SPAD XIII


Next up, a SPAD XIII in 1:144 scale.

In this scale it can probably stand in for a SPAD VII as well, though there are many differences in detail, and doing that would probably make the purists' teeth squeak with rage.

The SPADs are all very ribby.

I've given this model a bit of belly detail that I don't normally bother with. Some of it is a bit more visible on the tabletop than usual.


Wednesday, 20 December 2023

SE5a Re-Scale


A couple of years ago I designed a 1:200 SE5a model, and printed it in resin on my Mars Pro. 

I thought I might re-scale it to 1:144 and print it in FDM on my Ender3, to keep my new Fokker D-VII company.

The result is adequate for a gaming piece, but I'm far from fully satisfied with it. My Ender is getting pretty long in the tooth now, and it's starting to show. Perhaps it's time to start saving up for a little Bambu Labs A1 Mini.

Sunday, 3 September 2023

P-47d Thunderbolt


Another of Roman Troyan's 1/200 aeroplanes, up-scaled to 1/144.

I did not especially enjoy painting this one, mainly because of the metallic paint. The surface of the FDM print isn't smooth enough to get the best out of it, and once cured, the surface of the paint is quite slick, causing adhesion issues with overlying layers.

However, it's finished now.


Thursday, 31 August 2023

Bristol Blenheim in the Desert


This is yet another of Roman Troyan's 1/200 scale models, up-scaled to 1/144. 

It's the Bristol Blenheim Mk.I, and I've painted it in a colour scheme suitable for North Africa and the Mediterranean.

It was very fast for its day, but alas for the crews, its day passed before WWII kicked off, and with its rather pathetic defensive armament and against much faster enemy fighters, losses of Blenheims were very heavy.


Wednesday, 30 August 2023

Typhoon, also with paint on


I've finished off my 3d printed 1:144 scale Hawker Typhoon, complete with rockets, ready to kick the crap out of anything it can spot in the Falaise Pocket.

It's a bit cleaner than the Tempest... I'll see how I feel about that later on.


Tuesday, 29 August 2023

Tempest, Now With Added Paint


I've painted up my 1:144 Tempest model.

These are the markings, I believe, of the Tempest of Pierre Clostermann, a very famous exponent of the type.

Friday, 25 August 2023

Tempest


I've been building a WWII fighter-bomber in 1:144 scale in Blender, the Hawker Tempest, and trying out a method for creating panel lines that seems to be working okay.

I cut a line through the model where I want the panel line to go and then extract that edge as a curve, which I can then adjust to the exact thickness I want, convert it to a mesh, and then boolean out the panel line. It would be nice if I could do the mesh conversion non-destructively, and I think it's possible with geometry nodes, but they are pretty much still a complete mystery to me.

I'm pretty happy with it so far, and now I just have to make some under-wing rockets for it. Though I find, from the small amount of research I've done, that not many Tempests ever used the famous 60 pounder rockets in action — that was more for the Typhoon.

I'd like to do a Typhoon as well, and I think I could probably reuse most of the fuselage geometry. I'd have to redo the wings from scratch of course, and the tail fin (and probably the tail planes) will need reprofiling.


2023-08-26

Test print(s) done, and I've learned some things.

  1. Double check your dimensions. For some reason I designed the thing at 1:122 scale instead of 1:144 — I have no idea how that error crept in.
  2. Tolerances for FDM printing are coarser than you might imagine. The panel lines were right at the edge of the envelope when I originally laid them down, at 0.3mm wide, and when the model scaled down to 1:144, they mostly disappeared in printing. (They'd probably be fine for resin printing).
  3. There's a difference between a scale model and a wargaming model. I could (and should) have made the tail fin, tailplanes and wing trailing edge about 50% thicker. Also, making the wing a true aerofoil profile probably just made life harder for myself without returning much real-life benefit.


Wednesday, 23 August 2023

Jug


Here's another one of Roman Troyan's 1/200 models, up-scaled to 1/144, this time a P-47 Thunderbolt Razorback. I have a bubble-top in the painting queue as well.

I've painted the invasion stripes on the under-surfaces only, so they're not really visible — if you squint hard you might just make out a hint of them on the fuselage.

 I found that the easiest way to paint the national markings was to cut a mask of the general silhouette and spray in the dark blue background, then brush paint in the star and bars — this way I can be sure of getting the general proportions right at least.

Monday, 21 August 2023

Printing Petite Planes


Roman Troyan's 1/200 models (PlanePrinter on Patreon) are a treasure trove for people like me who have a desire for models for aerial wargaming, or as air attack models for all-arms games. I like 1/144 as a scale for both these purposes, and his models scale up to 1/144 very well indeed.

This particular model is a P-47 Thunderbolt "Jug", printed on my Ender 3 in PLA+.

There are some issues with FDM printing aircraft though.

They tend to be made up of lots of smooth aerodynamic curves, and to look their best they need to be printed in such a way that minimises the layer lines that are inevitable with any FDM printer.


The best way to achieve this on both the wings and the fuselage is to cant the model at quite a steep angle to the print bed. That's easy enough.

However, though Cura's tree supports do a pretty reasonable job for the most part, there are a couple of things they're not good at:

  1. They don't necessarily accurately preserve the profiles of things like wing tips
  2. They're not very strong until they've built up a bit of their own structure, and this means that elements close to the build plate are more likely to fail. While it's possible to tell the slicer to thicken and strengthen the supports, this also makes them a lot harder to remove cleanly.

For those reasons I've taken to modifying the base STLs in Blender, to provide them with some stronger, more reliable supports for the crucial areas. Adding these support structures does extend the printing time a bit, but on the other hand the print as a whole is less likely to fail, and it's more likely to be properly dimensionally accurate.

The built-in supports have to be clipped away and the nubbins filed smooth; they don't detach the way that slicer supports do. However, that's not usually a huge job, and the lower rate of failure is adequate compensation.

I still use Cura's tree supports in addition to my built-in structures, and because the important bits of the model are elevated off the print bed, I can print on a raft which very much reduces the chances of the print detaching itself from the bed during printing.

Sunday, 20 August 2023

Desert Airforce P-40


I've made an addition to my 1/144 scale Desert Airforce in the shape of a 3d-printed P-40 Tomahawk or Warhawk or Kittyhawk, depending on who you are. They all look very similar, with minor differences in the size and shape of the radiator housing beneath the nose.

For the most part, the British and Commonwealth pilots knew it as Kittyhawk, and that's what I'll think of it as.

The model is up-scaled from one of Roman Troyan's 1/200 designs. He can be found at https://www.patreon.com/planeprinter. I printed it on my Ender 3 — although it's not as smooth as an injection-moulded or resin-printed piece, it will serve just fine as a wargaming model.

I've done another P-40 before, but this is a better design, in my opinion.

Tuesday, 16 May 2023

Gladiator For Sale


I've put my 1:144 Gloster Gladiator model online at https://www.wargaming3d.com/product/gloster-gladiator-1144/

It's in several formats: a one-piece model (for resin printers) and two kit variants (easier for FDM printers).


Now I'm vaguely thinking of doing its immediate predecessor, the Gloster Gauntlet, in keeping with my usual policy of making models that almost nobody will be interested in but me.


Later on...

I found that I got better results when printing in resin (no distortion or warping) if I printed the wings straight up and down. So I split up the model in a different way to accommodate that, and added the STLs to the zip files on wargaming3d.com.

The sticky-outy bits are still pretty fragile with the resin I use; it would be better printed in one of the ABS-like resins I think, from the point of view of durability.

Sunday, 14 May 2023

The Gladiator of Theseus


I've been working on a 1:144 scale Gloster Gladiator, based on a model I found somewhere quite some time ago.

The model I based the Gladiator on was very low detail, and I suspect that it was originally based on a 3d scan due to the way the cowling and canopy blended into the fuselage. There's not much left of that original model now, but there's still a little bit (unfortunately).

I've cleaned it up substantially: given it a new cowling, canopy, undercarriage, elevators, and also cut it up into multiple components to make FDM printing easier and better. And now I'm in the process of adding ribs.

The fuselage ribs are going to be very fiddly, but doable. Fortunately I can get away with quite a bit in this scale. I do wish now that I'd replaced the original fuselage geometry entirely, because the mish-mash I've left myself with is not going to make my life any easier.

It will need some under-wing gun pods too, now that I come to think of it.


Later...

The remaining fuselage geometry enraged me so much that I've just done away with it and replaced it entirely. So this is now the Gladiator of Theseus — I don't think there's any of the original geometry left at all.


I've broken it up into kit form, to minimise the need for supports and also to optimise the stair-stepping of FDM printing. Now all that remains is the test printing.


Next Day...

I've done some test prints. They've all been sprayed the same Vallejo ModelAir Middlestone so that the colour and surface of the different media don't obtrude.

  • The one on the left is FDM printed, having been split longitudinally and with separate pieces for the cowling and undercarriage.
  • In the centre is one that I printed in one single piece in resin, and as usual I got some very bad warping and distortion of the wings. I don't seem to be able to beat that; I don't know what's causing it. I know it's possible to get good, dimensionally stable results in resin, because I've seen other people do it. So the fault lies somehow with me.
  • The one on the right is an older, pre-ribbed model that was just split down the middle and FDM printed in two pieces.

FDM printing gives me much better dimensional reliability, at the expense of perceptible layer lines on the sides of the fuselage. Maybe I could combine the two printing methods: print the fuselage in resin, and the wings in FDM. It's probably doable, though it wouldn't be entirely straightforward.

Sunday, 12 February 2023

3d Printed Stukas


I just got hold of Roman Troyan's new 1:200 scale Ju87B Stuka model, and I've up-scaled it to 1:144 and printed it both on my Mars Pro resin printer (left) and my Ender 3 FDM printer (centre).

The results are shown here alongside a Zvezda 1:144 injection-moulded kit, on the right.

It's a nice model, though in 1:144 the wings are very thick and the panel lines are very prominent. That's not a big deal for me, as I'm producing it for use as a gaming piece, not a diorama model.

It prints at roughly the same speed on both printers, with the Ender 3 being just a little bit faster. The resin model from the Mars Pro has smoother surfaces, especially the underneath — the FDM model's supports left quite a bit of mess there. Again, that's not really a big deal, as on the tabletop the models will really only be seen from above.

What is a big deal is that the resin model is considerably distorted. The wing-tips are perceptibly narrower than they should be, and the wings and tailplanes have both warped. The nose is also considerably distorted. This is an issue I've been getting pretty regularly with my resin prints, but unfortunately I don't know enough about resin printing to be able to make a guess at what's causing it.

I've printed these two Stukas more out of curiosity than necessity; I have another Zvezda model assembled but unpainted, and yet another still in its box. Realistically I'm highly unlikely to need more than one at a time on the wargaming table so the surplus Stukas will probably stay unpainted for quite some time.

The resin print is probably going to go in the bin, because it's rubbish.

Saturday, 2 April 2022

Hawker Hart (1:144)


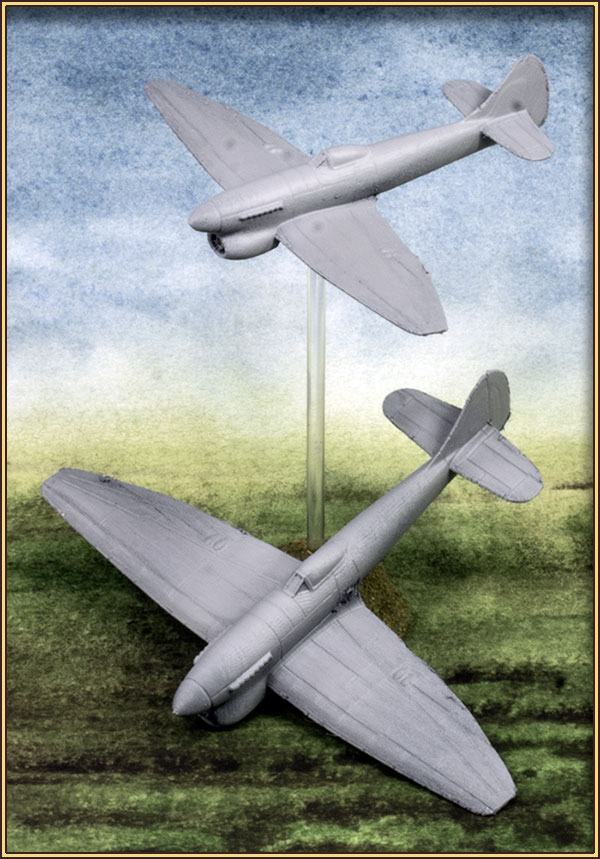
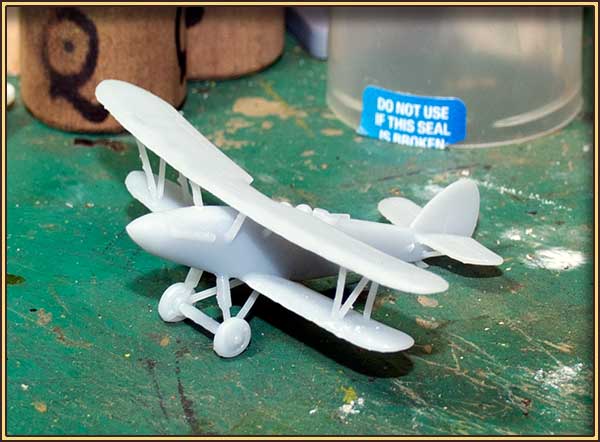
Some time ago I designed a 1:144 scale digital model of the Hawker Hart in Blender, and from time to time I have another go at 3d printing it.

The silver one on the left is printed in FDM on my Ender 3; the STL for that one is split longitudinally and the model is printed in two halves. The resulting print is okay, but as usual with FDM the surface texture is quite striated, I end up with a lot of little nubbins where supports rest, and the struts and undercarriage are really quite rough. It will do as a wargames model, but I crave something smoother.

However, I've had very little success when it comes to printing aircraft in resin, like the one on the right. This one was also cut in half, but fore and aft this time.

Part of the issue is that resin isn't all that dimensionally stable, and warping in the curing process is fairly common. But the recurring problem, again and again, is deformation of one or more wing-tips. Even when I've supported both sides completely symmetrically, I'll often get one side failing to print properly. In the case of this print, the profile of the whole port side is screwy, and I honestly have no idea why.

I'm trying another print right now with the front half of the plane in a different orientation, but to be honest I'm getting a bit pessimistic.


Next Day...

Success at last!

I had a couple of breakages when the supports came off (one of the wing struts, and the undercarriage) but they glued back together okay with some raw resin, cured with a UV flashlight.

There is a little bit of sanding to be done where support nubbins exist, but it's the best result so far.

I'll print one more, and paint one in the silver peace-time livery and the other in the dark earth/dark green it would have been repainted in if it had to go to war.

Tuesday, 9 March 2021

Decals for tiny aeroplanes


Note: this is not a very good 3d print —
I did it when I was brand new to using ChituBox,
and I didn't do the supports very well at all.
However, it's still recognisable as a Camel,
so I see no reason not to make use of it.

I hate using decals, but I also hate painting RFC or RAF roundels. So, decals it is.

However, these little aeroplanes I printed (this one is a Sopwith Camel) are 1/200 scale, not a scale that anybody but me is interested in, it seems. 

Fortunately for me, somebody recommended to me Kevin Hammond of Miscellaneous Miniatures, and he very kindly whipped up some custom-sized sheets of RFC roundels, German crosses, and some lozenge pattern camouflage.

His prices are very reasonable, his customer service is exceptional, and he sends out the decals by letter post, so postage rates aren't nearly as terrifying as USPS parcel rates have become in recent years. It took about two weeks or so for my order to reach me here in New Zealand from him in the USA.

The decals on each sheet are all printed on a contiguous piece of film, so they need to be trimmed before use. However, the film seems to be very clear and reasonably thin, so its edges disappear under a coat or two of matte varnish.


 This one is an Albatros D-II, also in 1/200 scale. It's not my design, and I'm no longer sure who it was who originally created it — I've had the STL for quite a while.

This model doesn't have three-dimensional wing ribs built in, so the ribs have had to be painted on. All in all, that's no big deal — in fact, it probably makes life a bit easier, especially when it comes to applying decals.

Wednesday, 3 February 2021

SE5a (1/200)


I built this 1/200 scale model of a RAF* SE5a in Blender, and printed it on my Elegoo Mars Pro.

The wingspan is about 40mm.

The Lewis gun is much too large in scale, but I feared that if I made it smaller it would become insignificant, and possibly not print. However, I now think it could be shrunk a bit.

There has got to be an easier way of doing the RFC roundels. In spite of my distaste for decals, I'd even go so far as that, if it didn't cost an arm and a leg to buy decals from across the seas.

* In this case, RAF stands for Royal Aircraft Factory, not Royal Air Force. Though in 1918 it could also stand for Royal Air Force, in which case it would be a RAF RAF SE5a.

Sunday, 31 January 2021

Tiny Air Force


In spite of the fact that absolutely none of my friends seem to share my view that WW1 aerial wargaming is great, I do persist in making little aeroplanes for the express purpose of WW1 aerial wargaming.

These are my latest attempts, in a new scale: 1/200, off my new printer. These ones are from STLs I've picked up somewhere, I don't recall where, but I'm designing some of my own as well. Generally, printing has gone pretty straightforwardly, but I'm getting some warping in the leading edges of the starboard top and bottom wings on the Fokker Dr1 (front).

I think the Wings of War/Wings of Glory models are 1/144, which is a good scale for these planes too. I might try one or two in that scale.

Next day...


I've been tinkering with making some 1/200 models of my own. I've been a bit intimidated about modeling aircraft because of all their compound curves, but WW1 aeroplanes are a lot easier in that respect — most of them are just made up of canvas-covered wooden frames.

This one, the Albatros DVa, is one of the curvier planes of the time, but even so its fuselage is a pretty simple shape to create. It had a monocoque fuselage built up from laminated plywood, which made it light and strong. 


The first test print went well, so I think I can call it a success.

I've only stripped off the supports, and I haven't done any other cleaning up, so there are a few nubbins and things that will need to be taken care of.

It should up-scale to 1/144 without any problems, though I wouldn't take it any larger than that as it would start looking very chunky. It would probably print at 1/300 too, though I wouldn't make any promises in that regard.