Saturday 23 December 2023

Fly My Pretties


To use model aeroplanes in a wargame effectively, you really need some way to indicate that it is a flying machine. I use magnetic flight stands made from 3.2mm acrylic rod.

The magnets (5x3mm neodymium) are glued to the end of the acrylic rod with epoxy. It's important that the rod and magnet are perpendicular, or else the models will be wonky when attached to the magnet.

I achieve this with the jig shown in the photograph: the jig sits flat and square on the workbench, and the acrylic rod is held in a perfectly vertical groove in one edge. The magnet is sitting on some masking tape on a steel rule, which is also lying flat on the benchtop. Then all I have to do is add a blob of epoxy, bring the two components together, and wait for the glue to set.

NOTE: I've found that it's better to put a piece of light card between the acrylic rod and the rubber bands, as the rod then moves more freely in its slot rather than being grabbed by the rubber. It is still held more than firmly enough for the job.


I glue a nail-head into a socket in the belly of my little aeroplane, which will cling to the magnet on the end of the rod.

It looks huge and obvious on this 1:144 scale Fokker Dr1, but when the model is the right way up and in use, it's fairly unobtrusive.

The Fokker is something of a special case: the undercarriage fairing would get in the way of the flight stand, so the nail-head has to stand a lot more proud than on most models. Normally the flat of the head can be right up against the belly of the model.

Until recently I've been using steel washers as the base for my flight stands (see here for that process), but now I've started using 3d-printed bases. The washers have the advantage of providing their own weight, but the 3d-printed bases are socketed so that rods of different lengths can be swapped out to deal with altitude differentials. I've designed the bases so that I can fill them with bits of lead ballast and what-not glued in place, and then cover all that clutter with some sort of terrain effect.

I've put STLs for these hex bases in 25mm, 30mm, 40mm and 50mm on Thingiverse at https://www.thingiverse.com/thing:6396827. There's also an STL there for an alignment jig for positioning the acrylic rod and magnets.

A couple of days later...


Here is a set of stands being glued up on my 3d printed jig.

I went for six stands at a go, because that will cater to two 3-plane flights.

At the moment I'm doing stands in 30mm, 60mm, 90mm and 120mm heights. I could go further to 150 and 180, but I fear they'd become a bit unstable, especially with 1:144 scale models mounted.

The photos below show the height range, both naked, and with some 1:300 scale aeroplanes on them.


At present these 1:300 scale models are mounted on dressmakers' pins with 2x2mm magnets glued to them. However, I'll replace those with some steel flat-headed tacks, as the magnet-to-magnet connection runs into issues with polarity.

SPAD XIII


Next up, a SPAD XIII in 1:144 scale.

In this scale it can probably stand in for a SPAD VII as well, though there are many differences in detail, and doing that would probably make the purists' teeth squeak with rage.

The SPADs are all very ribby.

I've given this model a bit of belly detail that I don't normally bother with. Some of it is a bit more visible on the tabletop than usual.


Wednesday 20 December 2023

SE5a Re-Scale


A couple of years ago I designed a 1:200 SE5a model, and printed it in resin on my Mars Pro. 

I thought I might re-scale it to 1:144 and print it in FDM on my Ender3, to keep my new Fokker D-VII company.

The result is adequate for a gaming piece, but I'm far from fully satisfied with it. My Ender is getting pretty long in the tooth now, and it's starting to show. Perhaps it's time to start saving up for a little Bambu Labs A1 Mini.

Wednesday 13 December 2023

Little Fokkers


I got distracted from what I was supposed to be doing, and instead of doing that, I built this little Fokker D-VII in Blender at 1:144 scale.

The struts and things are far too thick for scale, but that's because it's a model intended for tabletop wargaming, and the thick struts will make it much sturdier, as well as being easier to print.

I've given it a 3mm socket underneath for mounting on a flight stand.

It's available for sale now at https://www.wargaming3d.com/product/fokker-d-vii-1144/

Next Day...

Printed nose-up on Ender 3

Vital supports added in Blender

Test prints begin.

I've tried the print in two orientations: nose-up and nose-down, with vital supports added in Blender before creating the STL. Each has it pros and cons.

The nose-up model printed well, but the scalloped trailing edges of the wings could be better.


Printed nose-down
Blender export


The nose-down orientation printed the wing edges better, and the front edges are much easier to clean up.

However, I had some failures with the undercarriage and some of the centre struts. I'm not sure exactly why, but I'll try changing its Z-axis orientation on the printer platen, that sometimes helps. Who knows why.


Later... several days later


This Fokker Dr1 triplane isn't all my own work. I took one of Captain Ahab's models, intended for 1/300 - 1/200, and jazzed it up.


Wednesday 6 December 2023

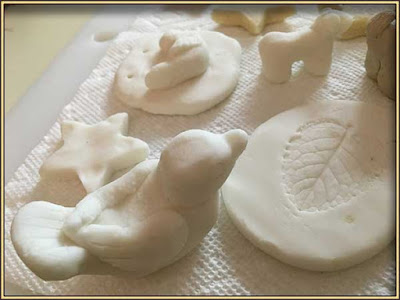
Baking Soda Air-Dry Clay Recipe


For later reference:

Baking Soda Air-Drying Modeling Clay

  1. Pour 2 cups Baking Soda and 1 cup of Cornstarch into a saucepan.
  2. Add 1¼ cups cold water and keep mixing.
  3. Add food coloring if desired.
  4. Cook over medium heat, stirring constantly until mixture is the consistency of mashed potatoes (about 10-15 mins).

Also called "cold porcelain". Makes a soft white modeling clay that takes impressed detail well, very suitable for terrain rollers. The clay can be coloured when made, and takes acrylic paint well. It will take a day or two to harden.

Monday 4 December 2023

OSRIC Player's Guide(s)


Back in 2017, my friend Steve gave me a copy of the OSRIC Player's Guide, which extracted and republished the bits of the OSRIC rules that a player needed to have access to. Character generation, equipment, spell lists and so forth. It was excellent, and a bit less cumbrous than using the Big Book at the table.

For some reason, and I don't know what that reason was, it was withdrawn from publication and was no longer available.

Just this year, a new version of the Player's Guide has been published, with new art and layout, though I think the content is essentially the same. It looks okay, and the text is presented in a large enough font that if one wanted to make an A5 copy from the PDF, (and I might), it would probably be quite legible. Some of the table text might get a bit small though.

The spell descriptions in the first were presented alphabetically, but all lumped in together regardless of class, whereas in the new version they are arranged alphabetically but by class. I don't mind either method really — I just hate having to know what level a spell is before I can find it in the book. I haven't looked at the rest of the content in any detail.

The old Player's Guide was a hardback; the new one I just got is a softcover, and I got it via Amazon. It may well end up being available from other retailers such as DriveThru RPG, but I don't know what the timeline for that is. I don't object to buying via Amazon except that they don't accept PayPal, which I prefer to use for buying toys and tools and stuff from foreign parts.