Showing posts with label conversion. Show all posts

Monday, 4 March 2024

Panther to Jagdpanther and back again


Some time ago I bought a box of five 1:100 (15mm) plastic kit Panthers from PSC Battlefront. They included alternate hull and gun pieces to make Jagdpanthers, if the modeller so chose.

Realistically, getting three Panthers and two Jagdpanthers out of the box would probably have been sufficient for 99% of my wargaming needs, but being the cheap and stingy person that I am, I decided that I wanted to get maximum flexibility from the set.

So, through the magic of magnetism, I made the two options interchangeable on the basic running gear. I used epoxy to set the magnets in place because of both its strength and its gap-filling properties.

The bottom magnets were straightforward enough to place, but to get accurate registration and polarity for the upper magnets, I placed the two sets of magnets together with a piece of cling-film between them, put a liberal blob of epoxy in about the right spot on the inside of the upper hull, and closed it up and let the epoxy drool down and around the upper magnets.

I numbered each set so that the matching magnets always go together.

I will have to make sure that the camo pattern at the front edge of the hulls match, more or less, when I paint them up, but that's not really a big deal.

Just as an aside, I also glued a slug of lead in the hull bottom to give the plastic model a bit of heft. It makes it feel more satisfying in the hand, but it does have the disadvantage that the increased mass means that if I drop it on a hard surface it's more likely to smash into a bajillion pieces.

Saturday, 21 April 2018

H&R Conqueror - rebarreling

Heroics & Ros 1/300 BM53 Conqueror Heavy Tank

When I got my Centurions, I also got a troop of Conquerors to fend off those pesky IS-III from about ten miles away.

The Conqueror has a very long gun barrel, which is very vulnerable to damage from ham-fisted wargamers, as you can see in the top model. So, I'm replacing the soft metal moulded guns with new ones made from 1mm steel rod — I believe it's welding wire. It's very sturdy indeed, and should survive anything that won't completely destroy the whole model.

The diameter of the gun on the original vehicle tapers subtly from the mantlet to the muzzle, but that's not something I feel a burning desire to replicate in this scale. It would be quite difficult, for no real perceptible benefit.

The bore extractor is made from paper, soaked in liquid superglue and wrapped around the wire several times. The superglue penetrates the fibres of the paper, and you end up with a hard, plastic-like mass that can be sanded smooth to remove the seam where the last wrapping is cut off. It would be a lot easier to use a short piece of brass or copper or even plastic tube with a 1mm bore, but I have none.

The Conqueror's gun doesn't have a muzzle brake, which simplifies matters quite considerably.

Next Day


I remembered some useful stuff from my brief essays into stained glass — the bore evacuator on this one is made from some self-adhesive copper foil, cut to width and wrapped several times around the barrel.

The copper foil gives a much cleaner surface than the glue-soaked paper, and it's also much easier to handle. It's very thin, so it needs to be wrapped in more layers to get the required thickness, but you don't have to worry about smoothing off the end-seam as long as it's located on the underside of the barrel where nobody will ever see it.

The copper foil is intended to be wrapped around the edge of pieces of glass, which would then be thickly soldered together to create the complete stained glass object. It's an alternative to the traditional lead channel seen on windows, and is often used for three-dimensional objects like lampshades.

Thursday, 17 August 2017

Opel Blitz Office Body (1:100 conversion piece)

Front view

Rear view
I've been working on a 3d-printed kit conversion piece with Zvezda's 1:100 scale Opel Blitz in mind. I haven't seen PSC's kit yet, but I don't see any reason why it shouldn't work with that too.

This is the most basic form of the body; there seem to have been quite a few variants. This would be usable as the command truck version, or (with the addition of a radio mast) the radio truck. The rack on top is for stowage.

It's available for sale at http://shpws.me/OSrJ
This is Shapeways' render of what it will look like.
What the actual thing will look like will
remain a mystery until I get one printed.

Friday, 11 August 2017

Opel Blitz Ambulance (15mm)

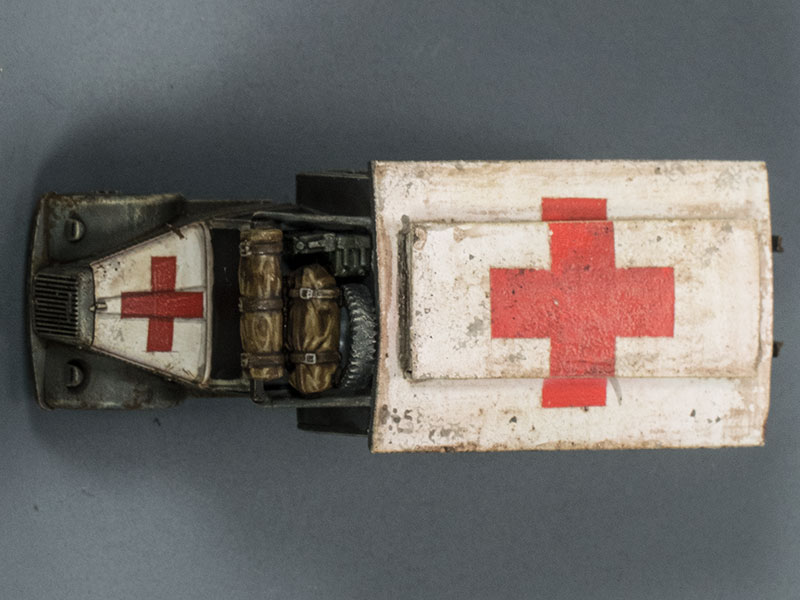
 The ambulance conversion fro the Zvezda 1:100 scale model of the Opel Blitz is complete. Or complete-ish. I still haven't found a satisfactory way to add ropes to secure the load on the stowage rack without making them look like they're just lying there, and I don't think there is a way without actually carving the front tarpaulin to make it appear that the ropes are pressing into it. I'll probably end up just leaving it, unless it niggles at me too badly.

Its been an enjoyable project, and good to get back to some almost ground-up modelling after all these years. And now my little toy soldiers have some medical back-up.... though I note, now that this is done, that I still don't have any medics or stretcher bearers.

That grid on the back is a set of foot-steps

The view from above

Thursday, 10 August 2017

Opel Blitz ambulance conversion (15mm)

I'm in the process of building some Zvezda 1:100 scale Opel Blitz trucks, and my easily-distracted mind turned to thoughts of other variants even before I'd finished the stock-standard kits. One conversion that would suit 3d printing would be a set of tracks to turn the truck into the half-tracked Maultier variant, but the one I've started working on immediately is an "office" body to turn the standard truck into an ambulance.

I haven't done any plastic card conversion work in decades, so I'm pretty rusty.

I'm building up the shell of the body around the existing kit's truck bed, because that gives me a square base of the right size, and more importantly, because it already has all the mounting points and what-not moulded in place. The plastic card I'm using for the walls is about 1mm thick, so  after the vertical slats have been sanded off and the card walls glued on, any increase in dimension is negligible.

The curved roof was a bit of a problem, because I couldn't find an easy way to evenly and precisely bend the card I have available.

In the end I laminated some light cardboard around a tin can of the right diameter, cut it to size, and then slathered it all in liquid cyanoacrylate to make it sandable — the superglue works a bit like resin in fibreglass.

The door and window frames stand proud on the original vehicle, so I cut them out of paper and glued them down with PVA. Looking at them now, I could have cut them a bit thinner, but it's a bit late now unless I strip them right back and start again.... which I'm becoming more and more tempted to do.

Now I've got the framing applied on the other side — I cut these ones to about half the thickness of the other side, and I think they do look better, though it makes the paper a little bit harder to handle. This sort of thing would be ideal for a laser cutter, or for photo-etching.

With all the surface detailing done, I gave the whole thing a squirt with white primer. This really brings out all the flaws. In general I'm not too displeased, but there are definitely some areas that need attention.

Did I say all the surface detailing? I just realised that I hadn't applied the door hinges. Bugger.

Now the module is mounted on a chassis, and it would be quite usable on the tabletop in this form (assuming I'd finished the painting, of course).

However, for completeness' sake, there are a couple more bits and pieces to be added.

There should be a stowage shelf just above the cab, which would be full of all sorts of clutter, and there should be a set of footsteps that fold up against the rear doors when in transit. They'll be next.

OK, here we have our front stowage shelf with some bits and pieces from PSC's German Stowage & Tank Commanders set.

There really should be some ropes and things holding everything in place, or else it would all go straight over the bonnet the first time they put on the brakes. I'm not quite sure how I'm going to go about that.

Friday, 7 October 2016

Conversion stuff: Vickers Light Mk.III running gear (1/56 scale)

In response to a request, I've uploaded a model of just the running gear for the Vickers Light Tank Mk.III in 1/56 scale.

It's at http://shpws.me/MM73

Hopefully this will help people with some conversions of various interwar vehicles. The running gear is usually the trickiest part of any scratch-building project.