Wednesday 31 May 2017

Air Support in the Offing

I got distracted from my Panzer III troop by finding this.

It's an old Revell 1/144 scale Ju87D Stuka dive bomber. I've had it sitting around in a drawer for decades, and it had got a bit battered — the tailplanes needed to be glued back in place, and its lost its dive-brakes, but it will do as a representative model of a ground-attack aircraft so I made a start on painting it.

Belly-up, showing the Cunning Clip
I bent a short length of steel into an open parallelogram form and glued it to the belly of the plane.

The magnetic stand
The cunning of this addition is that, when added to a magnetic flight stand, I can either have it shown in level flight, or it can rock forward on to the front face of the clip and be shown as if in a dive.

The clip looks fairly horrible and obvious in the photos, but fortunately in real life it doesn't stand out nearly so much. If I cared to take the trouble, it could be inset into the belly of the plane and faired in, but I don't think it's worth the effort for this particular model, which isn't a spectacularly detailed representation in any case.

Next day


I decided that my splinter camo looked like crap, so I took it back to overall RLM Grau.

Lesson learned here: paint yellow first, over a white undercoat. Then paint everything else. Yellow is not an opaque pigment by any means.

I don't have any decals of a useful size for this aeroplane, so I suppose I shall have to paint all the markings freehand, which I am not really looking forward to at all.

Next Stage

With the canopy and some of the other details painted, it's starting to come together.

I'm in two minds about whether to paint in any panel detail or not. There's virtually none on the model itself to guide me, and it would require painting lots of dead straight lines, which is not a lot of fun.

And Next...

I remembered that I had a 0.05mm fibre-tip pen, so I gave that a go to draw in some panel lines.

It didn't much like drawing on the paint surface (or maybe it's just getting a bit old and stale) but I eventually got a bunch of lines in what I think are roughly the right places.

I'm glad I did it; I think it makes the aeroplane look a lot better.

And now I have to gird my loins for painting a whole lot of crosses and letters. Groan.

Next Day

Now, on to the flight stand.

This is a 3mm acrylic rod, buried in a stack of washers covered with epoxy putty.

The rod is roughly 150mm long, but I didn't measure it exactly. It's difficult to make out in the photo, being transparent, but I melted and smushed the end of the rod — a little magnet will be epoxied there.

The folded card is there to make sure that the rod stays exactly vertical and square while the putty is setting.

Monday 29 May 2017

Next in the queue, a Panzer III

Starting on my 15mm Panzer III box o'goodies.

I originally intended to magnetize the gun barrels and turret bustles so that I could swap out the 37mm and 50mm guns, but that turned out to be more of a pain in the arse than I expected, so I'll just build 3 x 37mm and 2 x 50mm tanks.

I really like these little PSC kits. The only thing that would make them better would be if they included an extra turret body on the sprue 

Next day

The only thing I have against these injection-moulded plastic kits is that they're very light. That's not an issue if they're only intended for display, but for tabletop use I prefer them to have a little heft, to lessen the chances of being moved accidentally among other reasons such as an improved tactile feel in the hand — tanks are supposed to be massive things, so if you pick one up and it's light as a feather, there's a mental disconnect.

I made a little ingot mould out of plaster to cast lead weights in, designed to fit the hull cavity quite snugly. Each of these ingots weighs about 35 to 40 grams, which doesn't sound like a lot, but it's enough to give the model quite a perceptible increase in mass.

The ingots are glued in place with 5-minute epoxy.

I originally intended to do this with lead bird-shot, but these days lead shot is surprisingly expensive — I guess, with the legislation against its use on environmental grounds, it's just not as commonly available as it used to be.

Battlegroup Tobruk — a love affair

I got up this morning to the sound of a courier carefully and tenderly throwing this at my front door.

I've thus far only taken a quick flick through, but even at that passing acquaintance I can see that this is an excellent addition to the Battlegroup series.

I've come late to the Battlegroup party; I thought, when I first saw it on the internet, that it was just jumping on the Bolt Action bandwagon with its fancy illustrated books and what-not — all talk and no trousers, I thought, just another house-organ designed to sell models.

Boy, was I ever wrong. Battlegroup is a far superior wargame to Bolt Action in almost every way.

Don't get me wrong: Bolt Action is a fine battle game, very quick and easy to learn and play, and it can be a lot of fun, but its simplicity necessarily means that technological differences are very much glossed over, and lots of equipment is lumped in together in very broad, indistinct groups. Within the game, for example, a pre-war Hotchkiss 25mm anti-tank gun is functionally identical to a 6 pounder, which is fine if you're happy to accept that lack of granularity in return for the ease of play in not having to account for actual historical performance differences.

I would describe Bolt Action as a generic 20th century battle game wearing WWII lipstick.

Battlegroup is more detailed and granular in pretty much every aspect, while retaining an essential simplicity of play that makes it very beginner-friendly. It deals well with all-arms battles on a tactical scale.

It uses a system of chits (the "battle rating" system) which are taken when units are eliminated or when various conditions occur. These are mostly numerical, and are totted up against your army's total Battle Rating: when the total of your pile of numbered chits exceed your BR, you've lost, and if anything is left they run away. But there are other chits in the mix which, when drawn, can initiate things like air strikes, mine attacks, or which can be used to break down one of your opponent's tanks, for example. They add an element of uncertainty and variability to a game outcome which I like, disheartening though it may be to learn that losing that detached Bren team was much more catastrophic to your army than you might have expected.

The only mechanisms I've found at all tricky to come to grips with are those for indirect artillery, but "tricky" is a relative thing — playing through a few sample barrages soon got us used to the system, and it does a good job of representing the importance of artillery on the WWII battlefield, without making it an all-destroying unstoppable juggernaut. Usually.

I'm more impressed by the Battlegroup rules, the historical information in the theatre volumes, and the presentation of the whole package than I have been by a wargaming system in some considerable time. I may even splash out on a copy of Barbarossa, in spite of having very little interest in gaming that particular bit of the war.

Saturday 27 May 2017

Zvezda Hanomag (1:100)

Zvezda Art of Tactic snap-fit models — still need a bit of trimming before painting.
I bought some armoured transportation for my 15mm WWII Germans in the shape of these snap-together kits from Zvezda of the SdKfz 251 B half-track.

They're fairly cheap, at about four quid each from PSC, and while rather simplified, they'll serve quite well as wargaming models.

They do snap together as advertised, with the exception of one point where the hull is supposed to clip to the mudguard piece under the engine compartment: that's an over-under arrangement with a peg that is supposed to hold the hull, mudguards and chassis all together, but try as I might I couldn't get the peg to go through the hole, and ended up just chopping it off and gluing the pieces. That's not a big deal, since I glued all the other joints as well, just in case.

Apart from that, my only problem with the kit is that the only machine-gun supplied is the AA MG that should be mounted at the rear, while the MG34 with gun-shield that should be mounted above the driver's head is absent. If I were more motivated I'd convert the AA MG, but I probably won't be bothered.

Something else I'd quite like is some seated passenger modules I could slip in and out to indicate whether the vehicle is loaded or not, but again, that's something I doubt I'll get around to.

Couple of days later...

Here they are, as complete as I care to make them. Completely crewless, alas, and I had to find some old decals since (as is fairly usual these days) they came with none.

They'll serve perfectly well as wargaming models, but I think, if I find I need any more, I'll try the PSC 5-pack next time.

Friday 26 May 2017

Pz38t (15mm)

 I've finished the first of the PSC 15mm Pz38t that arrived recently.

I think that the large white rectangular aerial recognition flash on the engine deck might have only been used in Poland, whereas the black and white Balkankreuze was only brought in later. And the commander's cap is a still later style.

So, all a bit of a mish-mash, but not to worry.

Port side

Front quarter

Rear quarter

Top view

15mm Pz38t — resin vs. plastic

Long gone are the days when 15mm WWII models were the province of just one or two vendors. These days there's quite a wide range to choose from.

On the left of the picture is the Pz38t in resin and metal from Battlefront (BF), which I've owned for quite a few years now. On the right, the injection-moulded styrene version from The Plastic Soldier Company (PSC), which I've just obtained.

Both are pretty good in terms of detail and profile. The BF model's commander is wearing the huge beret that panzer troops wore at the very beginning of the war, which is a nice touch. The detail on the PSC model — rivets, guns, etc. — is generally finer and more delicate. It doesn't include the hull-mounted stowage boxes; they would need to be scratch-built if you want them on your tank. The BF model's tracks include more link detail, but on the other hand they're also a lot thicker and chunkier than the tracks on the PSC version.

The BF resin/metal model has a more satisfying heft in the hand, which would also make it less subject to accidental movement on the wargames table than the PSC plastic model in its unmodified state. I fill the body cavity of these plastic lightweights with lead and epoxy, which takes care of that issue.

For ease of construction, the BF model wins hands down. It's just five or six parts, and you can get from blister to completed model in fifteen minutes quite easily, if you don't have to do too much cleaning up of the components.

The PSC model is far from being an involved building project, but it takes a bit longer to get from sprue to completed model than its much simpler resin/metal colleague. On the other hand, the PSC offering provides options on the same sprue to build either the gun tank, as shown here, or one or other of two versions of the Marder tank destroyer. I expect that it would be possible, maybe, to build them all so that they're interchangeable on the basic hull with the help of magnets and the like, but it would be very tricky — for the effort involved, you'd be much better off just buying another sprue.

Which brings us to price, and here PSC wins hands down. At current exchange rates (May 2017), the BF resin/metal model costs $US 13.00 ($NZ 18.52). The PSC model costs £UK 5.99 ($NZ 11.04) for a single sprue, or about £UK 20.00 for a box of five (or about $NZ 9.20 each).

Battlefront are now producing their own injection-moulded plastic models, though they don't (yet) offer a Pz38t. However, their packs of five vehicles sell at $US45.00 ($NZ 64.00), so PSC's packs are still very much better value for money.

Once assembled, either model paints up quite straightforwardly, but I'd say the PSC model has an advantage here inasmuch as all its plastic surfaces are quite smooth and even. The resin can have quite a ragged, webbed surface, especially if it's been de-moulded a fraction too early, and the mould lines on the metal components are often fairly pronounced.

On balance, my choice would be without hesitation for the PSC injection-moulded model at almost half the price of the resin and metal offering from Battlefront, even though it requires quite a lot more preparation time from me to get to the point of painting.

Thursday 25 May 2017

SdKfz 263


Finished and done, the PSC 15mm SdKfz 263 (8-rad) armoured car. In the past I probably wouldn't have bothered with a vehicle like this, but the Battlegroup rules actually make it worthwhile to field specialised long-range radio vehicles.

Port side

Top view

Front quarter

Rear quarter

SdKfz 263 — WiP

Now that the putty has cured overnight, it's on with all the usual palaver of painting.

I start with a black primer (Vallejo Surface Primer, polyurethane: it goes on to plastic very well, and once properly cured is very tough and scratch-resistant).

Then I spray on the grey (VMA German Grey), mostly downwards so that the black still predominates on under-surfaces. I find this helps to exaggerate the shadows a bit; necessary in this small scale. I find the VMA German Grey a bit light for my taste, but it will be darkened somewhat later on with washes.

Last step in the basic paint job is an overall very light dry-brush with VMC Buff. I prefer Buff over a lighter grey; the yellow gives a warmer tone to the scheme, and blends in better with later dust weathering.

Next step, before I go any further, will be to paint on the markings. I have to make a choice at this point whether I want to use the solid white crosses that were used in the very early days of the war, during the invasion of Poland and Norway, or the white-outlined black crosses as used during the Battle of France. I'm leaning towards the later version, I think.

Wednesday 24 May 2017

Blobby Stowage

I'm not usually much of one for adding all the clutter and crap to my models that actual real-life soldiers tend to accumulate on their actual real-life vehicles, but I thought I might give it a go on this PSC 15mm (1:100 scale) SdKfz 263.

The jerry cans were simple enough, and came from another kit. The helmet was carved off the head of an extraneous crewman.

The rucksack and tarpaulin were made from epoxy putty, and I am more impressed than ever by people who can use that stuff to make miniature things that actually look like the things they're supposed to represent. I'm not too unhappy with the rucksack, but the tarpaulin looks more like a rolled-up feather sleeping bag than anything made of canvas. Hopefully it will look a bit better when I get some paint on to it.

Friday 19 May 2017

The Grand Panjandrum

The Grand Panjandrum was an experimental rocket-propelled explosive device, developed during WWII by the British for clearing beach obstacles.

It was a disastrous failure, its big demonstration test turning into a terrifying (but comedic) fiasco.

In real life, it never made it into service. However, in the Operation Sealion book for Bolt Action it appears as a novelty weapon option, so you can pretend that it did actually get used in anger.

Pictured is a render of a 1:100 scale model of the device, 3d-printed by Shapeways. You can get it at http://shpws.me/Oy2Z in either WSF or FUD.

It's a bit expensive in FUD, because the central hub is solid and there's nowhere to allow for escape holes. I might try making it in two halves for assembly; that should bring the cost down a bit.

Sealion

Just arrived on my doorstep from BookDepository.com is this: the Operation Sealion campaign supplement for Bolt Action.

Operation Sealion (or Unternehmen Seelöwe, in German) was the Nazi plan for the invasion of England in 1940. It had virtually no chance of success, or even partial success, but it's a "what if" campaign that has occupied a lot of military historians and wargamers over the decades.
I haven't read through the book thoroughly as yet, but on brief acquaintance I like it a lot. It includes information not only on lots of the improvised Home Guard weapons, but also some of the way-out experimental things like the Great Panjandrum.

It's also got entries on the Home Guard (including the Walmington-on-Sea platoon, naturally), the Boy Scouts, and fifth-columnists like Moseley's British Union of Fascists.

However, what I absolutely must do is get hold of some hobbits to arm with shotguns and turn them into a Shire Patrol :)

Thursday 18 May 2017

Palm trees on the cheap

15mm 25 pounder gun and crew, for scale
This is the base of two el-cheapo plastic palms that I showed in my last post, jazzed up a bit.

Once a bit of paint disguised the hideous lollypop green of the leaves and plasticky brown of the trunk, and with a bit of sand on the base, they really don't look too bad.

Not very much money well spent, I'd say.

The trees in the raw:
useable, but definitely toy-like.

Trees as far as the eye can see

Over the last few days, a bunch of mail orders have arrived here from China. They're a variety of very cheap plastic trees, advertised on AliExpress as being for railway modeling, but naturally I intend to use them as wargame terrain.

They are not high-quality, diorama-standard models, but then for the price I wouldn't have expected that. The whole lot cost me about $US30, and there are about 300 trees in total, so roughly ten cents each. That's pretty good value.

15mm PzIV for scale.

There are four varieties — palms, a couple of conifers, and generic deciduous. The palms came in four sizes: the two shown here, and two smaller sizes at about 50mm and 30mm, which would be suitable for 6mm games.

I bought some smaller versions of the ones second from left before, for 6mm forest terrain. You can see how those turned out here.

I've mounted these ones in holes through 3mm MDF hexes, anchoring them on top with hot glue, and beneath by melting the plastic stem into a countersunk cavity with a soldering iron. It makes them very firmly fixed, and they won't come free without being cut free.

Countersunk holes beneath
The deciduous trees will need a heavy spray with diluted PVA, as their foliage is a bit loose and has a tendency to fall away, but that's no big deal.
Plastic stems melted into the cavities and smoothed off

Tuesday 16 May 2017

PaK36 (15mm)

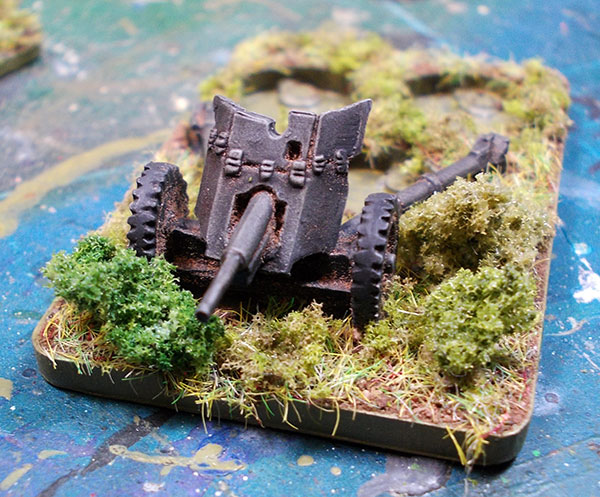
This is the 15mm (1:100 scale) PaK36 Anti-tank platoon set from Battlefront. They're mounted in my magnetic sabot bases, so the figures can be used individually if need be.

(Click on the pictures to embiggify).

Left

Right

Front

Back

Top

Plane Tree Camo in 15mm — first attempt

The PaK 36 models I've been basing come with crew dressed in camo smocks. That means that for my chosen period (roughly 1930-41) my only painting options for them are as SS.

Unlike many WWII wargamers, I have a strong aversion to fielding any SS forces except as part of an historical recreation battle. They were a Bad Lot, and I really don't like the idea of commanding a bunch of war criminals, even in make-believe.

Be that as it may, I have these guys to paint, which means I have to plunge into the tricky world of WWII German camouflage uniform. I cannot say I've found it easy at all.

Platanenmuster
The smock in the image to the left is the one I want to emulate. It's the Plane Tree pattern (Platanenmuster) which was in use from before the war up until 1944.

There's not a lot of room on a 15mm figure, so some compromises will have to be made. What I've found is that while pale spots on the dark patches do show up, dark spots on light patches are pretty pointless. Also, the light green spots need to be added after any shading wash, or else they fade into the general mess and you lose the distinctive spottiness of the camouflage pattern.

I've seen much better examples of these camo patterns in 15mm, but try as I might I don't seem to be able to match that standard.

Later...

Here's my next stage of experimentation. On the left, before spots; on the right, after spots.

The addition of spots certainly makes it look more like what I'm going for, though I think I should probably go for fewer, less evenly-spaced spots.

Sunday 14 May 2017

PaK36 sabot bases — WiP Part 3: The Greenery

Once the dirt layer is thoroughly dry, the greenery goes on.

I start with a layer of strand grass flock, applied in blotches so that some of the underlying dirt shows through.

Next is some bushy stuff. This is Woodland Scenics Coarse Turf.

Again, it's applied in small blotches. I've found that I need to squash it down into the glue spots and leave it until it's absolutely set before brushing away the excess. If the glue is too thin, and/or not yet cured, then the springy foam rubber that it's made from just falls away.

The gun base at the bottom of the picture hasn't yet had all the excess cleared away.

This is as far as I'll go with the infantry base, to the left.

Almost last, on the gun bases, I glued some small bits of Woodland Scenics Clump Foliage.

I want some larger bushes around the gun, but I don't want so much that it will obscure the whole thing. Unlike the crew, who would probably be much happier completely out of sight.

In this close-up, you can see some of the MDF dirt nestling in the nooks and crannies of the gun. I could wash it out, but when you're not looking at it from 10cm away it actually adds to the weathering of the gun, so I'll probably leave it.

And here's one of the guns, complete with some extemporized crew.

These are just some figures I already had painted and based, but as you see, any old figures blend quite well into the sabot base, and are held there reasonably firmly by the magnets.

Once all the glue is dry, I'll give it a couple of squirts with matte varnish, which will help all the various types of flock stay where they are. And then the base will be done.

Part One
Part Two

PaK36 sabot bases — WiP Part 2: The Dirt

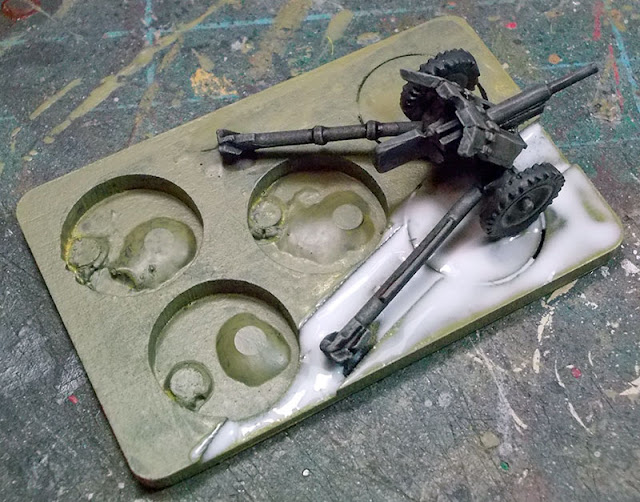
Now the guns and bases are painted. The bases aren't painted very smoothly except around the edges; they don't have to be, all of the top surfaces will eventually be covered with various textural materials.

I also haven't bothered smoothing out the hard channels in the surface of the bases, as those same textural materials will soften the hard edges quite successfully without going to all the extra work.

I use a slightly dilute mix of PVA glue (4 parts glue to 1 part water) to fix the first layer of texture. The dilution allows it to spread more easily, and it also slightly increases the glue's working time.

I've got into the habit of texturing the bases in several stages, because in summer the glue goes off quite quickly, and I want it to still be very liquid when the textural material goes on so that it will soak through it. It's late autumn here in New Zealand at the moment, so that's not really necessary, but habits are hard to break.

I'm careful not to allow any of the glue over the lips of the crew cavities; the washers they're based on are already quite a close fit, so there's no room to spare.

On goes the first part of the first layer.

This will be the "dirt", over which will go other materials to represent turf and other foliage. It's not actual dirt; it's actually MDF sawdust that I've coloured with acrylic paint and re-ground to a powder, with some ground-up model railway ballast added for stones.

There's no particular reason I can think of not to use actual dirt for this stage, as long as it's perfectly dry and ground suitably fine. The MDF just guarantees a consistent colour across a whole lot of bases.

Here's the first "dirt" layer complete on all the bases — the two guns, and an extra for a command group, if required.

Something I didn't expect is that the MDF "dirt" appears to be magnetic. I don't know why, maybe it's the ferric oxide in the pigment I used to colour it? It's not important in any case. Once the glue has dried, it will brush and blow away quite easily.

Part One
Part Three