Friday 17 April 2015

Tabletop Dungeon Mapping Modules

 I've been experimenting with using flat printed images on blocks of MDF for 3d (or 2½d) dungeon mapping pieces. Proper painted 3d resin pieces are very nice, but they also cost an arm and a leg.

These ones are my first "secret door" image, printed on self-adhesive label paper, and stuck to 12mm MDF. I might possibly go to 18mm for added stability, but I'll see how these go in play first.

The black edges are problematic. They'd be better covered with the stone pattern, but the edges of MDF aren't an ideal surface for sticking the label paper to unless it's sealed and sanded pretty smooth, which means more trouble than I really want to go to. Maybe as a partial fix I'll paint the sides of the blocks, where they're more likely to be exposed, in a roughly stone-like colour — it would still be a bit of a dislocation, but they wouldn't stand out quite as much when they're butted up against each other like this.

What I want to end up with is something like the Fat Dragon card dungeon bits, but with more weight and stability.

This is the image I've used for this particular module — I've got a bunch of other doors in the works at the moment, if these turn out OK.

I've saved it at 300dpi, but I don't know if Blogger's image uploader will preserve image resolution information. The physical dimensions of the image are 50 x 50 mm, so if it prints bigger than that, then you'll have to find some way to adjust it (such as embedding it in a word processor document, resized to the right dimensions.... though that sort of kludge makes me sad).

Later...

I later realised that I had a roll of 12mm double-sided tape, and since the MDF is fortuitously also 12mm, I could make my own block-pattern edge banding tape with relatively little travail.

Which I have now done.

As I suspected, it is a great improvement.


Later...

I tried out a single wrap-around image for a standard dungeon door, but I found that it made the location of the door sides centrally on the block on both sides difficult — impossible, in fact, without getting a lot more pernicketty about my measurements.

So instead I went back to separate individual images for each side, but this time with sufficient overhang to wrap around and cover about 60% of the width of the block. There is therefore a line up the sides where the two images don't tile seamlessly, but it's not at all noticeable unless you look for it, so I call that a win.


Here are JPG files for a couple of styles of door, to go on to 50 x 50 x 12 mm blocks:


Tuesday 14 April 2015

Sluggy the Slimy Slug-Monster (revisited)

Continuing with colouring in some old line drawings as a substitute for actual creativity, this is one I did a couple of years ago to try out a new brush pen I'd just bought.

Monday 13 April 2015

Eyes, Mouths and Tentacles, a Winning Combination

I originally drew this in 2009 in a little A7 rice-paper notebook I made.

Now I've Photoshopped it all into glorious technicolour, because why the hell not.

Sunday 12 April 2015

Slicey Leggy Scuttly Buggy Critter

Now here's a little something that I happened upon when I was looking through some old drawings. I must have done this about 1983 or '84 I think, and I'm pretty sure it was heavily inspired by creatures from The Dark Crystal.

I can't think why I didn't finish it off, since it was so close to completion. Maybe I had to go somewhere or do something, and just never got back to it.

I don't know that I'm all that happy with the position of the unfinished claw.

Friday 10 April 2015

Big Wormy Maggoty Thing

I've made a start on Mashaaf, a gigantic maggot-like abomination that came with the Bones II Kickstarter.

It's a big lump of plastic, roughly 90 x 100 x 150 mm, and quite difficult to handle; I'm not really looking forward to trying to paint it. I can only imagine how difficult it would be to manage something like this in pewter.

It needs quite a bit of filling between the sections, but no more than would normally be expected with a miniature of this size. I haven't (yet) filled around its arm-sockets; that may not be necessary (I hope).

It's supposed to have a sort of panel-mandible on either side of its maw, but I was sent two of the same side and so one of them doesn't fit the moulded socket. I've filled both sockets, and I'll decide later on whether or not I want to try to mount the panels with pins. I may just leave them off entirely.

Also, there are a couple of smaller sockets moulded at the sides of the tentacly mouth section; I have no idea what they're supposed to be for and I certainly didn't get anything in the package that could go there. I've filled those sockets as well.


Next Day...

I decided I would add the mouth side-flaps after all.

I pinned them with dressmakers' pins and superglued them in place, and then reinforced the join with Green Stuff textured to look (hopefully) like wrinkled skin.

Now, on to the painting.


Priming. I use Vallejo polyurethane Surface Primers almost exclusively these days; they're the best and most trouble-free airbrushing primers I've found. And they're tough too; once properly cured, I've never before had issues with paint rubbing off with handling, and that will be important for a miniature this size.

I've done an initial coat in a mid-toned khaki, then a downward "zenith" coat of white to hit only the upper surfaces. I find this brings out the form of the miniature, and helps me to see detail that might be harder to discern with a single, uniform colour.

I'll leave it now to harden for 24 hours before handling the model any more.

Coupla Days Later...

I want the thing to have an unpleasant, pallid, fleshy appearance, so I over-sprayed the primer with Vallejo VMC Basic Skintone.

The rocks embedded in the back of it were washed with a mix of sepia and black inks, diluted with water and Klear.

The mouth, tentacles, and anal sphincter-claws I washed with a mix of artists' watercolours, a sanguine base with som crimson lake and Van Dyke brown, along with some Vallejo dilluant to make it water-resistant when dry.

I used the same wash to start the shading of the flesh of the beast — I don't want to go too dark here, just enough to pick out the form and details.

It's a decent start I think, but there's a lot more work to be done.

A Bit Later On...


I've made a start on the multitude of eyes (at least, I assume they're eyes), using a simple three- or four-colour "jewel" technique, which no doubt everyone has seen a million times elsewhere.

I don't have the steadiness of hand or sharpness of eye any more to do it with much precision, but I think they're looking pretty good as long as you don't look too closely.

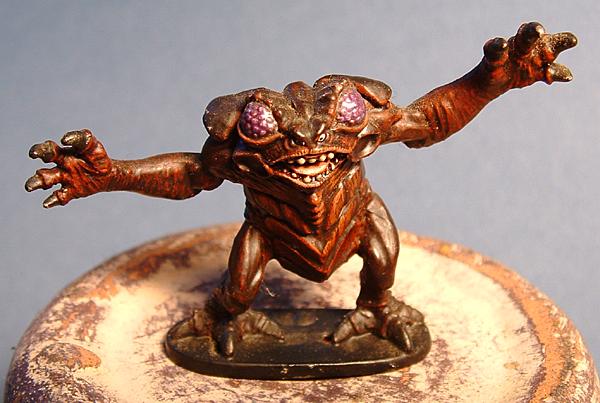
I'm starting to think ahead to the feet and slashers — I'm in two minds, whether to keep them pale and go for a bone effect, or to try for a chestnut-brown chitin. I'm leaning towards the chitin, if only because I think the colour and tone would be quite nice; I've done it before on an old model of an Umber Hulk, and I think it turned out quite well.

About ten days later...

I've definitely decided to go with chitin rather than bone for the legs and slasher-arms, and I've started glazing them with various Vallejo inks. Next step will be a bit of highlighting in paint, just to emphasize the contours of the things, and then a couple more glazes to tie the colours all in together.

I've also done some progressive glazing on the mouth-tentacles to darken them towards their ends, with the aim of making them look even more disgusting than they already are.

I had been considering doing the teeth in dark, chitin-like colours too, but I think I'll make them ivory after all, to provide a bit of contrast with the interior of the mouth.

Generally speaking, I'm reasonably pleased with the way things are progressing.

And later...

This is about as far as I want to go with the slasher-arms.

I've pulled out more of the contours with some dry-brushing, and another wash with Vallejo Sepia.

I gave the scuttly legs another wash as well, but I think I might pull the tone back a bit at the shoulders so that there's not such a firm delineation between the soft, maggoty body and the hard, chitinous legs.


There's some quite nice texture in the modelling of the slasher-arms that really wasn't perceptible before all the paint and stuff went on.

Thursday 9 April 2015

Bea

I've finally got around to painting the figure Annette is using for her current character in my D&D5e campaign. She's a two-sword-wielding leather girl, an ex-sergeant in the forces of the Little Sisters of Carnage — hence the red cloak.

Admittedly, at this very instant in the campaign, she, like pretty much everyone else, is pretty much nekkid and have lost nearly all their gear. However, I'm low on character figures that are mostly nekkid and have lost nearly all their gear, so this will continue doing the job until she eventually either gets more clothes and gear, or dies (permanently).

It's another Reaper Bones plastic figure; don't know the product code it's 77035: Deladrin, Female Assassin by Werner Klocke. For some reason my matte varnish refused to go properly matte on this figure, and I'm not really sure why. It was working last time I used it.

Wereshark... there shark

Here's another model from Reaper's Bones II Kickstarter.

I can't tell you what its product code is, because they haven't yet been added to the online store — the sooner that happens, the better, because right now finding any information on the Bones II models is an exercise in tedium, and sometimes futility.

Anyway, it's a wereshark, or possibly some kind of Moreau-esque shark-man.

The mottling of its upper body isn't quite as I would like it, but it will have to do.

As is my habit, I've mounted it on a great big steel washer to give it some heft and make it more stable. Now I shall have to figure out some way of using it in a game.

Sunday 5 April 2015

Demon (collage)

There's a little bit of painting in this image, but for the most part it's digital collage, overlaying elements from various photographic images to end up with this.

Saturday 4 April 2015

Mara

Brought to you via the magic of insomnia.
There's a creature in Alan Garner's book The Weirdstone of Brisengamen called the Mara.

This is inspired by it to a certain extent, though it's not quite how I imagined the creature from the book, which would have been a lot less human-looking.

Friday 3 April 2015

Swallow-Whole-er (thumbnail)

This thing would be a swallower-whole-er. It has a hugely expansible maw with little grippy fangs all the way back down its throat, to hold on to prey it's in the process of swallowing. Clearly the gullet and abdomen would also have to be able to expand to hold anything, say, human-sized, but I see no problem with that.

It's a creeper, an ambush predator, so probably not much chop in a stand-up fight. It's the sort of thing that would sneak up on stragglers in the dark and gobble them down without, hopefully, alerting anybody too dangerous.

It has a venomous sting on the end of its tail. I guess it would probably use that to silence and immobilize its prey before beginning the swallowing-whole. I imagine swallowing something as large as an adult human would leave it somewhat torpid and sluggish of movement, so it would probably want to drag such prey to a place of safety before eating them.