Tuesday 30 April 2019

My Printer Broke

The fan in my 3d printer's PSU has been getting noisier and noisier over the last months as its bearings gradually disintegrated. The day before yesterday the damage became too much for it to bear, and the fan just stopped, apart from making the occasional pathetic little scratching noise.

Yesterday I bought a replacement fan, which I thought was the same spec as the original, but of better quality. I had to cut off the plug from the old fan and solder the wires on to the new, as the new fan came entirely plugless.

The new fan was also bulkier than the old. I could get the PSU case closed with it in place, but only just.

I suspect that I created a short circuit in there when everything was crammed back together, because when I switched on, something went
POP!
and then everything stopped. My PSU is dead.

-----=====<O>=====-----

I've ordered a new PSU from China, but it will be up to a month before it gets here. So, I'm without a working 3d printer until then. And even then there is no guarantee, as I will have to transfer all the switch and plug cabling over to the new one, and since I am really very ignorant about electronic fiddlery there's a good chance that I'll bollocks it up again.

I guess I'll just have to get started on painting all the bits and pieces I've already printed instead of just steadily adding to the pile of raw plastic things.

Sunday 28 April 2019

Unstable

In the Chain of Command rules, buildings exist in essentially one of three states: undamaged, unstable, or ruinous. A building that is "unstable" is usable, but is likely to fall down at the end of a Turn, potentially killing everyone still left inside.

I have digital models for undamaged buildings and for complete ruins, but until now, nothing for the inbetween state.

I took the roof component from the Printable Scenery French Townhouse and remixed it in Blender to create the damage you see here. This roof piece is compatible with their French Shop House model as well, but not, unfortunately, the Farmhouse model.

In retrospect, it would have been better to use the roof from the Shop for this "Unstable" indicator, as that roof piece has tiles on all four sides, so it would look a bit less out of place when swapped between the two types of models. But never mind; if need be I can always do another one.

Thursday 25 April 2019

Rural Ruin

Here's another ruin, with a bit more of a rural aspect than the others I've been doing recently. It's assembled from pieces from the Printable Scenery Modular Ruins set, plus the little outhouse I designed the other day. And, of course, various sorts of rubble and what-not.

I don't know what it is about ruins that attracts me more than models of functional buildings.

Monday 22 April 2019

3d Printing Destruction

Twenty bucks for a table full of Stalingrad from Printable Scenery seems like a pretty good deal to me, though it's going to take a power of printing.

This is where having half a dozen printers would come in handy, but I suspect that if I bought another one I would get some justifiably reproachful looks from the other half of the household. Fortunately I'm saved from myself by not having enough money to buy another printer in any case.


I've been putting together some single-level ruins using their Modular Ruins set, emphasizing, I must admit, speed over beauty, but the Stalingrad Ruins files will allow me to get some multi-level ruins on the table to get my snipers up in.

Saturday 20 April 2019

Warp Speed

Warping on the corner of the first floor piece.
The other two pieces are fine.
I'm getting warping of some pieces from my 3d printer again, as I did when I first got it about this time last year.

There are a number of variables that could be the cause:
  1. Inconsistent heating across the bed
  2. Change to a new variety of PLA filament
  3. Seasonal drop in ambient temperature, and an air current across that bit of the bed
  4. Angry gremlins
It always seems to be in things printed on the front-right corner of the bed, so I suspect either or both of (a) or (c), but I'm not discounting (d).

Thursday 18 April 2019

CoC Dice Tray — in the flesh

I've got my record-keeping dice tray for Chain of Command printed now in PLA. It took about 24 hours all up, for the tray, pegs and morale dice.

On the left, and turning a corner to run across the top, is the Morale Track. In this instance, the force has 11 morale, one peg for each level of morale. Immediately below the last five morale pegs are recesses for dice indicating the effect of falling below that level of morale: loss of a Command Die (the 5-spot icon), loss of a Jump-Off Point (the letter J), or loss of a special Red Command Die (the red square).

Immediately below that is the rack for the command dice, designed to accommodate up to eight 12mm dice (though most forces will only need five). In this instance, there are five regular command dice and one special red die.

To the right of the Morale track is the Chain of Command track. Every time a five is rolled on a Command Die, a red peg is added to the CoC track. When six fives have been rolled, add a gold Chain of Command peg and remove all the red pegs from their holes — there is space for up to three CoC pegs, though it's unlikely that anyone would collect that many before using any.

To the right of the CoC track is a cavity to keep CoC pegs and any other spare bits and pieces in.

And at the bottom, of course, is the dice tray itself. I'll probably end up covering the bottom with felt or a thin sheet of closed-cell foam to cut down on the clatter.

All in all, I'm pretty happy with it.

The STLs for all the components are available for free download at https://www.thingiverse.com/thing:3567059

Tuesday 16 April 2019

Chain of Command Dice Tray and Record Keeper

I've thrown together a custom dice tray for CoC, for 3d printing, which incorporates record-keeping aids as well as the dice-rolling cavity.

There are pegs for keeping track of your Force Morale and Chain of Command dice, small 8mm dice to use with the last few spaces on the Morale Track to indicate the effect of falling to specific levels of morale, and a dedicated rack for the Orders Dice to keep them out of the way and make them less likely to be picked up and thrown with the other dice (designed to fit 12mm dice, because that's what I use).

You'd probably want to paint the pegs in different colours according to their function. For example, the pegs used to count up to a CoC die should really be easily distinguishable from the ones used to indicate the presence of a CoC die.

The little morale-effect dice would benefit from being painted too, to make them a bit clearer and easier to read. They have faces with icons to match the loss of a Command Die, the loss of a Jump-Off Point, and the loss of a Red Command Die. Two of the dice will fit in each of the recesses below the appropriate morale track peg holes.

I've provided enough pegs that you could fill up the Morale Track as far as your Force Morale value, and remove them as you lose morale, or else you could just use one and move it down the track. Whichever works best for you.

The STLs are at https://www.thingiverse.com/thing:3567059

I haven't printed it yet; my printer is busy printing trench sections, so I'll have to wait until tomorrow.

Monday 15 April 2019

A Party of Special Magnificence

This is my post number 1,111. I am eleventy-eleventy-one today.

It's an arbitrary and meaningless milestone, I know. But what the hell. The universe is arbitrary and meaningless, so why can't I be?

Note: There will NOT be any parties of special magnificence to commemorate this event.

Monday 8 April 2019

Printable Scenery (Again)

It's easier, when playing the skirmish-level Chain of Command, or even company-level Battlegroup,  to have building models that you can actually put troops inside. It's not absolutely necessary, but it does cut down on note-taking, or reliance on increasingly fallible memory, if you can see at a glance which troops are where. Up until now I've been using my card buildings, and though they're fine as markers, they don't have accessible interiors.

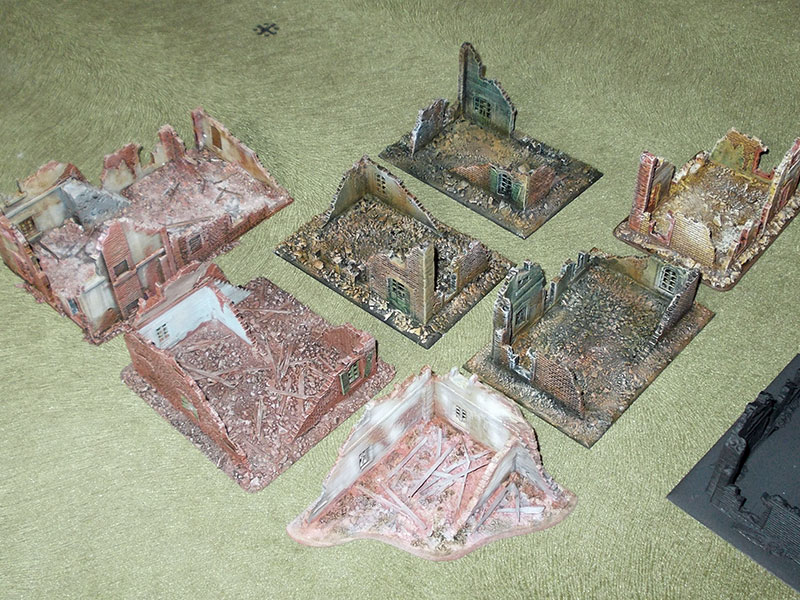
With that in mind, I bought some more models from Printable Scenery, to go along with the modular ruins I bought from them and printed a while ago. The models are sized for use with 28mm figures, but I've scaled them down to 60% for use in 15mm games. They could probably go down to 50%, but this size suits me well enough.

This particular one is the French Town House from their WWII range, and it costs about ten yankeebucks.

Even scaled down, and printed at quite low resolution (0.24mm layers), there's a fair amount of printing involved. These three pieces ended up taking about twenty hours, all up.

They're well designed for wargames use. Each floor is separate, and they sit together quite securely with peg-&-socket joints at the corners. There are no internal walls, so it's easy to access figures placed inside, but there is a little decoration applied on the floor and around the walls so that they don't just look like blank boxes inside.

This, and others in the range, are also available as bombed-out ruined versions.

All in all, I'd say they're pretty good value for money. I've seen much worse resin models going for a lot more money, and though twenty hours is a long time to print, it's still a considerably shorter time than I'd have to wait for a model to arrive through the post.

Highly recommended.

Later....

Front

Rear
Here's the first one, with a very, very quick paint-job.

I haven't painted any of the insides (except for a primer coat) and probably won't, since the innards aren't really very important except as troop containers.

Next Day


This is the next one, the Shop, also about ten dollars.

I had slightly less success with the printing of this model, probably because I did all three pieces in one hit, pretty much entirely covering the build plate, rather than doing them one at a time in the safe centre portion. I notice some slight lifting on a couple of corners on the second storey piece, and I got a bit of breakage of delicate details like window bars, banister and stair-well rail spindles. However, none of that really matters a great deal; I can just call it battle damage.

The brickwork and interior detailing would really benefit from being printed at a higher resolution, say 0.12–0.16mm, but of course that would about double the print time, which is already about 20 hours at 0.24mm. If I had a second printer, I'd probably do that, but I find it very frustrating to want to be able to print something, knowing that the printer is going to be tied up for another day at least.


There's at least one more piece that I want to get and print — well, two really, since the farm house in this image is a separate purchase. That's the French Farm set. That's about $22 all up, ten for the farmhouse and twelve for the walls and outbuildings. It looks to me like it would make an excellent centrepiece to a wargames table.

Aaaaaaaaand.......

Here it is. Took a lot of printing, and now it needs a coat of paint. At the moment it's all just free-floating (the wall sections are clipped together) but I think I'll probably put it all on a permanent base, along with some scenic rustic farm stuff. I can, after all, print more pieces if I need them separately.


Friday 5 April 2019

I'm not saying it's Traveller..... but it's Traveller

I found this being referred to online as a decent Traveller clone, and thought I'd check it out.

It's available as a PDF and/or softcover book from DriveThruRPG at https://www.drivethrurpg.com/product/237247/Cepheus-Engine-RPG — as of writing it's about seven bucks for the PDF, and thirteen for the hard copy/PDF bundle. And it seems to be fairly well supported with other volumes on planetary systems, vehicles, and so forth, which is all to the good.

Dried out, but still slightly mangled.
Thanks so much, NZ Post.
I liked what I saw of it enough to spring for the extra six whole dollars for the book, and it arrived the other day. Late. Having been dropped in a puddle.

Thanks, NZ Post.

And yep, it's Traveller all right, which suits me just fine.

It's been many, many years since I've played Traveller. We dabbled briefly in T20 when it first appeared, but I didn't like it much — it seemed to me to be a bit too much like D&D with blasters, which is fine as far as it goes, but not what we were looking for. I ran some Travellerish games using the Hero System ages ago, and they were pretty satisfying, but I became weary of the amount of accounting required to keep a Hero campaign running.

http://mojobob.com/…/terr…/campaign_notes/campaignindex.html
http://mojobob.com/rolep…/hero/sci-fi/gaeanreach/sci-fi.html

Anyway, the culmination of my long-running AD&D campaign is in sight at last, and I thought I'd switch gears and try a Traveller game, probably fairly Firefly-ish because I loved that show and the characters in it.

So, now I have a copy of The Traveller Book, and my waterlogged copy of the Cepheus Engine (thanks again, NZ Post!) which has dried out a bit in the hot water cupboard and been ironed dry and flattish. How practical would it be to run a campaign using both at the table? Probably better to stick to just CE. My beloved players are more likely to spring for a $13 copy of Cepheus Engine than forty yankeebucks on their own copies of the Traveller Book.

Let me just consult my House Rules....

Now, I know I wrote down an amendment to that rule somewhere.....

I find it impossible not to tinker with roleplaying or wargaming rules.

I'm beginning to think my players might be losing patience with this trait of mine. The rolling eyes, the heaving of sighs, these are all subtle signs and hints.

Too bad.

Thursday 4 April 2019

Modular Monster Model

I'm not completely sure where this model came from. It's called Ambush Maw, and I've had it sitting on my hard drive for a while now.

It could be quite a flexible miniature for tabletop use, as it could be used all together, as shown here, or the central mouth-thing could be used alone, or each of the graboid tentacles could be used as separate creatures. The tentacle-things are about 100mm tall.

I also printed eight of the graboids at 50% size, just because I thought they might come in handy. At that size they're closer to the scale of a character figure (a little taller) and might be usable as some kind of underground eel thingy. Maybe they could be bulette larvae?

Everything has been printed at quite low resolution (0.24mm layers) in grey eSun PLA+ filament. I could have printed it smoother at 0.1mm or 0.08mm, but it would have taken a couple of days, and I don't really see the point for something that is only ever going to be a tabletop toy.

Wednesday 3 April 2019

Goblin Doodle — WiP

I started doodling idly away at a subdivided cube in Blender, and pretty much before I knew it I'd ended up with this little goblin's head and torso.

Now I think I need to take a step back and have a thought for what I actually want him to end up as, and what I want to do with him, because up until this point I've just been sculpting fairly mindlessly.

I'm not even really sure exactly how big he is, at this point.