Saturday 30 April 2016

Shapeways High-Definition Acrylate — a great disappointment

I've just received my first couple of models from Shapeways in the High-Definition Acrylate they've been trialling. There should have been three, but they busted one in the course of post-printing clean-up, and rather than re-printing it they just cancelled it.

Long story short: I am not very impressed. As far as I can see, it offers no benefit over FUD.

It has been touted as being much tougher than FUD resin, but so far it seems to me to be almost equally as brittle and fragile, while at the same time being little cheaper — in fact, for multi-part models, it ends up quite a bit more expensive as they don't allow spruing.

The Austin-Kegresse model broke off the end of one of its 'horns', presumably in transit, but possibly during packing.

The need for support structures during printing means that under-surfaces end up badly pock-marked.

The print-lines are more clearly visible than in any of the FUD models I've received, and there's perceptible distortion in several areas on both models.

Very visible print lines, and distortions where the model seems to have been shifted on the print-bed during printing.


Very visible pock-marking left behind by support structures.

More pock-marking — from what, I don't know — and pronounced definition of printing layers on the mud-guards.

Print line galore, and a broken-off roller. So much for the supposed 'toughness' of this material.

What that white smear is on the hull rear I don't know.


Thursday 28 April 2016

Plague Rat

Back to monster-painting, after a fairly long break.

This is one of the two nasty boil-ridden critters from the Reaper Bones 77198: Barrow Rats pack. They're pretty big rats; beside a regular human-sized figure they'd be about the size of a pony.

Wednesday 27 April 2016

Vickers Light

1/100 scale Vickers Light Tank Mk.I
Here's my 3d-printed Vickers Light Tank Mk.I, printed by Shapeways in BSF nylon, painted up.

The SF nylon printings are fairly crude, but adequate for gaming pieces. The model lost most of its rivet detail in the printing though, so I had to paint them on. It's not that the material is incapable of reproducing small details — some of the rivets were reproduced (those on the hull front, for example, and an occasional one here and there elsewhere) but it seems to be heavily dependent on the orientation of the model when it's printed.

Monday 25 April 2016

HMSLS "Improbable", finished (probably)

Front quarter

Rear quarter

Side view

From above
Her Majesty's Steam Land-Ship Improbable is ready now to go steaming across the veldt.

Except that now that I look, I suddenly realise that I completely forgot the funnel.

Bugger.

So, not quite finished. But nearly!

A bit later....

I added the funnels and replaced the pictures, so now I'm done.

I added a full crew of 15mm mannequins. There's plenty of room for them, and it looks to me like it would probably work quite happily with 20mm or possibly even 25mm figures (though they would certainly have to crouch a bit down at the stokers' positions). 28mm figures would certainly be much too large though.


Saturday 23 April 2016

Benz-Mgebrov (3d-printed 15mm)

This is my 1/100 scale (15mm) Benz-Mgebrov armoured car, 3d-printed in WSF nylon.

The printing artifacts are very prominent on this model, and it's taken a lot of painting to pull out the detail that was lost amongst all the clutter. There's still detail there, but it's difficult to find until it's been carefully extracted from the background noise of the WSF printing.

I really should hollow the model out to make it more affordable in FUD resin, because it would look so very much better printed in that. At the moment, it's just over thirty bucks (plus postage), three times the cost in WSF, which is far, far too expensive.


Later...

I've hollowed out as much as I can hollow, and it's dropped the FUD printing cost down to $20. That's still expensive for a wargaming model, but it's not have-to-sell-a-kidney expensive, and it's positively cheap compared with GW's pricing.

Friday 22 April 2016

How To Draw A Hexagon


It's very, very easy. You will need a compass, a pen and/or pencil, and a ruler to make measurements and draw straight lines.

  1. With the compass, draw a circle with the same radius as you want the length of the sides.
  2. With the ruler, draw a line exactly bisecting the circle by going through the hole the compass made in the centre.
  3. Draw two more circles with the compass, this time centring it at the points where the line bisects the circle.
  4. With the ruler, connect the points where the three circles overlap.

And that's it. You have a perfect hexagon drawn to precise measurements.

If you need to draw a hexagon with measurements from side to side, you will need these ratios:


The circle will need to be 1.154 x the desired width of the hexagon, which means that the hexagon will be 0.86 x the diameter of the circle.

There you go. Easy-peasy.

Monday 18 April 2016

Her Majesty's Steam-Landship "Improbable"

I have begun work on an imaginary VSF (that's Victorian Science Fiction) steam-powered land-ship in 15mm scale.

So far, I've only completed the front wheel assembly, and the front gunner's position with its Gatling gun.

I haven't done any preparatory drawings for this thing, and I'm just making it up as I go along, which is proving to be both easier and harder than working from plans. Easier, because I don't have to worry too much about dimensions, except to cater to 3d-printing limitations, and harder, because I have only the vaguest idea of how it will end up looking, so I have to sort out how all the parts inter-relate as I go along.

Later...

Getting more bits on it
Progress is being made. I have the beginnings of a boiler, and a lateral Gatling position, but I still need a bridge and stoker's platform. Also, everything is just floating in the air at the moment, so I shall have to build some nice wrought-iron buttressing and what-have-you.

I suspect this thing is going to cost an arm and a leg to print.

Later still...

And more. Still a lot to do.
We have a pilot-house, and the side-sponsons are complete except for their support structures.

I think the pilot-house is going to need a lot of gauges and pipes — just have to leave enough room in there for the actual pilot, and probably a co-pilot as well.

I just realized that I have no idea just how the crew are supposed to get to their positions.....

And yet later....

Progress has been slow, but I think I now know more or less what's going to be going on down the back.

Drive wheels and belts added, and some other bits.
I've added the drive-belt and its flywheel, and next up will be the stoker's station and coal bins, and the rear gunner's cupola.

I'm not quite sure yet how I'm going to attach the flywheel — I've got to allow for the pistons that would actually turn the thing.

Thursday 14 April 2016

Fiat 2000

This is my 3d-printed Fiat 2000 (in WSF nylon).

The colour scheme is entirely speculative, but is characteristic of schemes in common use when the Fiat was designed.
From every angle

Sunday 10 April 2016

WSF vs FUD

This is a direct comparison between Shapeways WSF (White Strong & Flexible) and FUD (Frosted Ultra Detail) materials. This is what you get when you pay for the premium stuff vs. the cheaper stuff.

They're not exactly the same model, but both are based on pretty much the same chassis, and both use the same sizing parameters for things like rivets and what-not. You can see that in the WSF, the rivets have pretty much disappeared.

You can pull out a bit more detail in the WSF by judicious painting, and it does look fine at tabletop distances, but the FUD is clearly superior. Where the FUD might fall down as a material for gaming pieces is that it's quite brittle — you can see a spot on the starboard track-guard where I knocked off a headlight when I was cleaning off the waxy shit that it comes covered in. The WSF is, on the other hand, practically indestructible.

Shapeways are trialling a much tougher acrylate high-resolution material; I've ordered some things in it, and I shall be interested to see how they stack up.

Thursday 7 April 2016

Bob Semple Tank

In 1941, with the possibility of a Japanese invasion considered very likely, New Zealand had no tanks, and no heavy industry capable of designing and building a proper tank from the ground up. Great Britain had problems of its own, and it was apparent that the Mother Country wouldn't be diverting any of its scarce supplies of armour to little old Kiwiland any time soon.

Bob Semple, at that time the Minister of Works, ordered this thing created, based on a D-9 tractor. It was top-heavy, very slow, under-armed and under-armoured, and if it had actually seen combat it's unlikely that it would have lasted more than a few minutes. Nevertheless, it was quite successful as a morale-building parade piece to keep up the spirits of the civilian population.

By 1944, the army had plentiful supplies of British and American tanks, and the "Bob Semple" was more of an embarrassment than anything else. They were disassembled and turned back into tractors, that being deemed their most useful possible contribution to the war effort.

I've long thought it a crying shame that there was no 15mm scale model of the Bob Semple tank to make its brave (but slow) way on to the wargames table. Now there is.

It's available from my Shapeways shop, starting at nineteen bucks for WSF.

Wednesday 6 April 2016

Latest from Shapeways

I just got a few more models from Shapeways, and I've taken some photographs of them, and processed those photos in the most unflattering way possible to bring out as much detail as possible.

Frankly, it's not really fair to be looking at them like this, because in real life the models are very small and many of the faults aren't really visible. However, it's good to know exactly what you can expect from 3d printing.


First up, the 1/100 scale Fiat 2000 in WSF nylon. This is the first WSF model I've done on which all of the rivets have printed visibly. I thought that I had gone overboard  by using 0.8 mm diameter icospheres; in the renders they looked like footballs glued to the hull of the beast, but in the flesh they actually look pretty good; though actually grossly over-scale, they don't look horribly over-scale. 0.7 - 0.8 mm seems to be the sweet spot for SF nylon printing.

That means that it's not really possible to replicate the exact rivet patterns on specific vehicles; they'd be far too crowded. I just have to apply rivets in such a way that it gives the right impression of how they were laid out.


This is the Benz-Mgebrov armoured car, again in WSF nylon. From memory, I think these rivets used 0.5 or 0.6 mm icospheres, and though some are clearly visible, others in problematic printing areas are quite indistinct. Also, the limitations of the material means that the sharp edges between the various angled plates have been softened quite substantially.

I haven't hollowed this model (yet), so I haven't offered it in FUD resin — it would just be too expensive. If there's a request for it I'll do it, but not until then; I'd rather be making new models than revisiting old ones.


Lastly, the Vickers Light Tank Mk.III, this time in FUD resin. The rivets on this model are 0.5mm diameter, and they've all printed clearly, plate edges are clear and sharp, and surface detail is all nicely visible (though terrible to photograph, being translucent).

The FUD resin is much, much more expensive than WSF, but if you want a sharp, clean finish, it's clearly much, much superior. Shapeways charges by material volume for FUD, so hollowing out anything that can conceivably be hollow is imperative to keep costs down

Monday 4 April 2016

Lancia

Lancia armoured truck, c.1921

Front-ish
 I painted up my 3d-printed Lancia, and in the process, thought "that's a really tiny truck". Not just the model, the actual vehicle the model is based on.

My suspicions aroused, I went back and checked my measurements, and it is indeed smaller than it should be — it's about 1/116 scale, not 1/100. Bugger!

Well, it was an easy error to fix, and I've re-scaled the models now so they're actually the right size.

I feel like it should have some stirring revolutionary slogans painted on the side though.
Rear-ish

Top-ish

Guns! Guns! Guns!

I've put together a sprue of six Lewis guns in 1/100 scale, with pole mounts, for use in arming vehicles like the Lancia armoured truck or fortified positions or whatever. They're designed for 15mm figures.

I've only made them available in FUD/FED resin, because in WSF/BSF they'd just be shapeless blobs.

They're at my Shapeways shop at http://shpws.me/M1zg

Sunday 3 April 2016

Behemoth


Here's my 3d-printed Land Dreadnought painted up and ready to roll. It's nominally in 6mm scale, but it's big enough to make an appearance in 15mm games too — the model is about 65mm long.

It's been printed in BSF sintered nylon, of which I am not particularly enamoured, and has had a couple of coats of acrylic gesso (among other things) in an attempt to subdue its very pronounced surface texture.

From Facebook, copied here so I can find it again:
In 1/300 scale, that howitzer would be something on the order of a 500-600mm gun, and the thing would have a turning circle of about half a kilometre. 
I'm thinking that it could form the basis of an objective game: one side is defending a city, the other is attacking it with this monster (and other much tinier ground forces). 
The game starts with the defenders in control of the high ground, so the attackers have no direct observation of fall of shot into the city. The side with the Behemoth win if they manage to take out a specific city block; the other side win if they can capture or destroy the Behemoth. The Behemoth fires blind once every turn (couple of turns?), so I guess it's possible they could get a win by sheer luck. For the sake of balance, there should be some equally unlikely way the defenders could luck into a win — the terrain for the battle is underlain by layers of limestone, gypsum and anhydrites, and so there is a non-zero chance each time it fires of the Behemoth being swallowed by a gigantic sinkhole. 
The attackers have to get the high ground to be able to direct fire accurately AND defend the Behemoth, the defenders have to keep the high ground AND attack the Behemoth.


Saturday 2 April 2016

BSF Prep (Part 2)

Continuing with my experiments with Shapeways' Black Strong & Flexible (BSF) plastic after waterblasting all the extra crap away, now it's time to try out various surface treatments to see if I can ameliorate the crumbly, sponge-like surface. I assume that all this will also apply to white (WSF). Hopefully you can see the difference in the various treatments in the photographs.

I finished off by over-spraying everything in a pale grey primer, so that the differing colours wouldn't distract from the important thing, the surface texture.


First, I gave the Behemoth an all-over sealer coat of a Vallejo Surface Primer, brushed on. The porous surface really sucks up the paint, and the surface primer does little to fill the pores.

Over that, I tried various treatments:
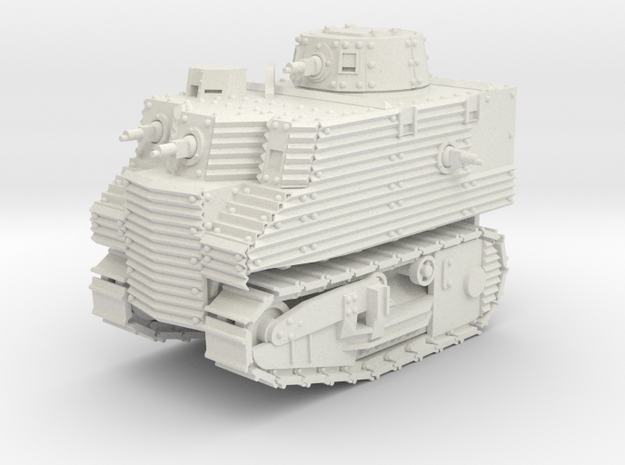
Super-Glue Gel

This was terrible. You can see on top of the little sub-turret how it went all crufty and crinkled. I won't bother with that again.

  • Addendum: I actually found that once the superglue had cured completely, it could then be scraped and sanded back to a very fine surface. So, not as useless as I had thought, though it would be a lot of work, so unless you value your time at only a shiny penny per hour, it's probably better just to get the thing printed in a higher-resolution material.

Gesso

I used a cheap black "craft" acrylic gesso by a company called FAS. Pretty much any acrylic gesso should give you similar results, but steer clear of anything with "impasto" on the label — those are designed to leave a brushed texture behind.

I applied it in one and two coats. It filled the surface pores well. It doesn't get rid of the surface texture completely, but I've had cast resin models that were as bad or worse than this.

It shrinks considerably on drying, so is unlikely to kill most detail, but you'd need to be a bit careful around anything you really want to preserve. This particular model isn't riveted (like most of the stuff I've done), so it's relatively easy to work with.

On the underside, I tried another couple of things:

PVA (Elmers Glue)

I just brushed the PVA on undiluted, and it smoothed out the surface pores very effectively. However, the resulting surface is a bit more woogly than a couple of coats of gesso.

Klear (Future) Floor Polish

This is a very thin self-levelling acrylic floor polish that I've mainly used for making Magic Wash. It has very little effect on the surface at all, probably because of its very low viscosity.

Conclusions

None of the treatments fixed the issue completely. There seems to be no easy way to get a surface anywhere near as smooth as the much more expensive stereolithography resins in this (relatively) cheap WSF/BSF sintered nylon.

However, of them all, two undiluted coats of gesso appears to be the most successful, and that's what I'll persist with until the price of high-resolution 3d printing comes down to a manageable level.

Beaverbug painted

 I've painted up my 3d-printed 15mm Beaverette Beaverbug.

I'm not sure that I'm a huge fan of Shapeways' BSF plastic; it seems, if anything, even fluffier than the white. That may be my imagination, but I dunno...
And again, from behind
Anyway, here it is along with a few Battlefront Mediterranean Brits to keep it company and show just how tiny it is.

I need to do a bit more research on what, if any, markings it should have*. It was an RAF vehicle, so it might need some roundels painted on.

I did a 1/56 scale version as well, for 28mm gaming. That has more detailing in the guns, and they and the turret are separate pieces for a bit more flexibility in display — the turret could, if left unglued, be revolved.

* Well, that was easy — Wikipedia came to the rescue with very little effort on my part. The "Mickey Mouse ears" camouflage is from later in the war than my period, but the markings should be roughly similar.

Garford-Putilov (15mm)

I've just designed this clunker in 1:100 scale for 3d-printing, the Garford-Putilov armoured truck of 1914 (maybe 1916?), based on the American Garford truck.

It wasn't an elegant machine by any means, and it was grossly top-heavy and under-powered but I rather like the weird look of the thing. It would work for the Back-of-Beyond and Interwar crowds as well, since it was used after WW1 in the Russian Civil War, and by the Freikorps. It could even be used in a WWII game, since apparently the Germans encountered a few of them around Leningrad, though they didn't last long.

The turret is attached to the body of the vehicle by sprues that will need to be cut away. I've experimented for the first time with a lug-and-socket arrangement on the turret plug so that it will remain in place regardless of the attitude of the main body of the model.

It's available from my Shapeways shop at http://shpws.me/M19z, starting at $13.50 in WSF plastic.