Saturday, 23 November 2013

New Washes For Old

I use washes a lot when I'm painting figures. I use various experimental recipes of my own devising, but I also use commercially available washes a good deal — they have the virtue of predictability, which my own concoctions sometimes do not.

The wash I've used and liked the most is the old Citadel Devlan Mud. It's no longer available, having gone out of production a couple of years ago, so I'm having to find an acceptable replacement.

I've airbrush-primed this figure with Vallejo's polyurethane acrylic surface primer white, and then washed it in sections with three commercially available washes:

  • On the figure's left (front and back), the old Citadel Devlan Mud.
  • On the right-front, the new Citadel equivalent, Agrax Earthshade.
  • On the right-back, the nearest Vallejo equivalent I could find, their Umber Shade.

All of the washes were applied undiluted, straight from the pot (or bottle).

Visually, there's not a hell of a lot to choose between them. They all dried to a good matte finish.

  • Agrax Earthshade is the lightest, and it pools the least in open areas. Judging by the smell, it has an alcohol component. It's very similar in hue to Devlan Mud, and I quite like its lighter, looser fluidity.
  • Vallejo Umber Shade is a little bit thicker, and it pools a lot more on flat, open areas. It's a touch warmer in tone, but still pretty close in colour.

Of the two, I think I prefer the Citadel wash, but the Vallejo offering is certainly quite usable and I don't feel that it's money wasted.

Monday, 18 November 2013

Terrain: Roads

A couple of years ago I bought some resin terrain pieces at the annual CWS bring & buy. These were actually being sold as river pieces, but the "water" surface is actually quite lumpy and gritty, so I thought I'd finish them as dirt roads instead. The pack was $10.00, so about a buck per piece.

They're OK, as far as they go, but I think in future I'll just make roads out of pieces of paintable silicon caulk-impregnated fabric, which is both much cheaper and more flexible, and lies flatter on the table.

Friday, 15 November 2013

Laser-cut Casualty Markers

Continuing in my forays into the wild world of laser-cutting, I've designed these casualty markers designed for use with games like Hail Caesar, Pike & Shotte, Black Powder and so forth.

The idea is that they're used with standard 12mm six-sided dice to indicate the number of casualties a unit has taken thus far.

I've created them in two parts, as you can see at bottom-right: the base, pierced with a hole for the die, and a little collar. The bottom of the base would have some thin card glued to it, so that the die wouldn't just fall through if the base is picked up and moved.

What I haven't quite decided on just yet is precisely how I'm going to assemble them. I have two options in mind:

  1. As you can see in the example to the left of this unit of Peasant Rabble, the collar is used to deepen the recess for the die. This has the advantage that it makes it less likely that the die will fall out when the marker is being pushed around the table. Also, it means that there's room to create a little casualty mini-diorama on the other half of the base, which can look quite good on the table and makes the marker feel more like part of the battle scene.
  2. In the example to the right, the collar is mounted to one side of the hole pierced through the base, creating two shallow sockets instead of just one deep one. This has the advantage that two dice of different colours can be used, which can be useful for the morale mechanic used in the games I referred to earlier — in which the number of "casualties" can vary within a turn, with only casualties in excess of a unit's "shaken" morale value counting against them in a break test, after which those excess casualties go away. There's an added advantage that the marker can accommodate units with a higher morale value than 6 (though I could also do that with a d8 or d10, or even a d12).

I have a bunch of them cut already, so perhaps I'll just do some of each and see how they go.

It's dark in the dungeon...


Wednesday, 13 November 2013

Babau

I doodled away at this while I was watching some entirely unrelated TV show (Agents of SHIELD, as it happens).

It's a critter from the 1983 AD&D Monster Manual II, a minor demon called a Babau.

The thing is, I still think of anything out of the Monster Manual II as being a new-fangled, possibly suspect, creation that may or may not be worthy of inclusion in the hallowed precincts of D&D. I guess that's because the book didn't appear until I'd already been playing AD&D for a few years, and I didn't even see a copy until the very late '80s. By the time I saw it, TSR was in its death-throes and was putting out a hell of a lot of pot-boiler garbage.

I didn't finish its right hand; I got bored with drawing and stopped. I might finish it off some day, but I wouldn't count on it. It will certainly never get any taller, because I ran out of leg-room on the page.

Monday, 11 November 2013

New Old Character Sheet Design


I just found an old AD&D character sheet that I designed years and years ago. It was intended to be printed double-sided, laid out on A3 to be folded down to 4 A4 pages, the theory being that it would act not only as a character sheet, but also as a folder to hold all of the gajillions of scraps of paper players seem to inevitably end up with. It was designed when we were playing an AD&D 1e/2e hybrid, so it's not quite either 1e nor 2e.

It was originally drawn out in technical pen and photocopied, but I just spent a couple of hours converting it to a vector format in CorelDraw so that the resulting PDF file-size isn't too huge. If you use Acrobat's "booklet printing" feature, it will print in the intended foldable format, or you can just print it as separate pages. I've tried printing it on A4 paper (and thus ending up with an A5 booklet), and though small, it's still quite usable.

You can download it here if you want to take a closer look. It's about 163 KB.

Edit: This links to a more readable A5 version if you want to print it as an A5 booklet. All of the text has been reformatted to Helvetica — much easier to see.

Sunday, 10 November 2013

Sir Fnord the Pretty Darned Nifty

This is the figure I use to represent one of my oldest and most-played characters, Sir Fnord. It's a Grenadier figure I believe, or maybe Citadel — they were the two manufacturers I patronized most regularly back in the day. It was painted some years ago (maybe ten years? I'm not entirely sure) and since then some changes have made themselves manifest.

For a start, the static grass around his feet used to be green. Now it's a dead, arid tan, and the PVA it's stuck to is lifting away from the plastic base.

Also, his shield: I printed the blazon on my Epson inkjet printer on to photo paper, and then laminated the shield out of three sheets stuck together around a bottle (to get the curve) and then trimmed to heater-shield shape. The fleur-de-lis used to be black highlighted in blue; now those highlights have turned green as the cyan ink fades away. Eventually the highlight will be yellow.

Close-up photography is terribly unforgiving of paint jobs, which makes me all the more impressed at some of the work I see on sites like Cool Mini Or Not.

Tuesday, 5 November 2013

Laser Cutting


I've just recently been given access to a laser cutter, and the opportunity to try my hand at designing some stuff for production on it.

I did this little MDF cabin, with a lift-off roof, and some sabot bases for converting my skirmish-based 15mm infantry to use in Flames of War (should that ever be necessary). I just glue some magnetic sheet underneath and trim it flush with the MDF sabots, and Bob's your uncle — the washer-based infantry stay in there quite securely. I'm tempted to do the same for my medieval figures as well, so that I can easily transpose between Hail Caesar and DBA/DBM/HOTT/FoG.

At the moment it's all very simple stuff — proof of concept really, rather than a serious attempt. However, I'm learning already how to achieve what I'm aiming at, and now I'm ready to try my hand at something a bit more ambitious.

I'd like to have a laser cutter of my very own, but even though the price has come down drastically for small desktop models, they're still well out of my reach. Maybe one day.

Monday, 4 November 2013

Is that...? No! Yes? Maybe....

I'm beginning to feel those vague stirrings that indicate that maybe starting GMing again might not be entirely out of the question.

Then again, it might just be wind.

Friday, 1 November 2013

Kea-Griffon: Finished at last

Finished, at long last.
Not much different, visually, from the last WIP I posted, but now the wings have been faired in (badly) with the body.

Wednesday, 30 October 2013

Dungeon Dressing

I very seldom use dungeon dressing props like these, even less frequently than I use character or monster figures, which isn't very often at all. Nevertheless, I've got them, so I thought I'd paint them: not least because I felt like doing a bit of painting, but didn't feel like anything very challenging just for the moment.

These are more of Reaper's "Bones" plastic figures.

Monday, 28 October 2013

Kea-Griffon: Close, so close

The Reaper "Bones" griffon I got via their last Kickstarter is grinding slowly, so slowly, to completion.

All that's left to do now is to fair the wings into the torso — not an insignificant task, but not too difficult. I had hoped I'd get away without having to do it, but the join looked a lot less obvious in the bare white plastic than it does now, painted.

Friday, 11 October 2013

Multiple Characters for Players

One of the recently-released Old School RPG systems (I forget the name of it) makes use of the idea of the "sieve" for starting characters, in which, to begin with, each player begins with three or five or however many lowest-level characters. As they inevitably die off one by one, the player will end up with one, which (hopefully) has proven to be tough and lucky enough to have a better than even chance of extended survival, and which will become the player's only character for some time. Effectively, it's kind of like the video game concept of extra lives.

Giving each PC a posse can be an excellent opportunity for the GM to introduce some intra-party conflict and rivalry without actually going the PvP route; effectively the PCs would all be very minor gang leaders in cooperation with other gang leaders for a specific goal.

I'd draw up a fairly simple relationship chart for the various factions (and maybe some of the individuals) and let them go for it, treating the members of their posses as followers, their actions usually under the direct control of the player with the understanding that the GM may direct their actions as NPCs at any time for dramatic purposes.

It's possible — even likely — that one or more players might want to try a bit of backbiting, bribery and corruption amongst his or her fellow PC's entourages. This is not the sort of behaviour that any self-respecting GM should discourage. :)

And, of course, let the players know that their posse is their available pool of backup characters in case of their unfortunate but inevitable grisly demise. If a player starts using his posse as meat-shields to protect his or her own worthless skin, they may find themselves abandoned as their erstwhile followers transfer their loyalties (or simply run away) ....kind of a permanent loss of hit-points.

I suppose the players could choose whichever of their posse they want to inhabit as and when they die off and have to transfer characters, but to maintain the idea of the player being the gang leader, I'd suggest it would be better to rank them in order of Charisma, with the surviving follower with the highest CHA becoming the new leader (PC).

Friday, 4 October 2013

Tsuro

I was introduced, a short time ago, to a cute little tile-placement game called Tsuro.

It's very simple, plays quickly, and will cater to two – eight players.

I couldn't find a copy locally, so I thought I might as well make a set of my own. This is (almost) it — I still have to make the layout grid (the work of a moment, hopefully) and find something to use as player markers... probably painted chess pawns or the like.

The tiles are 50mm squares of 3mm MDF, lovingly painted by yours truly. I could probably have done them more neatly, but these will serve quite well I think. The blank one in the bottom-right corner isn't used in the game layout; it's a marker tile which indicates who gets the next draw of the tiles. In the proper game it has a dragon printed on it; I've just painted mine metallic gold.

I think, if I were to do it again, I'd bump up the tile size to 75 or 80 mm square, and maybe do them in stained oak or something, with the tracks outlined in pyrogravure.

Thursday, 3 October 2013

Traveller

Tonight's game: Zombie Apocalypse in SPAAAAACE!!!

It was all fun and games until somebody foolishly alerted the authorities to the situation, so now we've been declared Plague Ships and have SDBs in-bound to make sure we don't go infecting their precious system. Spoilsports!

Monday, 23 September 2013

Another childhood dream achieved

I absolutely loved these pencil sharpeners when I was a kid at school. I would happily sharpen perfectly good pencils right down to useless nubbins, just because sharpening was so golly-gosh-darned satisfying.

Now I own one of my very own, after all these years. It's mine! MINE! AHAHAHAHAHAHAHAHAHAAAA!!!! THEY MOCKED ME, THE FOOLS, BUT NOW I'LL SHOW THEM! I'LL SHOW THEM ALL!

It cost about thirty-five bucks (plus postage) from officecentre.co.nz


Tuesday, 17 September 2013

Hey! Where's my missing numbers?

While re-inking it for enhanced readability, I just discovered that a Gamescience d10 I thought was a d10 is not actually a d10 at all, but a d5. It's a 10-sided die all right, but marked 1-5/1-5.

That could kind of explain why my percentile rolls are so shitty. Then again, it might just be because I can't roll dice for toffee except when I'm the GM, in which case I'll get nothing but the best scores, constantly.

This is one of the dice I ordered from frpgames.com, and I wasn't that impressed with their service even before I knew they'd sent me a d5 instead of the d10 I asked for.

Monday, 16 September 2013

Kea-griffon - progress of a sort

Progress has been rather slow owing to real-life intruding its unwelcome self into my business.

I've got as far as airbrushing the scarlet under-wing flashes and the blue-green wing-tips. I got the proportions a bit out of whack because I was working from memory, but I'm not too displeased with the effect.

Friday, 13 September 2013

WiP -- Kea-Griffon

I really have got to clean up my workbench
I'm reduced to working in about half a square foot
right on the edge.
In amongst the clutter in the photo above, you may be able to just make out my next Bones painting project — it's a griffon. At the moment it's still disassembled; I'm painting the wings and body separately to ease handling, then I'll glue it all together and touch up the joins.

Your traditional griffon is supposed to have the head and forequarters of an eagle, and the hindquarters of a lion.

I'm intending to keep the lion bit, but I'm painting the forequarters in the style of one of our New Zealand birds, the kea, which has spectacular green and red plumage. The kea is actually a mountain parrot, not a raptor, but I don't really care about that because they look so cool. They're also frighteningly intelligent and mischievous, and one of their favourite fun-time activities is to strip all the rubber seals from tourists' cars, breal off their aerials and let down their tyres. Imagine that personality in something the size of a winged lion? Cooooool!

Anyway, here are some pictures of keas.


Wednesday, 11 September 2013

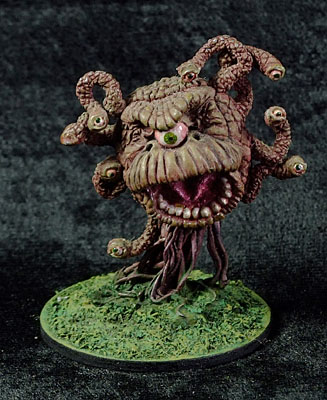
Behold! A trademark-innocuous Tentacled Eye Monster!

And so the painting of the Bones mountain proceeds, with a creature that beholds, while simultaneously maintaining its product-identity-sensitive status by pretending to be called something else entirely.

Getting a paintbrush inside that mouth was a giant pain in the bum; I'd have much preferred it if the miniature had come disassembled, allowing me to paint its innards and then glue it together myself.

It now has a significant dental tartar problem, among its other personal defects.

I glued it to a 30mm steel washer and expanded the base modelling with Green Stuff.

Tuesday, 10 September 2013

Bonesium Smirnoff (and "magic wash" recipe)

Well, he's done I guess. The miniature that will now and for all time be Smirnoff the Huge and Stupid Fighter to me. Pity I didn't have it when I was actually playing him, but them's the breaks I suppose.

I made an error using a Vallejo wash over the armour instead of the superior Citadel washes, or one of my own concoctions*. The Vallejo washes are rather gloopy; I'm not that impressed with them really.

The figure is glued to a steel washer, which is why the base is extra-thick.

=================================================

For those who are interested, the "magic wash" recipe I use is as follows:

  • 1 part Klear acrylic floor polish (Future in the USA)
  • 1 part Armorall blue windscreen washer detergent. This acts to break the surface tension so the wash will flow into any creases or scratches.
  • 1 part water — distilled water is probably best, but Christchurch tap water is pure enough to use straight.
  • Just enough Tamiya X-21 matting agent to take the shine off — quantity is by trial and error. Add it in small doses until you get a finish that is acceptable to you.
  • Add ink of an appropriate colour, again in small doses until you get the strength of colour required. My most-used general-purpose colour is 50/50 sepia and black.

As I understand it, Klear (Future) may not be being produced any more. You can probably use a clear acrylic medium in its place, but I haven't tried it myself yet. The great thing about Klear is that it's very low viscosity, and self-levelling — that will probably not be the case with acrylic medium.

If you want more of a glaze than a wash, reduce the proportions of Armorall and water. In fact, you can pretty much do away with them completely.

Step Two... Works In Progress

OK, the painting continues. I've chosen the beholder Eye Beast, and this extremely muscular axe-dude to be going on with.

The beholder eye beast, because let's face it, who doesn't love beholders eye beasts? This is a two-piece miniature which, unfortunately, come pre-assembled. Unfortunately, because getting a paintbrush into that mouth, large though it may be, is going to be a huge pain in the arse.
I've airbrush primed it with Vallejo polyurethane black, then a downward-dusting with white, to accentuate the texture and create shadows, allowing me to start painting with quite thin, translucent paint.

The extremely muscular axe-dude, because he's a dead ringer for Smirnoff, the very first of my AD&D characters to survive for longer than one session. He even has Smirnoff's huge axe and very tiny head.
This one I've brush-primed, using a free sample of Reaper's own MSP line of paints, which goes on (un-thinned) very well. The only complaint I have with it is that the dropper-bottle doesn't easily dispense more than one or two drops at a time, which is fine for most circumstances, but a nuisance when you want to get a lot of paint out at one go.

The only other beholder I've painted thus far:
A very old Citadel figure (early-mid 1980s)

Monday, 9 September 2013

The journey of a thousand miles begins with a single step

I've begun painting the vast mass of Reaper Bones plastic miniatures I got via their Kickstarter. I've started with these two pieces of dungeon dressing: a sarcophagus (empty, alas) and its lid, and an eeeeevil altar. At least, I assume it's eeeeevil owing to the skulls on the four corners.... then again, it may just be an eeeeeemo goth altar.

It's not a very spectacular start, but to be frank I'm a little intimidated by the sheer quantity of figures they've sent me. I haven't actually counted them, but I'm pretty sure there's more than two hundred there. That's a lot of painting.

Reaper claim that Bonesium (the plastic they make the Bones figures from) doesn't need priming before painting, but that's not really 100% true. Washes, inks, and any acrylics that are a bit thin will tend to web on the straight plastic surface; they need a layer of paint beneath them to give them a bit of a tooth to hold on to. Vallejo's acrylic polyurethane primer does a pretty good job through the airbrush, but it's too thin to brush on successfully in a single coat.

No doubt I'll have my process figured out by the time I get to the end of the pile.

Monday, 2 September 2013

Reaper, at long, long last

A heapin' pile o' plastic, all for me
At long, long last my Reaper Kickstarter pack has finally arrived, only about a year late (though to be fair, it's only about six months past the last revised final shipping date). This picture really doesn't indicate the scale of the un-bagging task that lies ahead of me. There are a lot of these little suckers.

I ordered the gigantic Cthulhu figure (that's in the box at centre-back), not because I ever expect to use it in a game (except to end a campaign with a Cthulhu-falls-everyone-dies event), but because it's cool, in a groteque sort of way.

Hydra. Troublesome.
Our dread lord Cthulhu. About 180mm to the top of his head.

Everything de-bagged, sorting beginning.

Left to right: a griffon, a hydra, and a beholder.

Wednesday, 28 August 2013

And another FT-17

And here's another Renault FT-17, this time in WW1-style outlined three-colour camouflage.

Friday, 23 August 2013

15mm Renault FT-17

This is Battlefront's 15mm (1:100) scale Renault FT-17, an excellent little World War One-era tank that survived right through the inter-war years and into World War Two. The American 6-ton tank was pretty much a direct copy.

I've done this one in a plain drab scheme, and I haven't added any markings as yet because I'm not completely sure just how I'm going to use it. I have another (they come in a pack of two) which I intend to finish in a WW1 outlined three-colour disruptive pattern.

Wednesday, 21 August 2013

New and shiny vs. old and busted (not really busted)

I've bought myself a new gravity-feed airbrush, a Paasche Talon, to complement my ancient Badger 150 that has served me loyally and well for near enough to forty years. The Badger is at the top of the image, the Paasche is at bottom.

Thanks to the internet making it so cheap and easy to buy things from overseas, this new airbrush only cost me about $75. When I bought that Badger, it was near enough to $200, and that was in the mid-1970s; I'm not sure what that would be equivalent to now, but it would be a lot.

I elected to go for Paasche this time around because I'd used a couple of Paasche brushes at polytech, and found them generally smoother of action than my Badger 150. It meant having to fiddle around with thread converters to attach it to my compressor and what-not, but I thought it would be worth that small trouble.

Alas, this Paasche does not live up to the standard set by those I used at school. Its double-action air/paint trigger is rather abrupt, and quite difficult to use with any delicacy of touch. I've lubricated it as far as I can, but even so it's not nearly as smooth or gentle an action as the old Badger.

I think the issue lies with the machining of the trigger shaft; there are visible machining marks on the sides, as can be seen in the hugely bloated image to the left, and I think these striations are catching as the trigger is depressed, resulting in the brush's jerky and rather clumsy action.

I'll see if I can polish them out, and we'll see if that makes any appreciable difference.

The new Paasche isn't wholly unsatisfactory, by any means. I do like its system for limiting paint flow, which is easier and more accurate to adjust than that of the Badger. The top-mounted gravity feed cup is more convenient for very small volumes of liquid too; there's less wastage as it doesn't need to keep a siphon working. I'm hopeful that if I can ameliorate the trigger action, it will prove to be a very useful tool.

Addendum:

The Talon has become my default brush over the last couple of months, mainly because the gravity-feed makes it a breeze to clean, and being able to use just a few drops of paint at a time is very convenient. I ordered the super-fine (0.25mm) and heavy duty (0.66mm) heads and needles as well, and the .25mm needle has ended up being the one I use all the time. It is quite fragile though; I've already bent its tip once, and although I managed to get it straightened out again I don't think it will take too much more of that sort of abuse.

The trigger is still somewhat problematic, but I no longer think it's to do with the trigger itself, but with the return valve — it has a propensity to stick in the "on" position, especially if being used at low air pressures.

Saturday, 3 August 2013

Teensy-Tiny Brute Squad

Brute Squad
Some considerable time ago I picked up a pack of 10mm Warmaster ogres, because they were going cheap from the bargain-bin, and because I thought I might one day have a use for them. And now that day has come.

These are them, each with a front and back view. Ugly little suckers.

In 10mm scale they're huge and ogreish, naturally. In 28mm scale they're tiny, and would make good little goblins or something. In 15mm scale they're big, hefty dudes, a bit taller than your average 15mm figure, and definitely fatter, and it's in that scale that I intend to use them.

They're going to be my Brute Squad.

As I've mentioned before, I've been toying with using Warlord Games' Hail Caesar rules in a fantasy setting, and that's where I envisage using the Brute Squad. Not that they're all that fantastic; when it comes down to it they're just really big, mean dudes with sharp pointy things and a bad attitude. They're shock troops, so I'd give them a high Clash value, but not much staying-power — difficult to kill individually, but with brittle morale once they start falling.

Friday, 26 July 2013

Finished at last...


These little guys are 15mm medieval crossbowmen. When I bought them, some years ago, they were being made by a company called Tabletop Games, long defunct, alas. The moulds now belong to someone else, I don't recall who, and they're still in production.

I'm not completely sure how long it's taken to actually get them painted, but it has to be at least ten years. Nobody can accuse me of leaping in and rushing things, that's for sure.

There are surprisingly few companies making 15mm medievals these days. I guess the period has fallen out of fashion or something.

I've based them for use with the Hail Caesar rules.

Tuesday, 9 July 2013

On the workbench

I'm in the process of re-basing some of my old Battlefront 15mm WWII British infantry on to individual bases for gaming with the Bolt Action rules. I've mounted them all on 12.5mm (½ inch) steel washers, so if I need to use them in another rule-set, such as Flames of War, I can put mount them on magnetic squad bases easily enough.

One thing about using 15mm figures for skirmish wargaming, especially with my increasingly decrepit eyesight, is that the figures are small enough that I have to make an effort to see which ones are modelled with which weapons.

In an attempt to make life a bit easier for myself in this respect, I've added colour-coded markers to the base of each figure, denoting their primary weapon load — in the case of the three pictured here, orange means a submachine-gun, pale blue a pistol, and white a rifle. Others include red for a light machine-gun, purple for an anti-tank rifle, and black for other man-portable AT weapons such as PIAT, bazooka, panzerfaust or panzerschrek. The little coloured doughnuts are tiny glass beads — highly reflective, and easy to distinguish from a distance. The paint on the base edge, as well as distinguishing the model's weapon, indicates its rear quadrant, on the off-chance that that might become important.

--------------+++++-----------------

Newly-arrived today are some early-WWI British infantry and a single solitary 18 pounder field gun, from Peter Pig.

They're very nice little figures, and Peter Pig's service is top-notch: I ordered them just six days ago, and they're already here in New Zealand all the way from the UK. That's the fastest turnaround I've had from any overseas company anywhere.

I'll be basing them on washers, just like the WWII figures above, and as well as fighting various small colonial actions, they can stand in for VBCW militia and the like.

Wednesday, 3 July 2013

Scenery: Dragon's Lair and Watchtower


The small gazebo-like structure just outside the cave mouth is a watch-tower with an alarm bell to warn when the dragon emerges from its decades-long sleep. It's a low-odds russian-roulette suicide post; if you're on duty there when the dragon comes, you're almost certainly going to die, but you could go your whole career in the Dragon Watch without there ever being an alarm.

Saturday, 29 June 2013

Hiatus

Well, I've officially made the break from GMing for an indefinite time, and I already feel the better for it. Even just running a pre-built adventure module, requiring very little in the way of creativity or prep work on my part, it was weighing me down unreasonably.

When I start up again (as I inevitably will, eventually) I think I'll just run my fantasy campaign in AD&D, pretty much (though not absolutely) by the book. It will simplify the use of third-party material enormously, and it's the system I know best, having begun my roleplaying career with it. AD&D has some odd peculiarities and restrictions, but I find I care less and less about that these days. Most, if not all, of the issues I had with it back in the day can be dealt with by loosening up the class-restricted skill system a bit.

Basing the campaign on AD&D will also mean that I can make use of the ever-increasing support material published under the ægis of OSRIC too, which is all to the good.

Monday, 24 June 2013

Time for a break

I find that I've lost almost all my enthusiasm for roleplaying gaming of late. I think it might be time to take a break, certainly from GMing, and probably from playing as well. It's been coming for a while, and now it's here.

I doubt very much that this will be a permanent state of affairs; I've had this sort of burn-out before and come back from it. For now though, I just can't really be bothered.

Sunday, 23 June 2013

WYSI-more-or-less-WYG

I've had a few games of Bolt Action now, and by and large I rather like it. However, all of the sighting rules are based on a WYSIWYG system, requiring the use of quite elaborate and realistic terrain and largish (28mm or larger) figures for best results. You'd also want to be using a periscope or something to be able to see just what can be seen from the viewpoint of your little toy soldier dollies.

I'm using the rules with 15mm figures, and the WYSIWYG sighting system isn't really all that feasible in the smaller scale. Cover and concealment has to be slightly abstracted to cope, but that's no big deal really, and principles from other rule sets can be easily adapted.

There are no target acquisition rules as written; again, they're assumed in the WYSIWYG sighting system. However, it's a simple matter to add them, taking into account target size, posture, range and concealment. The system used in the venerable WRG WWII rules works well, though it could do with being simplified a little.

One of the things I really like about the various Warlord rules I've seen — Black Powder, Hail Caesar and Bolt Action — is that they provide a simple, robust base to which can be added as much or as little detail as the individual gamer desires without too much danger of breaking everything.