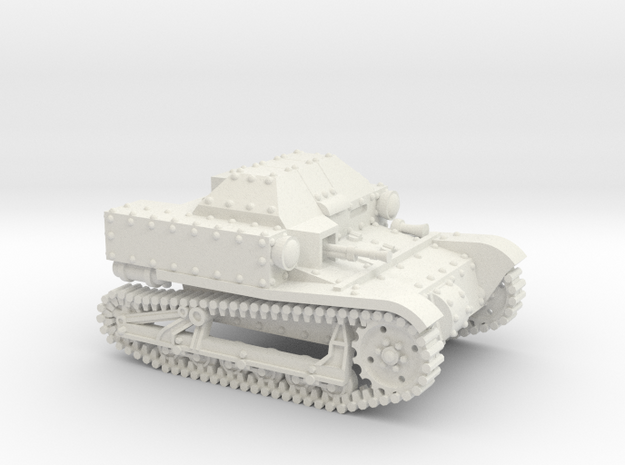
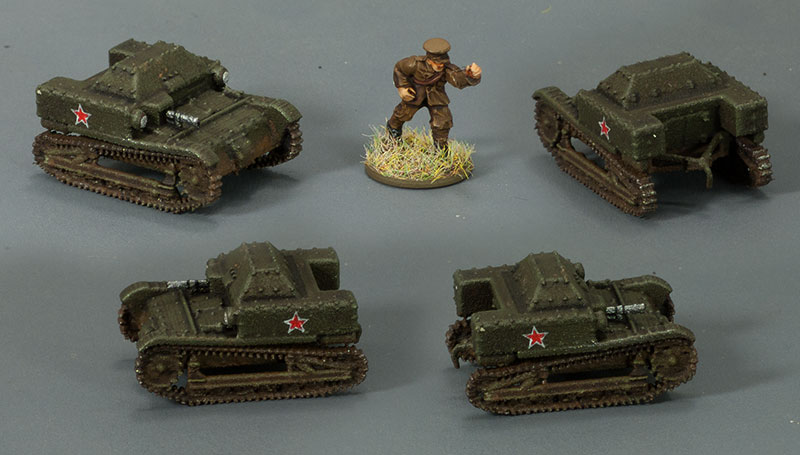
This is my 3d-printed Soviet T-27a tankette in 1/100 (15mm) scale, along with a Peter Pig WW1 British artilleryman for scale.
I thought it turned out pretty well, for a WSF print.
Monday, 30 May 2016
Garford-Putilov
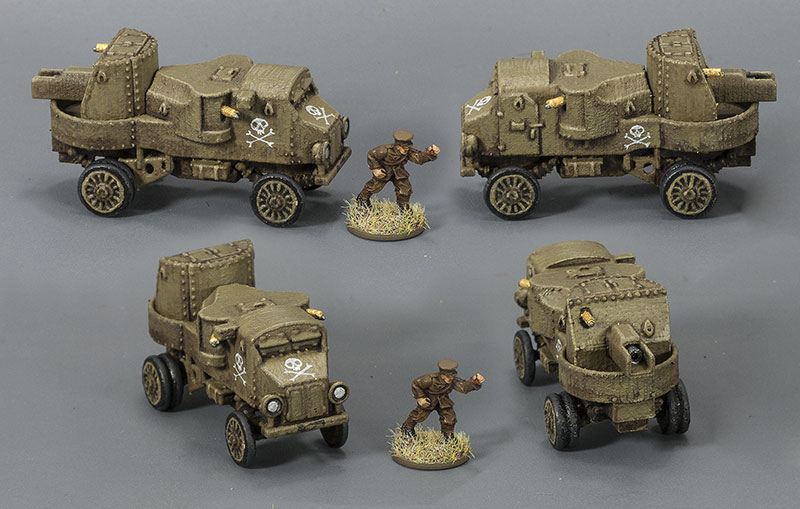
This is my 3d-printed model of the WW1-vintage Russian Garford-Putilov armoured truck, based on the chassis of the American chain-driven Garford lorry. It served throughout the First World War and after, used both by the Soviets and organisations like the Freikorps. Apparently the Germans even encountered some outside Leningrad (?) in WW2, though they didn't last long.
It really needs to be printed in FUD, because in WSF it's lost most of its rivets, and rivets are unequivocally good.
Saturday, 28 May 2016
The Mighty Bob Semple Tank
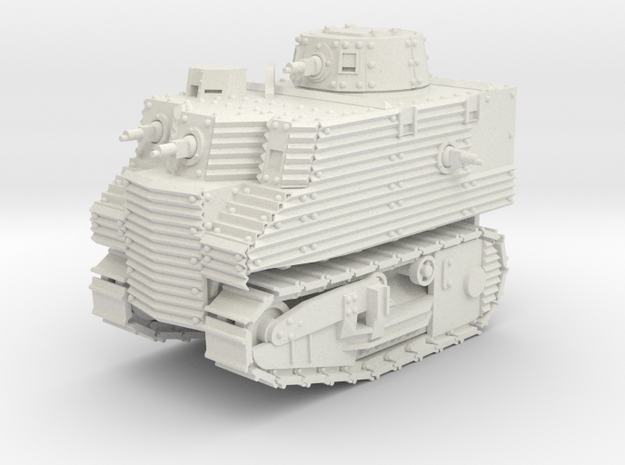
Behold, the mighty 15mm Bob Semple tank, in all its majestic glory!
The colour scheme is somewhat conjectural, as nobody seems to know for sure exactly what the colours were. The darker colour was definitely green, but the lighter tone might have been red-brown (as here), a lighter khaki-green, or possibly even a darkish yellow ochre. Other markings are completely absent in any of the photos I've seen — no serial numbers, no national or tactical markings. I imagine that if it had ever actually gone into action, it would have been supplied (very briefly) with those things.
Friday, 27 May 2016
Latest Shapeways Booty
Here's the latest batch of my 15mm models, received from Shapeways this morning, all in WSF nylon.
I've de-sprued turrets, scrubbed them down with a toothbrush to remove any excess nylon powder, and sprayed them with a pale grey primer to make it possible to photograph them, but that's all that's been done to them thus far.
They are, from left to right:
The limitations of the 3d printing process and material shows up most starkly in the steeply-sloped glacis of the Garford-Putilov's turret. The print layers are very apparent there. However, overall I'm quite pleased with them. As I've mentioned before, WSF isn't adequate for scale modelling purposes, but for wargaming models it's just fine.
Desktop stereolithography printers for high-resolution resin printing are available now for well under $US5,000, so I'm hopeful of being able to afford one of my own before senility sets in irretrievably.
I've de-sprued turrets, scrubbed them down with a toothbrush to remove any excess nylon powder, and sprayed them with a pale grey primer to make it possible to photograph them, but that's all that's been done to them thus far.
They are, from left to right:
- Bob Semple tank (New Zealand, WW2)
- Garford-Putilov armoured truck (Russia/Soviet Union, WW1—WW2)
- T-27 tankette (Soviet Union)
- T-24 medium tank (Soviet Union)
The limitations of the 3d printing process and material shows up most starkly in the steeply-sloped glacis of the Garford-Putilov's turret. The print layers are very apparent there. However, overall I'm quite pleased with them. As I've mentioned before, WSF isn't adequate for scale modelling purposes, but for wargaming models it's just fine.
Desktop stereolithography printers for high-resolution resin printing are available now for well under $US5,000, so I'm hopeful of being able to afford one of my own before senility sets in irretrievably.
Wednesday, 25 May 2016
Vickers Medium Mk.III update
I've done nothing new today, but what I have done is remodel my 15mm (1/100 scale) Vickers Medium Mk.III quite extensively.
I wanted to try to get the price down a bit, and I did succeed — I managed to knock a couple of bucks off the price in WSF, but pretty much halved the price in FUD. So that's nice.
More importantly, I'm a lot happier with the construction now. This was my very first Blender model, and my inexperience with that programme and with Shapeways' limitations were apparent. It's better now. There's more that I could do to improve it, but not much useful stuff, so I'll probably leave it here.
It's at http://shpws.me/LDbx.
I wanted to try to get the price down a bit, and I did succeed — I managed to knock a couple of bucks off the price in WSF, but pretty much halved the price in FUD. So that's nice.
More importantly, I'm a lot happier with the construction now. This was my very first Blender model, and my inexperience with that programme and with Shapeways' limitations were apparent. It's better now. There's more that I could do to improve it, but not much useful stuff, so I'll probably leave it here.
It's at http://shpws.me/LDbx.
Monday, 23 May 2016
Sunday, 22 May 2016
Humber LRC (15mm)
Not one of my own designs for a change, this is the 15mm (1/100 scale) Humber LRC (Light Reconnaissance Car) from Battlefront.
I've had these sitting around for years, and just got around to getting some paint on them. The markings are, I'm pretty sure, quite wrong — they're just a bunch of decals I happened to have to hand.
Friday, 20 May 2016
Komintern Komin-up
In progress: the Komintern artillery tractor, which was based on the running-gear of the T-24.
I thought it would be a doddle, since I could just re-use the stuff I'd already done for the T-24.... and to a certain degree, that's true. Except that I had to make a new drive wheel, new idler, and new track links. But at least I did get to use the suspension and road wheels, so that's nice.
I'm tossing up at the moment whether to leave the windows blank, or make holes in the cab shell for them. I'm tending towards making them solid for painting, since I don't want to build a multi-part model, and it would be pretty impossible to get at the inside of the cab to paint seats and what-not.
Well, here it is. It's quite a beast.
It's at http://shpws.me/Md5G for $18 in WSF.
EDIT: It's now also available in 1/72 scale at http://shpws.me/MdQa

The engine housing was too rounded in my first attempt, so I rebuilt it. I took the opportunity at the same time to detail the radiator grill a bit more.
EDIT EDIT: It's now also also available in 1/285 scale at http://shpws.me/MjpE (single model) and at http://shpws.me/MjpC (sprue of four vehicles).
I thought it would be a doddle, since I could just re-use the stuff I'd already done for the T-24.... and to a certain degree, that's true. Except that I had to make a new drive wheel, new idler, and new track links. But at least I did get to use the suspension and road wheels, so that's nice.
I'm tossing up at the moment whether to leave the windows blank, or make holes in the cab shell for them. I'm tending towards making them solid for painting, since I don't want to build a multi-part model, and it would be pretty impossible to get at the inside of the cab to paint seats and what-not.
It's at http://shpws.me/Md5G for $18 in WSF.
EDIT: It's now also available in 1/72 scale at http://shpws.me/MdQa

The engine housing was too rounded in my first attempt, so I rebuilt it. I took the opportunity at the same time to detail the radiator grill a bit more.
EDIT EDIT: It's now also also available in 1/285 scale at http://shpws.me/MjpE (single model) and at http://shpws.me/MjpC (sprue of four vehicles).
Wednesday, 18 May 2016
T-24s by the half-dozen
I've reinstated the 6-up sprue of the T-24 in 1/285 scale for sale again, having (hopefully) fixed up the issues that were preventing it printing.
It's $16.50 at http://shpws.me/MahS
Buy four of these, and you can field one model for every actual T-24 ever built.
It's $16.50 at http://shpws.me/MahS
Buy four of these, and you can field one model for every actual T-24 ever built.
Tuesday, 17 May 2016
SU-18 (15mm)
Since I already had all the geometry for the T-18 light tank this was based on, I thought I might as well whack out the self-propelled gun version, the SU-18.
It's available in 15mm (1/100) scale right now at http://shpws.me/Mclb, with 20mm (1/72) and 6mm (1/285) scale versions to come shortly.
Monday, 16 May 2016
Just a Tick
This is one of the critters I got in Reaper's last Bones Kickstarter — 91006: Prairie Tick Queen by Bob Ridolfi.
It's a simple paint-job that required very little in the way of thought or skill, which suited me very well at the time.
What You See Is Not QUITE What You Get
In response to a query about what Shapeways FUD prints actually look like, compared with how they're displayed in their material renders, I've put together this comparison shot.
The render is the top image, the painted physical model is below.
I've tried to get the two as near in size as possible, and the ruler is there for size information.
As you can see, though the quality of the physical model is pretty good (considering its very small size), there is some loss and softening of detail as compared with the material render (top).
This was my very first attempt at modeling for 3d printing, and I've learned a great deal since then about what needs to be emphasized or exaggerated, but there's only so much you can do in that respect. We're still stuck with the fundamental limitations of the 3d printing process.
The render is the top image, the painted physical model is below.
I've tried to get the two as near in size as possible, and the ruler is there for size information.
As you can see, though the quality of the physical model is pretty good (considering its very small size), there is some loss and softening of detail as compared with the material render (top).
This was my very first attempt at modeling for 3d printing, and I've learned a great deal since then about what needs to be emphasized or exaggerated, but there's only so much you can do in that respect. We're still stuck with the fundamental limitations of the 3d printing process.
T-18 (6mm) — small, and getting smaller
I've rebuilt my T-18 for production in 1/285 scale for 6mm gaming.
It is tiny, really teensy-weensy. It comes out at just a fraction over 15mm long.
How much of that rivet and panel-line detail will show on the printed models, I have no idea. There will be some, but it's difficult to predict.
The guns look idiotically stumpy and humungous, but in fact they're only 0.6mm in diameter.
It is tiny, really teensy-weensy. It comes out at just a fraction over 15mm long.
How much of that rivet and panel-line detail will show on the printed models, I have no idea. There will be some, but it's difficult to predict.
The guns look idiotically stumpy and humungous, but in fact they're only 0.6mm in diameter.
Saturday, 14 May 2016
T-18 (M6) - 15mm
This is my 15mm model of the Soviet T-18 (also called by them the M6). It was based on the Renault FT, with the addition of vertical suspension, and was produced from 1928 to 1931.
It's available at my Shapeways shop at http://shpws.me/MbEL for a measley ten bucks for WSF, and a slightly less measley eighteen bucks for FUD.
Thursday, 12 May 2016
SdKfz 3
Next in the list of things I've built is this pre-WWII German armoured car, the SdKfz 3. It was a big, heavy monster of a thing. It had no provision for permanent armament, but machine-guns were often mounted on the roof, with access via a pair of large trap-doors.
It took a surprisingly long time to put together. Nothing is ever as simple as it first appears.
It's available in 1/100 scale for 15mm gaming at http://shpws.me/MbaF
It took a surprisingly long time to put together. Nothing is ever as simple as it first appears.
It's available in 1/100 scale for 15mm gaming at http://shpws.me/MbaF
Sunday, 8 May 2016
T24
I've finished modelling the Soviet T-24 medium tank of 1932 in 1:100 scale, for 15mm gaming.
It's a lot lumpier than the original: due to printing size limitations, things like rivets, track links and what-have -you have to be hugely over-scale to show up at all. It generally looks OK in the flesh.
Photographs of the original are pretty thin on the ground, and tend to be very grainy and blurry, so I've had to make a few semi-educated guesses about some structures.
It's available for sale from Shapeways, at http://shpws.me/Ma76. It's $15.00 in WSF, or $32 in FUD.
It's a lot lumpier than the original: due to printing size limitations, things like rivets, track links and what-have -you have to be hugely over-scale to show up at all. It generally looks OK in the flesh.
Photographs of the original are pretty thin on the ground, and tend to be very grainy and blurry, so I've had to make a few semi-educated guesses about some structures.
It's available for sale from Shapeways, at http://shpws.me/Ma76. It's $15.00 in WSF, or $32 in FUD.
Saturday, 7 May 2016
Austin-Kegresse
Here's my 1/100 scale (15mm) Austin-Kegresse half-track. It's a WW1-vintage machine, based on the Austin-Putilov armoured car, that went on for use after the war by the Red Army as well as organisations like the German Freikorps.
This one is printed in Shapeways' High Definition Black Acrylate material. It does show detail nicely, but its 25-micron print layers really show up on curved surfaces, especially gently curved horizontal surfaces like the roof. Also, they're still coming to grips with the mechanics of printing the material — you can see distinct lateral bulges and distortions about half way up the hull, though not as bad as in the Lanchester.
Friday, 6 May 2016
Lanchester Mk.II
This is my 1:100 scale (15mm) Lanchester Mk.II that I had printed in high-definition black acrylate by Shapeways.
The colour is supposed to be the British army's Deep Bronze Green, their standard peace-time colour for AFVs on home service during the interwar period. It's a colour that consistently defeats me; I can never seem to get close to it. Vallejo do a Bronze Green in their VMC range, but it's nothing like the army colour, being more like the colour of actual green bronze.
Monday, 2 May 2016
T27A Tankette
Latest in the 3d-modeling saga is this Soviet T27A tankette of 1932, based on a Carden-Loyd design.
I've made it in both 15mm (1/100) and 20mm (1/72) scales. I'll probably do it in 28mm (1/56) eventually as well, though that will require quite a bit of rebuilding.
It's pretty tiny — it's only about 35mm long in 1/72.
I've made it in both 15mm (1/100) and 20mm (1/72) scales. I'll probably do it in 28mm (1/56) eventually as well, though that will require quite a bit of rebuilding.
It's pretty tiny — it's only about 35mm long in 1/72.
Saturday, 30 April 2016
Shapeways High-Definition Acrylate — a great disappointment
I've just received my first couple of models from Shapeways in the High-Definition Acrylate they've been trialling. There should have been three, but they busted one in the course of post-printing clean-up, and rather than re-printing it they just cancelled it.
Long story short: I am not very impressed. As far as I can see, it offers no benefit over FUD.
It has been touted as being much tougher than FUD resin, but so far it seems to me to be almost equally as brittle and fragile, while at the same time being little cheaper — in fact, for multi-part models, it ends up quite a bit more expensive as they don't allow spruing.
The Austin-Kegresse model broke off the end of one of its 'horns', presumably in transit, but possibly during packing.
The need for support structures during printing means that under-surfaces end up badly pock-marked.
The print-lines are more clearly visible than in any of the FUD models I've received, and there's perceptible distortion in several areas on both models.
Long story short: I am not very impressed. As far as I can see, it offers no benefit over FUD.
It has been touted as being much tougher than FUD resin, but so far it seems to me to be almost equally as brittle and fragile, while at the same time being little cheaper — in fact, for multi-part models, it ends up quite a bit more expensive as they don't allow spruing.
The Austin-Kegresse model broke off the end of one of its 'horns', presumably in transit, but possibly during packing.
The need for support structures during printing means that under-surfaces end up badly pock-marked.
The print-lines are more clearly visible than in any of the FUD models I've received, and there's perceptible distortion in several areas on both models.
![]() |
| Very visible print lines, and distortions where the model seems to have been shifted on the print-bed during printing. |
![]() |
| Very visible pock-marking left behind by support structures. |
![]() |
| More pock-marking — from what, I don't know — and pronounced definition of printing layers on the mud-guards. |
![]() |
| Print line galore, and a broken-off roller. So much for the supposed 'toughness' of this material. |
![]() |
| What that white smear is on the hull rear I don't know. |
Thursday, 28 April 2016
Plague Rat
Back to monster-painting, after a fairly long break.
This is one of the two nasty boil-ridden critters from the Reaper Bones 77198: Barrow Rats pack. They're pretty big rats; beside a regular human-sized figure they'd be about the size of a pony.
Wednesday, 27 April 2016
Vickers Light
![]() |
| 1/100 scale Vickers Light Tank Mk.I |
The SF nylon printings are fairly crude, but adequate for gaming pieces. The model lost most of its rivet detail in the printing though, so I had to paint them on. It's not that the material is incapable of reproducing small details — some of the rivets were reproduced (those on the hull front, for example, and an occasional one here and there elsewhere) but it seems to be heavily dependent on the orientation of the model when it's printed.
Monday, 25 April 2016
HMSLS "Improbable", finished (probably)
![]() |
| Front quarter |
![]() |
| Rear quarter |
![]() |
| Side view |
![]() |
| From above |
Except that now that I look, I suddenly realise that I completely forgot the funnel.
Bugger.
So, not quite finished. But nearly!
A bit later....
I added the funnels and replaced the pictures, so now I'm done.Saturday, 23 April 2016
Benz-Mgebrov (3d-printed 15mm)
This is my 1/100 scale (15mm) Benz-Mgebrov armoured car, 3d-printed in WSF nylon.
The printing artifacts are very prominent on this model, and it's taken a lot of painting to pull out the detail that was lost amongst all the clutter. There's still detail there, but it's difficult to find until it's been carefully extracted from the background noise of the WSF printing.
I really should hollow the model out to make it more affordable in FUD resin, because it would look so very much better printed in that. At the moment, it's just over thirty bucks (plus postage), three times the cost in WSF, which is far, far too expensive.
The printing artifacts are very prominent on this model, and it's taken a lot of painting to pull out the detail that was lost amongst all the clutter. There's still detail there, but it's difficult to find until it's been carefully extracted from the background noise of the WSF printing.
I really should hollow the model out to make it more affordable in FUD resin, because it would look so very much better printed in that. At the moment, it's just over thirty bucks (plus postage), three times the cost in WSF, which is far, far too expensive.
Later...
I've hollowed out as much as I can hollow, and it's dropped the FUD printing cost down to $20. That's still expensive for a wargaming model, but it's not have-to-sell-a-kidney expensive, and it's positively cheap compared with GW's pricing.Friday, 22 April 2016
How To Draw A Hexagon
It's very, very easy. You will need a compass, a pen and/or pencil, and a ruler to make measurements and draw straight lines.
- With the compass, draw a circle with the same radius as you want the length of the sides.
- With the ruler, draw a line exactly bisecting the circle by going through the hole the compass made in the centre.
- Draw two more circles with the compass, this time centring it at the points where the line bisects the circle.
- With the ruler, connect the points where the three circles overlap.
And that's it. You have a perfect hexagon drawn to precise measurements.
If you need to draw a hexagon with measurements from side to side, you will need these ratios:
The circle will need to be 1.154 x the desired width of the hexagon, which means that the hexagon will be 0.86 x the diameter of the circle.
There you go. Easy-peasy.
Monday, 18 April 2016
Her Majesty's Steam-Landship "Improbable"
I have begun work on an imaginary VSF (that's Victorian Science Fiction) steam-powered land-ship in 15mm scale.
So far, I've only completed the front wheel assembly, and the front gunner's position with its Gatling gun.
I haven't done any preparatory drawings for this thing, and I'm just making it up as I go along, which is proving to be both easier and harder than working from plans. Easier, because I don't have to worry too much about dimensions, except to cater to 3d-printing limitations, and harder, because I have only the vaguest idea of how it will end up looking, so I have to sort out how all the parts inter-relate as I go along.
Progress is being made. I have the beginnings of a boiler, and a lateral Gatling position, but I still need a bridge and stoker's platform. Also, everything is just floating in the air at the moment, so I shall have to build some nice wrought-iron buttressing and what-have-you.
I suspect this thing is going to cost an arm and a leg to print.
We have a pilot-house, and the side-sponsons are complete except for their support structures.
I think the pilot-house is going to need a lot of gauges and pipes — just have to leave enough room in there for the actual pilot, and probably a co-pilot as well.
I just realized that I have no idea just how the crew are supposed to get to their positions.....
I've added the drive-belt and its flywheel, and next up will be the stoker's station and coal bins, and the rear gunner's cupola.
I'm not quite sure yet how I'm going to attach the flywheel — I've got to allow for the pistons that would actually turn the thing.
So far, I've only completed the front wheel assembly, and the front gunner's position with its Gatling gun.
I haven't done any preparatory drawings for this thing, and I'm just making it up as I go along, which is proving to be both easier and harder than working from plans. Easier, because I don't have to worry too much about dimensions, except to cater to 3d-printing limitations, and harder, because I have only the vaguest idea of how it will end up looking, so I have to sort out how all the parts inter-relate as I go along.
Later...
![]() |
| Getting more bits on it |
I suspect this thing is going to cost an arm and a leg to print.
Later still...
![]() |
| And more. Still a lot to do. |
I think the pilot-house is going to need a lot of gauges and pipes — just have to leave enough room in there for the actual pilot, and probably a co-pilot as well.
I just realized that I have no idea just how the crew are supposed to get to their positions.....
And yet later....
Progress has been slow, but I think I now know more or less what's going to be going on down the back.![]() |
| Drive wheels and belts added, and some other bits. |
I'm not quite sure yet how I'm going to attach the flywheel — I've got to allow for the pistons that would actually turn the thing.
Thursday, 14 April 2016
Fiat 2000
This is my 3d-printed Fiat 2000 (in WSF nylon).
The colour scheme is entirely speculative, but is characteristic of schemes in common use when the Fiat was designed.
![]() |
| From every angle |
Sunday, 10 April 2016
WSF vs FUD
This is a direct comparison between Shapeways WSF (White Strong & Flexible) and FUD (Frosted Ultra Detail) materials. This is what you get when you pay for the premium stuff vs. the cheaper stuff.
They're not exactly the same model, but both are based on pretty much the same chassis, and both use the same sizing parameters for things like rivets and what-not. You can see that in the WSF, the rivets have pretty much disappeared.
You can pull out a bit more detail in the WSF by judicious painting, and it does look fine at tabletop distances, but the FUD is clearly superior. Where the FUD might fall down as a material for gaming pieces is that it's quite brittle — you can see a spot on the starboard track-guard where I knocked off a headlight when I was cleaning off the waxy shit that it comes covered in. The WSF is, on the other hand, practically indestructible.
Shapeways are trialling a much tougher acrylate high-resolution material; I've ordered some things in it, and I shall be interested to see how they stack up.
They're not exactly the same model, but both are based on pretty much the same chassis, and both use the same sizing parameters for things like rivets and what-not. You can see that in the WSF, the rivets have pretty much disappeared.
You can pull out a bit more detail in the WSF by judicious painting, and it does look fine at tabletop distances, but the FUD is clearly superior. Where the FUD might fall down as a material for gaming pieces is that it's quite brittle — you can see a spot on the starboard track-guard where I knocked off a headlight when I was cleaning off the waxy shit that it comes covered in. The WSF is, on the other hand, practically indestructible.
Shapeways are trialling a much tougher acrylate high-resolution material; I've ordered some things in it, and I shall be interested to see how they stack up.
Thursday, 7 April 2016
Bob Semple Tank
Bob Semple, at that time the Minister of Works, ordered this thing created, based on a D-9 tractor. It was top-heavy, very slow, under-armed and under-armoured, and if it had actually seen combat it's unlikely that it would have lasted more than a few minutes. Nevertheless, it was quite successful as a morale-building parade piece to keep up the spirits of the civilian population.
By 1944, the army had plentiful supplies of British and American tanks, and the "Bob Semple" was more of an embarrassment than anything else. They were disassembled and turned back into tractors, that being deemed their most useful possible contribution to the war effort.
I've long thought it a crying shame that there was no 15mm scale model of the Bob Semple tank to make its brave (but slow) way on to the wargames table. Now there is.
It's available from my Shapeways shop, starting at nineteen bucks for WSF.
Wednesday, 6 April 2016
Latest from Shapeways
I just got a few more models from Shapeways, and I've taken some photographs of them, and processed those photos in the most unflattering way possible to bring out as much detail as possible.
Frankly, it's not really fair to be looking at them like this, because in real life the models are very small and many of the faults aren't really visible. However, it's good to know exactly what you can expect from 3d printing.
First up, the 1/100 scale Fiat 2000 in WSF nylon. This is the first WSF model I've done on which all of the rivets have printed visibly. I thought that I had gone overboard by using 0.8 mm diameter icospheres; in the renders they looked like footballs glued to the hull of the beast, but in the flesh they actually look pretty good; though actually grossly over-scale, they don't look horribly over-scale. 0.7 - 0.8 mm seems to be the sweet spot for SF nylon printing.
That means that it's not really possible to replicate the exact rivet patterns on specific vehicles; they'd be far too crowded. I just have to apply rivets in such a way that it gives the right impression of how they were laid out.
This is the Benz-Mgebrov armoured car, again in WSF nylon. From memory, I think these rivets used 0.5 or 0.6 mm icospheres, and though some are clearly visible, others in problematic printing areas are quite indistinct. Also, the limitations of the material means that the sharp edges between the various angled plates have been softened quite substantially.
I haven't hollowed this model (yet), so I haven't offered it in FUD resin — it would just be too expensive. If there's a request for it I'll do it, but not until then; I'd rather be making new models than revisiting old ones.
Lastly, the Vickers Light Tank Mk.III, this time in FUD resin. The rivets on this model are 0.5mm diameter, and they've all printed clearly, plate edges are clear and sharp, and surface detail is all nicely visible (though terrible to photograph, being translucent).
The FUD resin is much, much more expensive than WSF, but if you want a sharp, clean finish, it's clearly much, much superior. Shapeways charges by material volume for FUD, so hollowing out anything that can conceivably be hollow is imperative to keep costs down
Frankly, it's not really fair to be looking at them like this, because in real life the models are very small and many of the faults aren't really visible. However, it's good to know exactly what you can expect from 3d printing.
First up, the 1/100 scale Fiat 2000 in WSF nylon. This is the first WSF model I've done on which all of the rivets have printed visibly. I thought that I had gone overboard by using 0.8 mm diameter icospheres; in the renders they looked like footballs glued to the hull of the beast, but in the flesh they actually look pretty good; though actually grossly over-scale, they don't look horribly over-scale. 0.7 - 0.8 mm seems to be the sweet spot for SF nylon printing.
That means that it's not really possible to replicate the exact rivet patterns on specific vehicles; they'd be far too crowded. I just have to apply rivets in such a way that it gives the right impression of how they were laid out.
This is the Benz-Mgebrov armoured car, again in WSF nylon. From memory, I think these rivets used 0.5 or 0.6 mm icospheres, and though some are clearly visible, others in problematic printing areas are quite indistinct. Also, the limitations of the material means that the sharp edges between the various angled plates have been softened quite substantially.
I haven't hollowed this model (yet), so I haven't offered it in FUD resin — it would just be too expensive. If there's a request for it I'll do it, but not until then; I'd rather be making new models than revisiting old ones.
Lastly, the Vickers Light Tank Mk.III, this time in FUD resin. The rivets on this model are 0.5mm diameter, and they've all printed clearly, plate edges are clear and sharp, and surface detail is all nicely visible (though terrible to photograph, being translucent).
The FUD resin is much, much more expensive than WSF, but if you want a sharp, clean finish, it's clearly much, much superior. Shapeways charges by material volume for FUD, so hollowing out anything that can conceivably be hollow is imperative to keep costs down
Subscribe to:
Posts (Atom)