However, there are a few things to be aware of before you launch into building these kits. More things than usual, in my experience of PSC kits, but nothing too intractable — for the most part the engineering is pretty good, but see below for my notes about the fit of the running-gear pieces.
NOTE: I am informed that the Honey in British service had the sponson-mounted machine-guns removed. Fortunately it's a simple matter to chop these ones off, and one of the sets of side-plates provided on the sprue has those points blanked off, which I will hopefully remember next time.
 |
| The usual PSC version display, colour-coded for your inconvenience |
 |
| WARNING! DANGER! |
As usual, PSC have provided a colour-coded layout to show you which parts are for which version.
WARNING!
The hull-top parts are mis-coloured, and the one used for the British "Honey", which should be in green, is actually shown in red.
I found this out when I tried to get the track pieces with sand-guards to fit, and could not. Fortunately the cement holding it to the hull-bottom had not yet set hard, and I was able to prise the two pieces apart and fit the right one.
The instruction sheet shows the process for building the "Honey" only, and nothing at all for the other two (American) versions of the machine.
Fortunately that doesn't affect me, since I'm only interested in the British version.
The illustrations are easy enough to follow, better by far than some of PSC's instruction sheets, but the pictures are still a bit dark and low-contrast. I've cleaned them up considerably for this illustration.
NOTE: If you glue on the auxiliary fuel tanks as shown in the last picture before you have the turret in place, you will not be able to get the turret on without shaving off its locating lugs. Also, with the tanks in place the turret will no longer rotate 360°.
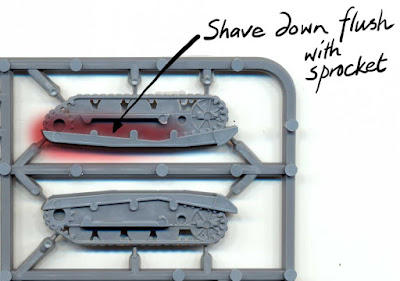
The only major issue I had with the fit of the parts was with the running-gear pieces with the sand-guards — they would not seat seamlessly against the hull top, and left a large and obvious gap along the front outer edge.
I found that what I had to do was to shave down the front half or so of the back of the piece — I've outlined the relevant area in the illustration — until it was flush with the front sprocket moulding. Then the piece settled properly hard up against the mudguard-edge.
There is still a visible seam, but it's not nearly as bad as it originally was. I assume this won't be an issue for the American versions, as they don't have to align with the sand-guards.


No comments:
Post a Comment