Friday 28 May 2021

A Couple of New Old Models

 I've been gradually working my way through the models I originally designed for printing by Shapeways to make them more suitable for home printing on FDM machines. These are about the last of those old models, I think.


The Peerless armoured car, designed in 1919 to replace vehicles worn out in WW1 service. It was heavy, and its off-road performance was pretty poor, but it was tough and it saw quite a lot of service with the British army, and with other forces as well. It was used a lot in Ireland.

There were still some in British service at the beginning of WWII.

The STLs are available at https://www.wargaming3d.com/product/peerless-armoured-car/

Test print


The Soviet Komintern heavy tractor was based on the chassis and running gear of the extremely unsatisfactory interwar T-24 medium tank, which, among other failings, had a habit of spontaneously bursting into flames.

The Komintern was much more successful, and spawned a much-used lineage of similar vehicles that saw a great deal of service throughout WWII. It was primarily an artillery tractor, but was also used as a personnel carrier and as a recovery vehicle.

The STLs are available at https://www.wargaming3d.com/product/komintern-heavy-tractor-15mm/ and include models with or without the canvas tilt.

Thursday 27 May 2021

Delusions of Grandeur, Maybe


I was looking through the Battlegroup: Barbarossa book, to see what extra use I could get out of my Winter War Soviets.

A BT-7 company needs seventeen tanks. That's a lot of printing and painting, and I don't know if I can really be bothered. If I print two more, sans aerial, I'll have enough for two platoons.

Each tank takes a little under four hours to print, so theoretically I could produce six per day, but honestly that's a highly unlikely production rate. Two or three is more my speed, mainly because washing, clearing supports, and and curing is a real pain in the arse.

Wednesday 19 May 2021

BT-7 remix (15mm)


I figured, since I'd already done a bunch of work on the hull for the BT-42, that I might as well re-use all that labour for a BT-7, also remixed from Zac Kuvalich's original work.

Apart from the extra track detail, the main improvement I've made to the hull is in the engine grill.

I don't know enough about Soviet and Finnish stuff to know just how similar the Finnish BT-42 was to its source vehicle, the BT-7. But ignorance, as they say, is bliss, and it will do well enough for me until I find out otherwise.


Next Day...

Right, so here's the first test print. Overall I'm not dissatisfied.

The only real issue was that I neglected to create locating lugs/sockets when I separated the running gear for ease of printing, and I glued the tracks on wonky. Then I broke them, trying to move them into the right position — it's not too apparent from this side, but the other side is a bit worse.

Never mind, I've adjusted the STLs and I've got another test print under way.

I've sprayed the model with Vallejo Soviet 4BO surface primer, and given it a gentle dry-brush with VMC Green Grey to delineate the surface detail. The transparent red resin I'm printing with at the moment is terrible to photograph, though it is admittedly quite pretty.


Later that day...

Test print number two complete, and all issues are dealt with.

The running gear components now fit into place easily and positively; no more guesswork.


Next day...

Naturally, errors were made.

It turns out that the squared cut-off track guards were just a Finnish thing, so I had to do a bit of juggling with another of Zac's files to get them back to the bulbous Soviet style.

I also had to re-do the tracks. The track links I modelled on the BT-42, though taken from a photograph of a surviving vehicle, are more appropriate for a BT-2 or BT-5. The links on a BT-7 were about 20% shorter. It's possible, even likely, that the surviving museum BT-42 was cobbled together from several vehicles, using the tracks from an older tank.

Several days later...


Print successful.

This is printed in a Frankenstein mixture of resins: the very last drops of transparent red left in the vat, the last dregs of some opaque tan resin, and some transparent green to take the vat level up to a safe depth. They're all the same type of water-washable resin though, and all from eSun, so they're perfectly intermixable.

The only issue is that the inert fillers in the opaque resin mean that you have to be very diligent about washing the print, and it's a good idea to blow off any water with compressed air before curing — I didn't do that this time, which is why I got that white crufty buildup in some of the seams. The transparent resins are much more forgiving in this respect, and in using them I've got a bit lazy.


Compare with this one, in exactly the same resin, that I blow-dried with my airbrush before curing.

You could use canned compressed air  I guess, if you don't have access to an airbrush; I have no idea what those cost as I've never used it for anything.

Tuesday 18 May 2021

BT-42 (15mm)


I've done as much painting as I intend to on my 3d-printed 15mm BT-42.

I have no doubt it should have more markings than just the hakaristi on the turret sides — I've seen a photo of one with a fairly large serial number on the hull rear, for a start — but I don't think I'll bother with them unless and until it nags at me too much.


Next day...

Well, it nagged at me too much, as I might have guessed it would.

I gave it its serial number, and I also changed the national markings to the drop-highlight style.


Tuesday 11 May 2021

WWII Finnish Colours


Vallejo Modelcolor recommendations from IPMS Finland
I've just printed a Finnish BT-42 SPG, for no particular reason except that I'm fond of tanks that look kind of dorky, and the BT-42 is one of the dorkiest of them all.

Fresh off the printer

I know very little about the Finns in WWII, especially in the Continuation War, but I do know that they adopted a three-colour camouflage scheme for their AFVs. It was a pretty standard group of colours — a sandy yellowish, a green, and a brown — but they were subtly different than the colours used by the Germans or Soviets.

IPMS Finland recommend these Vallejo colour mixes, and I'm willing to trust that they know what they're talking about.

They will certainly need to be lightened a tad for use on 1:100 scale vehicles, and I'll have to do that by eye. I'll use the mixes as shown as the base colours, and then highlight with tints of each, which should lighten the scheme overall. 


Several days later...

I've finally got on to doing the base coat on this model.

I was originally going to use blu-tak masks and airbrush it, but in the end it was less trouble just to brush-paint it. The finish is less even, but once the weathering goes on, and at tabletop distances, I doubt very much that it will be noticeable.

The markings are going to be a little bit problematic. I have no decals for the Finnish hakaristi (swastika), and no way of getting any very soon, so it's going to have to be paint. Getting nice clean, sharp lines and corners in this size will be a bit of a challenge.

Friday 7 May 2021

OT-130 — The Paintening Concludes


The OT-130 was a flamethrower variant of the Soviet T-26B light tank.

Painting complete. The tank and infantryman are both 15mm (1:100 scale), and both were 3d printed on my Elegoo Mars Pro in eSun water-washable resin.

For a blow-by-blow work-in-progress post on the painting of this thing, go here.

Thursday 6 May 2021

OT-130 — the Paintening Proceeds


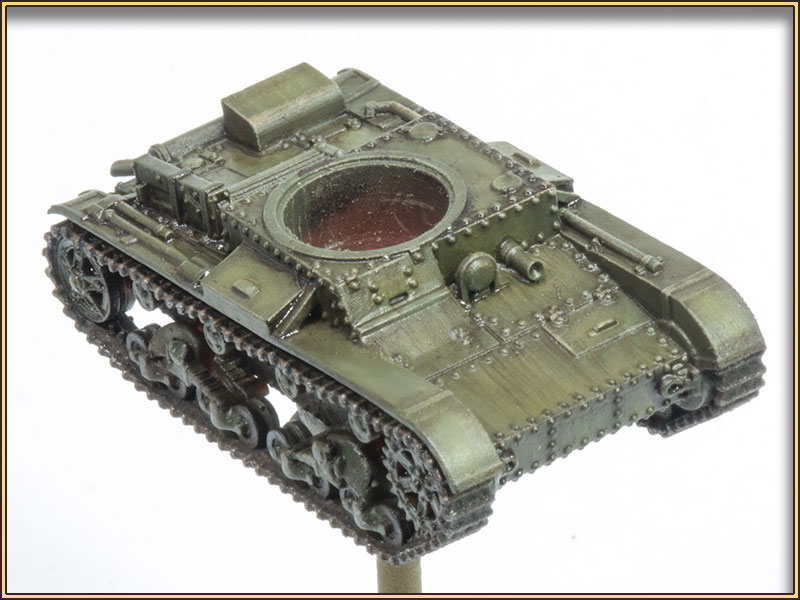
The time has come to start decorating my 15mm 3d printed OT-130 (or XT-130, or KhT-130). I was originally going to paint it in winter white, but as it turns out, the Soviets didn't feel the need to indulge in anything as cowardly or effeminate as camouflage when they decided to try to kick the shit out of the Finns, so generic Russian green it is.


Plain green is pretty boring, so I'm bashing the crap out of the paintwork. There's probably a lot more damage than would be very likely, but I think it helps to create a bit of an impression of how shoddy was the construction of these early T-26 variants. Apparently the armour plates were often so poorly fitted that the crew could see light leaking in around them, and bullet fragments finding their way in through the seams was a real danger.

This model is the first one that has presented me with the issue of uncured resin inside pooling and melting away at the shell — I clearly didn't wash out the turret as well as I had thought, and the turret peg was starting to come away from the body. I pulled it right off and hit the innards with a UV torch, and then superglued it back in place; that should take care of the problem this time.


I've now made a little snake-neck UV LED curing wand that is small enough to poke into a 4mm hole, so hopefully this will be adequate to ameliorating the issue in future.

The information I have from the internet suggests that a minute or two with this should cure the resin  left on the inside surfaces sufficiently. I don't know how long a 9v battery will last, running one of these LEDs. They're fairly expensive, compared with AA batteries, so if the lifetime is too short I may be better off spending a bit more on a 9v power supply and switch.


I've decided to try a new (to me) experimental method of painting the tracks. It's pretty straightforward.

1)   I painted the entire track run in a mid grey, in this case, VMC Medium Sea Grey. I think pretty much any grey would do, though if it's too dark you'd lose a bit of the colour variation the next step gives.

2)   Next, I gave it a couple of coats of fairly thin Vallejo Game Effects Dry Rust. I like the grainy texture this stuff leaves.

3)   Last, I gave the tracks a dry-brush of VMC Oily Steel. This catches the light and pops out the highlights a bit, while being quite neutral in tone so the brown of the Dry Rust still predominates.

It's not too different from my usual track-painting method, which is to start with a medium brown, splosh on a couple of washes, and dry-brush. I don't know that there's much to choose between them, though I do prefer the texture of the Dry Rust.


The next step is oil-washing. The wash in this case is just raw umber oil paint in white spirit — turpentine can be used, but I find white spirit evaporates faster, and is less likely to leave any oily residue. 

I prefer using an oil-based wash to an acrylic one, as I find it wicks along creases better, and it's more manageable — excess colour can be taken back off just with a clean brush, slightly moistened with white spirit. However, if I'm in a hurry I'll still use Citadel and/or Vallejo acrylic washes, as they dry quickly and I can race ahead to the next stage. A white spirit wash needs to sit for half an hour or an hour before proceeding, and leaving it to dry overnight is better, especially if you intend to do any more spirit-based pin-washes.

The white spirit evaporates long before the oil paint is dry, and  when the spirit is almost all gone, I can come back in with a brush and do a bit of streaking of the still-soft paint — you can see it very clearly on the glacis.


Paint chipping is my next stage. This is, no doubt, a familiar process to most AFV modellers these days. It's a weathering step that comes and goes in fashion; for a while it seemed like every AFV model represented a machine that had been forty years in the field without access to a paint shop, but people are being a bit more restrained nowadays.


I use a bit of torn foam to apply the "chips" in a semi-random fashion, and I like to glue the bit of foam to the end of a matchstick, to keep my sausage-fingers out of the way. You can do it in a much more controlled way by using a small pointed paintbrush, but that takes a long time and I'm generally too impatient.

My favourite colour for this is Vallejo Panzer Aces Dark Rust, but any dark brown will do. I've seen dark grey used as well, but I prefer brown to represent oxidized metal.

The key here is not to mash the paint-loaded foam hard against the model, or else you end up with big blotches of paint instead of small, discrete patches of chips.

The main focus is on the corners of the model, and areas of high wear, such as where the crew climb in and out of the machine.


After the chips have been applied, I take another step and add highlights to the edges of the chip patches with a light colour. This can be a tint of the vehicle's base paint colour, or a neutral light grey, or in this case I've used VMC German Camo Beige, which is the same colour I used for the initial dry-brushing to bring out the model's surface detail. This gives the chips a bit of three-dimensionality.

You don't have to hit every single speck and chip, but it's a good idea to get all the large areas, and it's best to confine the effect mostly to the lower edges of the chip area, where the broken paint edge would catch the light. I use a lot of thinner in my paint, and a very small pointed brush, but even so, in this small scale I find it very difficult to get an effect that is both subtle and visible.

You can also do this with a sponge, to get chips that have scratched the surface of the paint, but not penetrated right through to the bare metal. I've skipped that on this model.

Something else I haven't done on this model, but which can look good: go in on large areas of high-traffic chipping with a sharp HB pencil, and scribble into the brown-painted areas only. This will give them a metallic sheen, looking more like areas that are being constantly abraded. You don't need (or want) to entirely cover the brown with graphite; you just need enough there to give it a metallic glint.

As with any weathering technique, it's easy to go overboard with this.