Showing posts with label paper models. Show all posts

Monday, 8 December 2025

Paper Garden Shed


I don't remember where I got this from, but I vaguely recall that it was part of a set of download-and-print paper buildings for Warhammer.

I printed it years ago, and found it when I was organising (hah!) my workroom, so I put it together and gave it a base. It looks like I might have intended it for 15mm gaming, not 28mm — Sergeant Measuresby  would really have to bend down to squeeze in through that door.

Three-dimensional models are all very well, but it cannot be denied that these fold-up 2d models are a lot quicker and easier to get on to the tabletop, and I think they can look pretty good too. 

Saturday, 1 April 2023

Paper Minis from Okum Arts


Since I have the glimmerings of a Call of Cthulhu campaign beginning to form in my fevered brain, I thought it would be useful to have some miniatures for the tabletop.

I have a few of Reaper's Mythos figures, that I got in one of their Kickstarters some years ago. I have fourteen of them in all that would be suitable for Investigators, but there are only four female characters, and two of those are skinny little things in Victorian dress. I'd like to be able to pad out that lineup, but when I recently went to buy half a dozen figures from Reaper for about thirty yankeebucks, the cheapest shipping option they offered was about ninety dollars — three times the cost of the figures. So, bugger that.

Another option is to find or buy STLs for appropriate minis, and print them myself, and I may still do that, as I do prefer three-dimensional miniatures, for player-characters at least. But there is another option.

Okum Arts sells printable PDFs on DriveThru-RPG of quite a large variety of double-sided 2d paper figures, some of which I've shown here alongside a few of the 3d Reaper minis. They're pretty cheap, generally only a couple of dollars per set, and they're quick and easy to prepare. The few I've shown here are a bunch of cultists and a single down-at-heel Investigator, but there are a lot more, including a set of Mythos monsters, and some Pulp staples like gangsters, G-men, and Rocketeers. There are sets of steampunkish Victorians as well, designed for a game called Contraption, about which I know absolutely nothing.

They're in a fairly simple, colourful, cartoonish style that is well suited to this use. More detail would be mostly wasted and would tend to just confuse the image at tabletop scale. The PDFs are mostly layered, so that various colour and other options can be enabled or disabled before printing. They're the right size to work alongside 3d minis. I've printed out some standee-stands for them (STL available on Thingiverse at https://www.thingiverse.com/thing:3453434) but they could be quite easily glued to card bases.

These are just printed on paper, as my Brother laser printer is incapable of handling anything heavier. However, they'd be better printed on light card, which would make them a bit sturdier as well as making them stay in their bases a bit more securely.


Later...

I have, in the past, laminated fold-up paper minis like these on card to make them thicker and stiffer.

But that's a bit of a faff; it makes it difficult to align the front and back images, and it makes the figures harder to cut out.

For these ones I've just stuck a thin strip of black card along the base tab, front and back, with double-sided tape.

That keeps the paper mini firmly in its' standee-stand, and all I have to cut out is a double layer of printer paper.

They're perhaps not as sturdy as card minis would be, but what the heck, if they get damaged beyond the point of usability it's a matter of five minutes to print, glue, and cut out a whole new one. And unless the user is particularly ham-fisted, these paper figures are likely to last pretty well.


Tuesday, 26 February 2019

Printable Heroes

Click once for a two-sided fold-and-trim figure without background
Click again to get the same figure in black & white line work (colour your own!)
Click on the little silhouette figure above the standee to add or remove a heavy black outline
I have a personal preference for 3d painted miniatures when it comes to tabletop gaming, but they do have their disadvantages. They can be expensive, quite heavy en masse if cast in metal, and troublesome to store or transport. Also, they take quite a bit of work to prepare to a standard that satisfies me — pre-painted miniatures are available, but they're either phenomenally (and justifiably) expensive, or they're pretty crap.

There have been flat card playing tokens around for decades, but they've generally not been of great quality. They used to be called standees, among other things, and I first encountered them as tokens included in board games.

What I'm looking at here are much nicer than those old tokens, though they're essentially the same thing. They come from a site called Printable Heroes, and the person who runs it has a Patreon through which they release new standees on a regular basis.

I have only seen some of the PDFs released for free, so my comments are based mainly on those. The example I present here is the Banderhobb.

There is some information presented on the website about the creature, including in which book, and on what page, you can find the D&D5e stats for it.

On the right are download links. There are multiple options, depending on at what level you're donating to the artist on Patreon. As I mentioned above, I've only seen the free one.

The PDF is a single sheet, on which are five layered standees to be printed and trimmed. There are several configurable output options:

  • Click once on the figure to get a double-sided standee that can be printed and trimmed.
  • Click again on it to get the same layout, but this time in black & white line art, which you could colour yourself if you were so inclined
  • Above each miniature is a small silhouette figure: click on that to add or remove a heavy black outline — useful, as it means you don't have to be absolutely accurate with your folding and trimming.

Basing blanks are also provided on the sheet, and they too are configurable — you can choose one of several different coloured rings, to ease differentiation of individual monsters on the battlefield I assume.

Now, although the standee is double-sided, it isn't two-sided — there's no front and back, just two three-quarter front views.

This isn't really an issue for D&D3e onwards, as figures on a tabletop grid have no facing, but it could be an issue if you actually need to be able to easily distinguish a back and front. You could get around the issue by saying that its "front" is the edge of the standee it's more or less looking towards, and its back would thus be the opposite edge. That's a solution, but it's not ideal to me.

Obviously, having to also draw a back view for every standee would double the workload on the artist, but it would make for a better product, in my view.

It's possible that this is not the situation for the paid products, I don't know.

As far as the art work is concerned — I like it. It hits a good line between detail and simplicity, and it prints well. Much more detail would be largely wasted for the purpose of the figures, and less would start looking a bit too sparse and cartoonish.

These card cut-out standees have many advantages. They're cheap, easy to store and to transport, and they don't need to be painted (unless you want to). I like them a lot.

Later on....


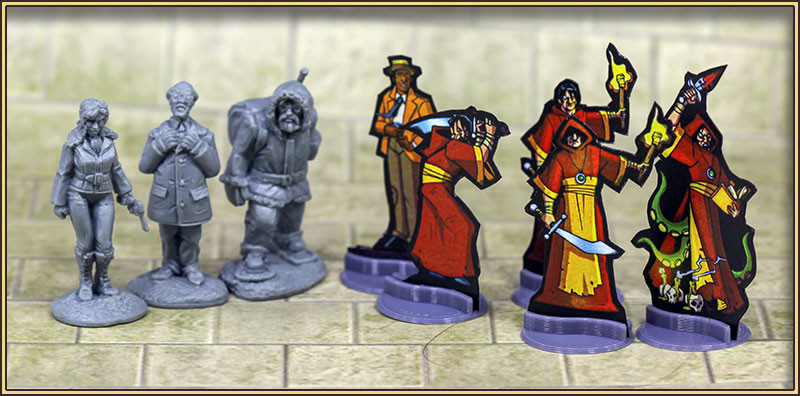
Here's some in the flesh, as it were. My laser printer won't handle card, so they were printed on copy paper and then had a sheet of card sandwiched in the fold when I glued them up. The edges were blackened with a Sharpie marker.

I got steadily slacker and slacker at following the outline of the creature when I was cutting them out, but I don't think it will really matter that much when they're in use.

The 20mm standee stands I just designed in Blender and printed; they have a shallow S-bend so they grip the base of the card figure by tension, and they're glued to 22mm fender washers for stability. I printed them at a pretty low resolution (0.24mm layer height), not only because they print faster that way, but the ridges of the layers also help to grip the standee.

The STL for the base can be downloaded from Thingiverse at https://www.thingiverse.com/thing:3453434

Tuesday, 1 November 2016

It Takes A (Paper) Village

Progress on my el-cheapo paper village progresses.

The one to the left I designed myself ages ago, and just re-scaled to fit better with 15mm figures. It could do with some adjustment I think; the timber framing needs a bit more definition. I rather like the somewhat cartoonish look of the WHFRP buildings, and I'll probably emulate them a bit more.

All of the WHFRP buildings I've put together so far have been very simple, constructionally — basically just rectangular boxes of various heights. I haven't investigated the archive fully yet, and hopefully there might be one or two in there that are a bit more interesting. The simple buildings have the virtue of being very quick and easy to construct, but one or two funkier ones wouldn't go amiss to add some visual interest.

I'm mounting them all on black mounting-board, with a lump of lead hot-glued inside to give them a bit of stability. I haven't decided yet what I'm going to do about decorating the basing; I'll do it all in one go when I have all the buildings I want so that they're all consistent in their groundwork.

None of these have removable roofs or accessible interiors, and I have no plans to change that. I don't think the added trouble is really justified in terms of improving game-play. It would be a different matter if I was playing Mordheim or something of that ilk, but I'm not. What I should do is make some "destroyed" versions that can be swapped out for, when occupying troops (inevitably) get mortared all to buggery.

I'm spray-gluing the laser prints to 260gsm black card, and getting them really well bonded by rollering the bejeezus out of them before the glue sets hard. That seems to be working pretty well, and 260gsm card seems to be quite adequate for strength as long as I don't go standing on any of them. The black card helps a lot with the outline issue I mentioned last time, though it doesn't cure it completely — the paper itself is still white.

Friday, 28 October 2016

El-Cheapo Terrain

I'm kind of a cheapskate when it comes to wargaming terrain. I hate to spend money on it, but at the same time, I want it to look at least half-way decent.

A long time ago, I found an archive of PDFs of papercraft buildings designed for WHFRP gaming. I don't remember now where they came from, and it's taken me years to get around to actually putting any of them together. They're very simple models, and they don't take much time to assemble, which is a good thing, and they're quite attractive when they're glued together.

They're in "Fantasy-Tudor" style, which perhaps isn't especially suitable for WWII gaming, but I like the look of them and they'd definitely be an improvement on wooden blocks.

I'm experimenting at the moment with scaling — they're intended for use with 25-28mm figures, and all my wargaming is either 6mm or 15mm. This one I printed at 50%, and it's just a fraction too small for 15mm; it's about 60mm tall to the peak of the roof — I'll bump up the next one to 60% and see how that looks.

This is an instance where a laser printer isn't as useful as an inkjet would be, for two reasons:

  1. The laser won't print on anything heavier than about 100gsm paper
  2. The fused toner is somewhat water-resistant, which makes gluing with PVA problematic.

The first issue I can get around by laminating prints to light card with spray glue, but the second is trickier. I can scrape away the toner on the glue-tabs, but that's kind of a pain. I think I may just re-composite a whole bunch of them on to A3 layouts and get them printed commercially on light card; it's not too expensive, and it would save a lot of faffing about.

One thing that's an issue with any papercraft model is that corners and edges tend to stand out like dog's bollocks, bright white against the printed textures where the paper has been cut or folded. It pays to run around these areas with a felt pen to subdue the glare — black is OK, but sepia or grey is less cartoonish.

Friday, 15 August 2014

Doors

Here, for your printing-and-folding-and-glueing pleasure, are some doors.

The link points to a PDF of about 650 KB, with 16 doors ready to assemble, and some simple instructions.

They should be printed on reasonably heavy card. My own laser printer won't handle anything heavier than paper, so I print on to sheets of un-cut self-adhesive label paper, and then stick that to black card before cutting anything out.

Enjoy.