Tuesday 29 May 2018

Desert Covenanter

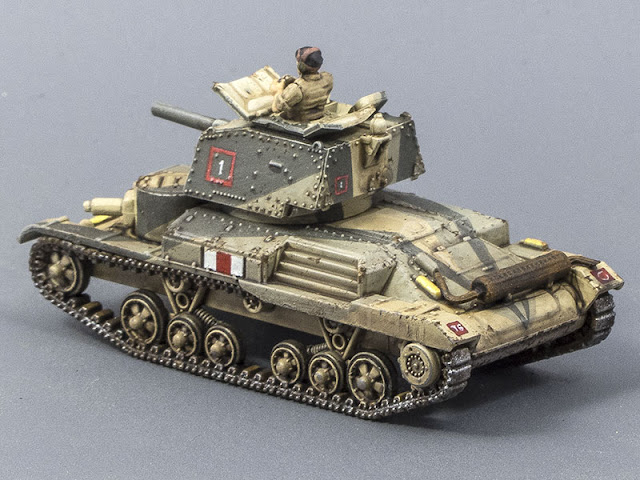
 This is my 3d-printed 15mm (1:100) Covenanter model, printed in white nylon by Shapeways.

There were not many Covenanters sent out to North Africa, but there were some — I've seen one in the background of a photograph of a tank park in Egypt, and they're briefly mentioned in one of the regimental diaries.

The Covenanter was a much-maligned tank, but in truth, by the time it was replaced by the Crusader (in which many of the same mistakes were made all over again), most of its issues had been fixed, and it was discarded more because the turret ring was incapable of supporting any weapon larger than the two-pounder rather than for any other issues. Much was made in the official literature about inadequate cooling, but it is notable that this issue is raised in none of the reports by the men who had to actually operate it.

It was retained as a primary training vehicle for some considerable time, at least up until late 1943.


I have a troop of Covenanters painted up now (plus another in Home Service livery). I've experimented with a variety of methods to paint this sintered nylon 3d printing material, and I'm fairly happy with them as wargaming pieces. As I've said before on more than one occasion though, it's not adequate for fine modelling purposes.

Monday 28 May 2018

Heavy Soviet Tractors

Komintern 15mm model available at http://shpws.me/Md5G
 I've shown these two of my 3d printing models before, but I wanted to get some better photographs of them.

They're the Komintern (above) and Voroshilovetz (below) heavy tractors, based on the 1932 T24 medium tank chassis. They were considerably more useful in this role than they ever were as a tank.

The models are available for purchase from my Shapeways shop, in 15mm (1/100) scale as shown here, or in 1/285, 1/144, or 1/72 scales.

The figures, included for scale, are from PSC's 15mm Soviet Infantry pack.

Voroshilovetz 15mm model available at
http://shpws.me/MmJN (with canopy)
or
http://shpws.me/Mmbg (without canopy)

Saturday 26 May 2018

Another PSC 15mm Churchill


Here's another 15mm (1/100) Churchill from PSC, this time the Mk.VI with the welded turret and 75mm gun. It's a little late for my curent chosen period, but I'm sure I'll get some use out of it one of these days.

Friday 18 May 2018

PSC 6pdr & Loyd Carrier (15mm) — review

Here's another British WWII gun and tow in 15mm (1/100) from the Plastic Soldier Company, this time the 6pdr (57mm) anti-tank gun and Loyd Carrier.

This is a pretty nice pair of models, very easy and straightforward to assemble, which come in a box of four sprues. The carrier and gun are on a single sprue, along with crew figures and various items of stowage — mostly ammo boxes. I especially like the modeling of the canvas tilt, which has a bit more of a fabric-like character than many injection-moulded examples I've seen, and it sits very snugly over the sides of the Loyd.

The only assembly issue I had was with the fit of the axle stubs and sockets; they were all too tight to press-fit without risking bending or breaking something. A few swipes with an emery board loosened them up sufficiently though. The same was true of the mounting pin for the gun barrel.

The carrier can be assembled without the tilt, and four seated crewmen are included, as well as figures to represent the gun crew in action.

In this picture they're just held in place by bits of BluTak, as they'll need to be painted separately and then glued in place. Trying to paint them in situ would be a nightmare.

There's no rolled-up tilt included amongst the stowage, so if you want to represent that on a top-down model you'll have to provide it yourself, one way or another.

 The instruction sheet is a little clearer than most I've seen from PSC, both in terms of image quality and instructions. It could still do with some improvement though; the instructions for their kits are PSC's weakest point, I would say.

For example, the sheet mentions installation of the fuel tanks, but it's not completely clear how or where they fit except by their shape. Likewise, the exact placement of the seated crew is rather vague according to the instructions, but I notice there are four square pads on the floor of the carrier which I have assumed are where the crew seats are.

The exposed engine housing is nicely represented, and in this picture you can also see the ammo cases and what-not that fill up the side bench-seats. They're quite nicely modelled, but if you want to use the Loyd as a troop carrier, you'll want to leave them out and fill up those benches with squaddies from some other source.

I have had some difficulty tracking down where and when the Loyd was first used in action. I've seen one photograph of one in Italy in 1944, but apart from that I don't think they saw active service until after D-Day, in the ETO.

The 6 pounder represented is the later version, with the stepped barrel and muzzle brake. It could be used as the early model 6 pounder, sort of, by cutting off the muzzle brake and ignoring the stepping of the barrel. The gun can be assembled either in its action configuration, or towed, but not both — or at least, not without using two separate models. There are two barrels provided on the sprue; one as shown here, and the other with what I assume is a muzzle cover in place, for use if the gun is to be depicted towed. There are also two sets of wheels with different hubs and tread patterns, and I'm not really sure why that is. I would have to do a bit more research to find out, if I were so moved.

In brief, this is a nice, well engineered pair of models, and the Loyd isn't easy to come by in this scale — certainly not for this price. I'm very happy with them.

Later:


I was pointed towards this Australian film of a pair of Loyds on the back of a truck outside Alexandria.

They appear to be part of a Valentine tank unit, so are probably the Starting and Charging variant rather than gun tows.

Thursday 17 May 2018

PSC 15mm 25pdr & Quad

Click on the pictures for larger versions
The 15mm (1/100) 25 pounder gun-howitzer box set is a pretty useful and flexible purchase for anyone fielding a WWII force. The 25 pounder served, in one form or another, throughout WWII and after, and in every theatre of operations.

This set offers options to build an early or late model 25 pounder on either a Mk.I/II or Mk.IV carriage, or an 18/25 pounder on the Mk.I/II carriage, or the 17 pounder Pheasant anti-tank gun on the Mk.IV. The limber is included on the guns' sprue, while the CMP Quad tow vehicle is on a separate sprue, and can be built with or without a canvas top cover. Mine is intended for North Africa, so I've built it without. (Note: PSC also offer a set with the Morris Quad.)

There are crew figures supplied suitable for the African or European theatres, and they're reasonably well sculpted, if a little soft of detail. All of the helmeted ETO figures have hessian scraps in their helmet nets, so if you want an early-war crew in battledress, you'll have to do some head-swaps, or sand down the clutter on the helmet covers.

The Guns and Limber

There are four gun/crew sprues in the box.There are sufficient parts on each sprue to build one gun and a limber, or two guns, one on a Mk.I/II carriage and the other on the Mk.IV.

Or, you can do as I did, and cheat: I used InstaMold (like Blue Stuff) to make a two-sided press-mould of two of the wheels so that I could do both guns and a limber. I cast the new wheels in 5-minute epoxy.

To be honest, it seems a little parsimonious of PSC not to have just included a couple more wheels on the sprue. There's room enough for them.

The guns go together pretty easily, though I got some parts the wrong way around at first and had to re-do them. The instruction sheets aren't some of PSC's worst by any means, but they could definitely still be clearer.

As you can see from the photo, I built an early model 25pdr and a Pheasant. There's only one hanger supplied (the connecting frame between the gun carriage and the turntable), so I didn't bother with it on the Pheasant. It would be a fairly simple thing to scratch-build, but I didn't think the effort worth while for my purposes. And besides, I vaguely recall reading that it tended to be left uncoupled on the Pheasant in any case, as the massive recoil of the 17pdr had a tendency to rip it off!

The limber, like the guns, went together very easily. Regrettably, there's no option to model it with the doors open, as they would be in action, and it's also missing the canvas cover that shrouded the connection between the limber and towing-pole — that will have to be added from putty or whatever if you want it present.

The Quad

For the most part, the quad assembled as straightforwardly as everything else, but with one exception: the roof.

The locating rim around the edge of the rear portion of the roof piece does not fit with the sides and rear. To get the roof to sit flush on the sides, you have two options: either shave down the inside top edges of the sides and rear pieces, or shave down the roof piece itself. I chose the former as the easier option. The plastic is fairly soft, so it didn't take all that long, but it was an irritation nevertheless.

I built mine as the open-topped version. In the desert, you pretty much had to choose between letting the air in or trying to keep the dust out, and since the dust got everywhere in any case, the choice was generally pretty easy to make.

Unfortunately, there's no piece supplied for the rolled-up top cover tarpaulin, so that's another piece that will have to be scratch-built or sourced elsewhere.

Summary

This set is not without its faults, but they are very minor. The fitting of the quad roof might cause problems for someone quite new to plastic modelling, but not to anyone with any experience.

The faults, such as they are, are far outweighed in my view by the flexibility and usefulness of the options offered. As such, it's good value.

Wednesday 16 May 2018

Cruiser Mk.I A9 CS

Next up for my 1940-41 North African Brits is this one, the Cruiser Mk.I A9 CS, in 15mm (1/100) from PSC. The Close Support tanks mounted a 3" howitzer in place of the gun tanks' 2 pounder.

The Caunter pattern is darker than I usually paint it, as I wanted this tank to look a bit fresher than the others I've done previously. The paint faded fast in desert service under the assault of sun and dust.


Tuesday 15 May 2018

Fresh Caunter

If I'm painting Caunter pattern camo, I usually paint it "pre-faded". For this one though, I want the colours to be pretty fresh, new from the paint workshop.

All the paints are Vallejo VMC acrylics. The base "Light Sand" colour is Iraqi Sand,  the darker "Slate" is German Field Grey, and the light "Silver Grey" is a 50/50 mix of Green Grey and Stone Grey. Apart from the base yellow, which was sprayed on, it's all brush-painted. Ugh.

The vehicle is a 15mm (1/100) PSC A9 Close Support cruiser tank, with a 3" howitzer instead of the 2-pounder.

I think I can honestly say that I am coming to truly loathe painting the Caunter pattern.

Friday 11 May 2018

PSC 15mm A10 Cruiser

This is the 15mm (1/100) British early-WWII A10 Cruiser tank, from PSC, painted in the Caunter disruptive pattern.

The A10 was a decent enough tank for its time, and it fixed a lot of the reliability and usability issues of its predecessor, the A9. But it became obsolete pretty fast, and was forced to stay in service longer than it really should for lack of a decent replacement.


The Agony of Caunter


The Caunter disruptive pattern used by the British in Africa and the Mediterranean up until the last months of 1941 looks simple enough, but it's deceptively difficult to paint well. I have always struggled with it, and I struggle still.

This 15mm (1/100) PSC A10 Cruiser is my latest attempt. The hull has been masked and airbrushed, while the turret has been painted freehand.

Freehand painting is quicker by far, but not so precise — though getting the edges straight(ish) has been made a lot easier since I remembered that I own a small #0 lettering brush. Lettering brushes have much longer bristles than a normal modelling brush, which both hold more paint and make it easier to create straight lines and flowing curves, as the length of the bristles allows the brush to sort of auto-correct the imprecision of the fingers. It's not a complete fix, and it still requires a steady hand, but it's a definite improvement over trying to use a standard #0 or #1 round brush.

The down-side to the long bristles is that they don't conform well to raised detail, so I've used it mainly for outlining the colour panels, and then filled them in with a standard round #1.

The next step up from a lettering brush would be a pinstriping fitch, but fitches have very long bristles indeed, and I strongly suspect they'd make life harder for this sort of job rather than easier.

Masking and airbrushing is a huge pain, but it does give very straight, precise edges. The key thing about Caunter is that all the lines are dead straight, and they have to look dead straight or else the whole thing just looks like crap. Straight edges are, to my mind, more important than absolute accuracy in colour for a convincing result.

Masking tape, even very good quality tape, has only a limited amount of stretch, so working over and around very deep raised or lowered detail is problematic. For a job like this, it would have been better if I had painted the hull top before adding elements like the exhaust or machine-gun. It would still be tricky, but it would be easier.

Thursday 10 May 2018

PSC 15mm M3 Honey

Here's the American M3 Stuart, called the Honey in British service. The model is 1/100 scale (15mm), from the Plastic Soldier Company.

I had originally planned to paint it in the Caunter disruptive pattern, but after several attempts I gave up in despair and settled for overall desert yellow.


Wednesday 9 May 2018

PSC 15mm Churchill

Here's the first of my 15mm (1/100) Churchills from the Plastic Soldier Company in its coat of paint.

I've painted it in a very generic scheme that I can use for Tunisia, Italy, or even Normandy. There are no unit markings (as yet), I may add some later on if I feel the spirit move me.


Here's the PSC Churchill (on the right) alongside the same Churchill from Battlefront, which I painted quite a few years ago. The resin and metal BF model is very slightly larger (in width, mainly), and its surface detail is less crisp than that on the injection-moulded model from PSC. It's also a heck of a lot more expensive, per model.

Tuesday 8 May 2018

PSC 15mm Churchill — first look

Here's my first look at the 15mm (1/100) Churchill from the Plastic Soldier Company. I've built this one as the cast-turret Mk.IV with the 6-pounder gun.

I wasn't quite sure what to expect from this kit. My only previous experience of a plastic Churchill kit was the fairly ancient Airfix model, with its horror-show running-gear of a bajillion tiny pieces. This one, however, was an absolute breeze to assemble, possibly the easiest of all the 15mm PSC tank kits I've tried so far.
Sprue layout and assembly options

Assembly instructions
There are five version options offered from the parts included on the sprue, the earliest model being the Mk.III.

I don't know enough about the Churchill to be able to say how easy or difficult it might be to convert this kit to a Mk.I — though I'm sure it's possible.

Instructions are given only for the Mk.III turret, but it's not difficult to work out what's needed for any of the other versions.

Monday 7 May 2018

PSC 15mm M3 Stuart "Honey" — first look

 The M3 Stuart "Honey" from the Plastic Soldier Company in 15mm makes up into a good representation of the original, and at the usual £20-ish for five models it's pretty good value.

However, there are a few things to be aware of before you launch into building these kits. More things than usual, in my experience of PSC kits, but nothing too intractable — for the most part the engineering is pretty good, but see below for my notes about the fit of the running-gear pieces.

NOTE: I am informed that the Honey in British service had the sponson-mounted machine-guns removed. Fortunately it's a simple matter to chop these ones off, and one of the sets of side-plates provided on the sprue has those points blanked off, which I will hopefully remember next time.


The usual PSC version display, colour-coded
for your inconvenience


WARNING! DANGER!

As usual, PSC have provided a colour-coded layout to show you which parts are for which version.
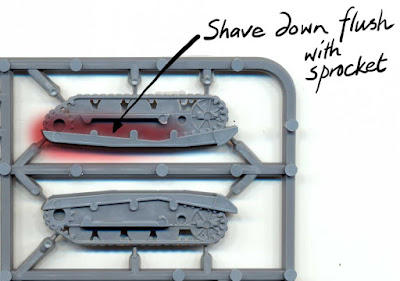
WARNING!

The hull-top parts are mis-coloured, and the one used for the British "Honey", which should be in green, is actually shown in red.

I found this out when I tried to get the track pieces with sand-guards to fit, and could not. Fortunately the cement holding it to the hull-bottom had not yet set hard, and I was able to prise the two pieces apart and fit the right one.


 The instruction sheet shows the process for building the "Honey" only, and nothing at all for the other two (American) versions of the machine.

Fortunately that doesn't affect me, since I'm only interested in the British version.

The illustrations are easy enough to follow, better by far than some of PSC's instruction sheets, but the pictures are still a bit dark and low-contrast. I've cleaned them up considerably for this illustration.

NOTE: If you glue on the auxiliary fuel tanks as shown in the last picture before you have the turret in place, you will not be able to get the turret on without shaving off its locating lugs. Also, with the tanks in place the turret will no longer rotate 360°.


The only major issue I had with the fit of the parts was with the running-gear pieces with the sand-guards — they would not seat seamlessly against the hull top, and left a large and obvious gap along the front outer edge.

I found that what I had to do was to shave down the front half or so of the back of the piece — I've outlined the relevant area in the illustration — until it was flush with the front sprocket moulding. Then the piece settled properly hard up against the mudguard-edge.

There is still a visible seam, but it's not nearly as bad as it originally was. I assume this won't be an issue for the American versions, as they don't have to align with the sand-guards.

PSC Valentine — Alternative Turrets

Valentine Mk.II

The PSC 15mm (1/100) Valentine sprue includes parts to make alternate turrets for the Mk.II, Mk.III, or Mk.IX versions of the tank. These two images show the turrets for the Mk.II (above) and the Mk.IX (below) on the hull I finished yesterday.

Valentine Mk.IX (on Mk.II-III running gear)

Sunday 6 May 2018

PSC 15mm Valentine Mk.III

This is the 15mm (1/100) Valentine Mk.III from the Plastic Soldier Company.

I may have gone a little bit overboard with the weathering I think. The vehicles in the desert took quite a hammering from the environment, but in this case I might have got a bit carried away. Ah well.


Saturday 5 May 2018

Photographic Light-Box On The Cheap

 You can get much better results when photographing models, even with a relatively mediocre camera, if you can control the lighting, and a light-box is an easy way to do that.

You can buy fancy light-boxes complete with adjustable lighting and everything, but they aren't cheap. There are ways that are much easier on the wallet.

I made this light-box from a cheap plastic storage bin, some white posterboard, and a couple of cheap clip-on lights. A cardboard box would do almost as well for the shell, but the strength of the plastic box means that if need be I can clamp lights to its edges.

You will notice that neither of the lamps is actually directed at the model — that's because I usually want a very diffuse light illuminating the scene, so the lamps are directed at the reflective arch of cardboard over the top. If some direct light is desired, it's a simple matter to add another lamp clipped to the top front edge of the box.

The piece of cardboard I used for the top arch isn't long enough to go over the whole span from bottom to bottom, and I'll probably fill those empty gaps with additional pieces of card. It doesn't matter if the join isn't seamless, as it will never be seen in a photograph.

I suppose it might do the job if I just painted the whole of the inside of the box white, but I prefer a smoother arch as it creates a slightly more diffuse light, being reflected from many more angles than just the four of a flat top, sides and back. I may well paint the cardboard liner though, as the posterboard has a very slightly blue cast. I believe it's possible to get a very highly reflective pearlescent white paint, intended for painting walls for home-cinema projection, and if I can find some (and it's not too dear) I'll give that a go.
The subject — an Airfix 1/48 Hurricane Mk.I
The light-box in action with two lights


This is a carved wood Garuda I found in an antique shop and picked up on the cheap, due to it having a large crack in its base which I didn't care about at all. I've photographed it against a piece of coloured card, but otherwise I haven't changed the setup as shown above at all.


Reaper Bones Ice Worm
These two scenes have been exposed and post-processed with the aid of a very simple little white-grey-black card. Photoshop allows you to eyedropper-select the tones to be treated as white or black within the the scene, and if you have elements in the image that you know are pure white and/or pure black, this automated levelling can be very handy.


Battlefront 15mm British (North Africa)
Cards like this are available from photographic supplies vendors, but they're ridiculously expensive, and I don't need that degree of accuracy. I just mixed the grey until it was a close enough match to the medium grey on a scanner calibration card I got with my scanner some years ago.