Friday 29 March 2024

Tiger II


I got around to painting the 1:100 scale Bergman Tiger II model I'd been mucking about with in Blender and printed on my elderly Ender 3 in eSun PLA+.

The number decal (from Skytrex, I think) on the starboard side didn't stick properly and came away on my finger; I had to kind of glue it back in position, and there's quite a bit of silvering as a result. I'll probably have to go in and paint over as much of the carrier film as I can manage.


Below is this 3d printed Tiger alongside an injection-moulded Zvezda kit of the same scale. I think it stands up pretty well, especially considering that it's a FDM print.


Sunday 24 March 2024

M-Space Binding


Because I wasn't expecting my copy of M-Space to arrive for a while yet, and because I'm starting a space opera campaign fairly shortly, for which I wanted to use the rules, I printed a copy from the PDF and bound it.

Because of the unusual format of the layout, the finished book, when the signatures are printed on my A4 laser printer, is only about 148mm square. I've found it to be an unexpectedly comfortable size for a RPG book — it takes up very little room, and doesn't get in the way on the table, while still being pretty readable. The page count could have been dropped quite a bit with a traditional page dimension I think (and by leaving out the huge black toner-eating full-page illustrations that I think are there mainly for padding) but the 240 pages of this one are a manageable size.


I just used the heavy brown manila paper from supermarket bags for the covering, over 1mm grey board (2mm would have been better). I screwed up the paper first and then ironed it out flat again, to get the crumpled surface texture — I think that if I'd also given it an acrylic glaze over the top it would probably look quite leathery. Maybe I'll try that another time.

The rather light 1mm grey board warped quite a bit under glueing. I'll just live with that I think.

The actual publisher's copy arrived unexpectedly early, so I have that now, but this one will be very handy I think, for slipping into a bag or pocket.

Saturday 23 March 2024

Tiger II Remix


More as an exercise than because I actually need one, I set about remixing the turret of one of Bergman's 15mm (1:100 scale) Tiger II models to minimise the problem of layer lines when printing in FDM.

I split it up to be printed in individual components so that the slightly sloping plates at fore and aft of the turret roof can be printed vertically, and the gun's strength can be maximized by printing it horizontally.

It worked well enough, though assembly was a bit of a faff and the individual components could do with some refinement.


Then, since I had a turret printed, I thought I might as well do a hull to go with it. I refined the detail on the engine deck, and added link detail to the tracks. Again, it was split fore and aft to print vertically, and it turned out okay.

My old Ender 3 is showing its age, and there's a bit of clean-up to be done, but I think it has produced a model more than adequate for tabletop use. I would probably print future models in resin, which would both be faster and give me better surfaces.

This is not the only model in Bergman's Tiger II set, and I went on and detailed those others as well. When, or if, I get around to actually printing them, who can say.


Sunday 17 March 2024

Preparing Paper

I am in the throes of preparation for reviving the mouldering corpse of my old space opera campaign. When it was last active, some considerable time ago, I was using the Hero System 5th Edition to run it. I did like the Hero System in many ways, but it was not the simplest game to run or to play in.

This time I'm planning on using Chaosium's Basic Roleplaying d100 system, though the milieu will remain the Star Hero Terran Empire. I have a d100 sci-fi game, based on the Mythras Imperative rules, called M-Space that I will pull all the character generation and equipment and what-not out of, since all the definition work has already been done there.

Rather than spending hours and hours painting 3-dimensional miniatures for the game, I'm once again making use of Okum Arts paper minis, which are great and cheap and pre-coloured. The pile to the left are all robots; the rest are various humanoids. I'm printing them on some 150gsm inkjet paper, so when folded and glued they make quite a stiff and sturdy miniature, still easily cut out with a little pair of decoupage scissors. Plain 80-90gsm printer paper is usable, but the resulting minis are still very thin even after being folded and glued, so they need card reinforcing strips applied along their bottom edge so that they don't fall out of the standee bases.

I've shown these before — these are some of them that I made for Call of Cthulhu, in 3d-printed bases that I designed in Blender and printed on my Ender 3.

I prefer black bases, but at the time I printed these I only had grey filament. Now I have some black PLA+, so I'm printing a bunch more. Because why not, after all?

Monday 11 March 2024

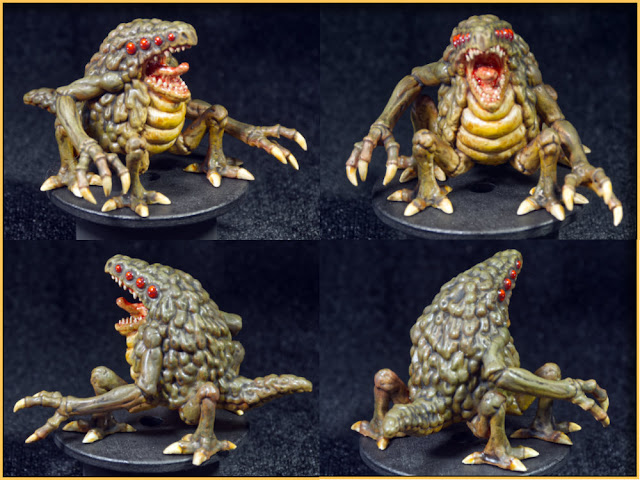
Critter


I cannot remember who sculpted this, nor what it was called, nor whether it's supposed to be a specific monster or just a generically monstery critter. It stands (or squats) 40mm to the tip of its muzzle.

I printed it quite some time ago, and just got around to painting it.


FDG Ranger


This is one of the support-free FRPG minis produced by Fat Dragon Games, in this case a ranger.

I like them as gaming pieces because their poses tend to be quite restrained. I'm not fond of the sorts of fantasy minis that are presented in hugely animated leaping-slashing-bellowing poses; they're exhausting to look at.

These FDG minis have the additional benefit that they can be reliably and successfully printed on a FDM printer.

That's maybe not as important as it once was, now that decent resin printers are affordable, and the resins available are tougher, but I still appreciate it. Plus, the new generation of FDM printers appear to be capable of detail and smoothness comparable with entry-level resin printers, while being much cheaper to run.

My old Ender 3 is not, alas, that good. Still good enough for tabletop work though.

Sunday 10 March 2024

Binding BRP


More adventures in bookbinding.

Some time ago I got a copy of Chaosium's Basic Roleplaying when the PDF was on sale at DriveThreRPG for 99c.

I printed it full-size and bound it in a fan-glue binding (the green one). The BRP Quick-Start rules were free, so I did them too (the floral cover, on the left). Both of those bindings have been around for a year or so, and since then I've also bought a PoD paperback edition of the rules.

Recently I thought I'd like a copy in a more compact form, so I printed the Big Yellow Book in A5 signatures, and stitched and bound it into a Little Big Crimson Yellow Book, on the right.

Now Chaosium have released a shiny new edition of BRP, with an editable RTF text block available under the ORC. However, even without any illustrations, and with all the text at 10pt, an A5 production of that comes to somewhere around 700-800 pages, so it might be a while before I get up the gumption to lay that all out and print it in signatures.

Thursday 7 March 2024

Very Old Wizards

 These are all very old 25mm figures that I painted some time in the late 1980s, mostly using Maimeri gouache acrylics. They all came, as far as I can recall, from two three-figure sets from Ral Partha, and I think they were designed by Tom Meier and/or Julie Guthrie.


Wednesday 6 March 2024

Reaper Great Worm


This plastic Great Worm from Reaper (one of their very first Bones models) is a mini that I painted quite a few years ago. I've used it as a test piece, to photograph against my new velvet backdrop.

I like the look of the dark background, and I'll probably use it quite a lot. I think it would make post-processing a lot easier if I could arrange the lighting to be a lot more focused on the models, and I'll experiment with some method to restrict the light circle quite a bit.

Black Velvet Backdrop

I bought a piece of black furnishing velvet to try as a backdrop for photographing my models.

I've hung it off a frame at the back of my photo box, draped forward over the floor of the stage.

I have three fairly powerful daylight LED bulbs over the stage, which is just a translucent plastic storage crate. There is a mirror tile on either side to reflect some fill light back into the scene.


My camera (a Nikon D3500), in common with all cameras with automated exposure controls, tends to freak out a bit when a scene is overwhelmingly dark or light. Fortunately, it has pretty easy exposure compensation controls, although finding the exact degree of over- or under-exposure is generally a matter off guesswork and trial and error.

This image has been underexposed by one stop, and though the minis look a little dark, the colour card is still a little bit washed out as the camera struggles to get the right exposure.


This one has been underexposed by two stops, and everything is pretty dark.

The velvet background is nice and black, but the white of the exposure card is perceptibly grey, and the minis are very dark. I could probably bring them out with some post-processing, but I suspect there would be a lot less faffing about involved in darkening the background of the first image than in trying to get an acceptable tonal range in the minis in the second.


This guy, a 28mm monk from Reaper, was underexposed by one stop to keep the dark background from making the camera blow out the highlights. But with this one, I focused the lighting much more closely on the mini, so that almost no detail from the background was picked up at all. He's been post-processed to further darken the background.

I like this effect, and I'll probably make a lot more use of it.


This was an experiment with a modeling light setup (i.e. using light to model the surface of the subject), using a single lamp from the upper right, and a convex makeup mirror as a fill reflector.

It's probably not often that useful a lighting rig for photographing miniatures, as highlights and shadows tend to be painted in, and the lighting generally needs to be more flat and even. However, I have it in my grab-bag if I should ever need it.

Monday 4 March 2024

Organisation


I've been very slowly tidying and organising my workroom, so that I could conceivably actually use it for something other than storing junk.

Part of that has been tidying up my modeling bench.

The top image is it yesterday; the bottom is its current state — it's unlikely to stay like this for long, but I'll enjoy it while I may.

It's refreshing to have more than a six inch square area free to work in.

Panther to Jagdpanther and back again


Some time ago I bought a box of five 1:100 (15mm) plastic kit Panthers from PSC. They included alternate hull and gun pieces to make Jagdpanthers, if the modeller so chose.

Realistically, getting three Panthers and two Jagdpanthers out of the box would probably have been sufficient for 99% of my wargaming needs, but being the cheap and stingy person that I am, I decided that I wanted to get maximum flexibility from the set.

So, through the magic of magnetism, I made the two options interchangeable on the basic running gear. I used epoxy to set the magnets in place because of both its strength and its gap-filling properties.

The bottom magnets were straightforward enough to place, but to get accurate registration and polarity for the upper magnets, I placed the two sets of magnets together with a piece of cling-film between them, put a liberal blob of epoxy in about the right spot on the inside of the upper hull, and closed it up and let the epoxy drool down and around the upper magnets.

I numbered each set so that the matching magnets always go together.

I will have to make sure that the camo pattern at the front edge of the hulls match, more or less, when I paint them up, but that's not really a big deal.

Just as an aside, I also glued a slug of lead in the hull bottom to give the plastic model a bit of heft. It makes it feel more satisfying in the hand, but it does have the disadvantage that the increased mass means that if I drop it on a hard surface it's more likely to smash into a bajillion pieces.

Sunday 3 March 2024

Found Terrain


When I was stacking the first batch of firewood for next winter, I kicked this little knotty chunk of twisted pine, and thought that it would make a good rocky outcrop.

So I painted it, and added some foam-flock mossy patches, and voila! A rocky outcrop.

Shown here with the 28mm Sergeant Measureby, to the left, and a pair of 15mm PSC plastic British paratroopers in front.