Thursday 31 August 2017

Panzerjäger 1 Revisited

I finally got the German WWII artillerymen I ordered from Peter Pig, to crew my 3d-printed 15mm Panzerjäger 1 conversion.

This is the longest I've ever had to wait for an order from Peter Pig; they're normally here within a week or ten days, but this time I had to wait nearly a month. I suspect the problem is with NZ Post, since a whole lot of stuff arrived simultaneously, all of which had been ordered and shipped at about the same time from all over the world (Canada, UK and China) at the beginning of August.

Anyway, back to the model. Both of the figures required a little surgery to get them to fit into the very cramped fighting compartment, but nothing too serious — I had to carve off their bases and gasmask canisters and bend their limbs a bit, but that's about all.

I like Peter Pig figures a lot, but it cannot be denied that they all appear to have been modelled off Munch's The Scream.

It also cannot be denied that my 15mm figure painting skills are a bit woeful, but since my own eyesight is turning to shit, I tend not to notice their shortcomings once I'm pushing them around the wargames table.

Wednesday 30 August 2017

Battlegroup Equipment Cards

One of the things that the Battlegroup WWII wargames rules have started including is sheets of reference cards for the various vehicles that you might find yourself using, so that you don't have to have  the rulebook open at the table all the time, taking up a whole lot of space.

Unfortunately, the Blitzkrieg book is the one I play from the most, and it was published before these cards became a Thing. So, I decided to make some of my own, having completely forgotten that the publishers have now made separate sets of cards available. For the cost of a few quid I could have saved myself a whole lot of effort. Hey-ho.

I've printed them with an image of the vehicle on one side, handy if you can't remember which model of SdKfz 251 is which. On the other side is the game-relevant information and a coloured background to distinguish the nationalities — khaki-brown for the British and grey for the Germans. The colours are mainly to make sorting them into their sets a bit easier.
NOTE: Unlike most of the printable game aids I make for my own gaming, I won't be making these available for download — there would be copyright issues with many of the images I've used for a start, not to mention that they'd be in direct competition with the Battlegroup card sets, and I like those guys. So, these ones are just for me.

Saturday 26 August 2017

Making Wargaming Terrain — an Epiphany

One of the things that has prevented me making terrain pieces in the past (apart from the problems of storage) is that I've been daunted by being in the mindset of "I must have sufficient terrain to play any conceivable scenario". The task seems overwhelming, so it just never gets properly started.

It's taken a good long time, but I've finally managed to change my brain to "I must have sufficient terrain to play the scenario we want to play this weekend — do I have it? If not, make the missing bits."

It makes the job so much more manageable, and of course stocks will accumulate over time so that I'll have fewer and fewer things to make for any given game.

Achievable goals, that's the key.

Something I've never done, and which I probably should start, is to keep a few notes on my processes for particular terrain modules — paint colours, materials etc. That way, when I come back to making river sections, for example, after a year's break, I'll be able to make bits that are more likely to match up with existing pieces.

Friday 25 August 2017

Road-building

 A couple of years ago, when I had access to someone with a laser cutter, I got a bunch of road sections cut from 3mm MDF. My cunning plan was to give them interlinking jigsaw ends, so that they'd stay in place on the tabletop during a game.

That turned out not to be such a fantastic idea. It's not that it didn't work, but it made the individual pieces a lot more troublesome to lay out and to pick up afterwards.

So, now that I'm on a bit of a terrain-building kick, I've got on to actually making some roads out of the pieces, and I'm starting by cutting off the interlocking tabs. A good sharp saw takes care of that with just two or three strokes, so it's not a big deal.

I've bevelled all the edges on my belt sander, and the next step is to carve out the wheel tracks with a shallow 25mm gouge. That takes a little bit more time and effort than cutting the ends square. Then everything is given a quick once-over with very coarse sandpaper to knock all the edges off.

I'm not completely sure that this is a necessary step; I'll finish one section without carving to see if the difference is noticeable enough to make it worth while carving all the others.

This is the first finished section (with carved-out wheel tracks). I was a little worried that the MDF strips might warp under the paint and glue, but it turns out to be OK and sits quite flat. This is quite a short piece though, and some of the others are a lot longer.

I did consider adding a bit more vegetation along the sides of the road, but I decided against it as it would make the pieces a bit more difficult to stack and store.

If I decide later on that I'd prefer them a bit more overgrown, it's a simple matter to add more crap.

Later on


This piece hasn't had its wheel tracks carved out, and to my eye the difference is pretty minimal. I can tell the difference, but I'm not sure if that's because I know it's there.

Thursday 24 August 2017

A Mighty Forest (Eventually)

Some time ago I bought a whole lot of plastic trees from China to make wargaming terrain with. I've finally got around to making a start on basing some of them.

The bases are 3mm MDF, the brown forest floor is real dead leaves munched up in a little ten dollar coffee grinder, and the grass is old-school sawdust flock. Lurking in under the trees behind the Lanchester armoured car is a 15mm British wireless operator, but so good is his camouflage that you can't really see him.

They're not the most realistic terrain pieces ever made, but considering that the trees cost me about fifteen cents each, and everything else was basically free, I'm pretty happy with the results. This is about a fifth of the whole bunch, so I've still got a bit of work ahead of me.

Tuesday 22 August 2017

Occupation/Deployment Markers

I play in 15mm, and I don't use buildings with removable roofs. So, for those times when our little troops have occupied a building, I've made these little markers.

I guess they could also be used for concealed deployment.

I thought I would number them on the base so that if need be I can note on my army list which unit is referred to by which flag.

Later....

I found some self-adhesive 10mm letters in the scrapbooking section of the Warehouse, which serve my purpose very well, except that there's kind of an odd distribution of characters — only one each of G and 6, for example. Still, they're pretty cheap.

So, this photo shows how I envisage these being used. There are three British units in the two houses to the right, and one German unit in the left-hand house. The players may or may not know the nature of their opponents' units, depending on whether they'd been spied approaching the buildings (and depending on how good their memories are). In the little copse in the centre are two sneaky dastardly Hun units, hiding and not yet revealed.... or are they? They might be dummies, laid out to deceive. They might be a pair of gulaschkanone, or they might be a couple of emplaced MG34 tripods just waiting for the Brits to break cover. It would be nice to know. Maybe just drop a few mortar rounds in there, just to be sure.

Portable Light Box

 I bought this portable light-box from a company called Upkeep Yoga for fifty of those Yankee dollars. It is, perhaps unsurprisingly, not as good as they made it look in the product shots, but it's not completely worthless.

The shell is what appears to be ABS plastic, and it's supposed to be held in shape by magnets. The magnets aren't strong enough for the job, and their placement is... inexact, to say the least.

It is lit by a single USB-powered LED strip, which provides barely adequate diffuse lighting. I won't be doing any hand-held shooting under this light.

It comes with two foam mattes: one white, one black-ish. They're OK; they create an adequately seamless background. How easy they will be to clean I don't know.


I will need to do some tinkering to see how best to set my camera for use with this box. These are on the white and black mattes, without any exposure compensation at all. With the puny amount of light shed by the LED strip, the black matte required about a second and a half of exposure at ISO 200, the white matte about 1/15.


These are from the RAW files, with quick EV compensation (but nothing else) applied in Lightroom.

In summary, it's not a worthless bit of kit, but it's far from stellar. It will be of some use on the road (which is its function, after all), but it's hardly going to replace my current photographic setup.

In-camera +2 EV compensation

Auto-bracket + HDR and Levels adjustment
These two images I've taken to try out some in-camera adjustments.

On the left, the photo was taken with a +2 EV compensation.

On the right, I've auto-bracketed by ± 1 EV, merged the three exposures into a HDR image, and then adjusted the levels to get a pure white background.

Of the two, I think I prefer the simple +2 EV exposure. Apart from anything else, it looks sharper to my eye.

Monday 21 August 2017

Yet another miniature painting WiP post


If I ever get back to DMing my own campaign, I might have the need for a half-orc or two. Fortunately, I got a half-orc or two (or three) in the most recent Reaper Bones kickstarter fulfilment.

So far, all I've done is glue the plastic figure to a steel washer, and extend the stone base texture out with Green Stuff.

Ettin
I need to decide what I'm going to do about the skin tones. I've been using a snotty greenish colour for the very few orcs and ogres and what-not that I've done thus far, and I'd like to echo that a bit, but I don't want to go the full green-skin for the half-orcs.

Orc archer
Maybe some kind of pale Caucasian skin tones with a greenish filter over the top might serve. Only time (and experiment) will tell.


Later....

I started, as usual, by spraying the whole thing black and then doing a zenithal spray with white. That helps a bit when it comes to establishing highlights and shade, but mostly it just shows me very clearly where the contours and detail of the miniature lie.


My experiments with filtering paler skin didn't work, so I've fallen back on my standard orky skin. The base colour is Vallejo VMC Japanese Uniform, washed with Citadel Athonian Camoshade. You can see the colour of the wash on the clothing, which up until then was still plain white.

I highlighted the muscles a little with a couple of tints of of the base colour, lightened with VGC Bone White. The tonal range is a bit broader than I'd like; it has a bit of a "chalk and soot" look, but I can live with it.

Friday 18 August 2017

Carden-Loyd MG Carrier (15mm)


These are some of my 15mm (1:100 scale) 3d-printed 1930s British Carden-Loyd MG carriers, printed by Shapeways in FUD resin.

This really was just a machine-gun carrier. It was possible to operate the gun from the vehicle, but the arc of fire was very limited and the crew very exposed — the gunner would have had to have exposed himself fully to change an ammo box. That thing on the port side track-guard is the tripod for the Vickers.

The model is available for sale at http://shpws.me/OkRX

Thursday 17 August 2017

Opel Blitz Office Body (1:100 conversion piece)

Front view

Rear view
I've been working on a 3d-printed kit conversion piece with Zvezda's 1:100 scale Opel Blitz in mind. I haven't seen PSC's kit yet, but I don't see any reason why it shouldn't work with that too.

This is the most basic form of the body; there seem to have been quite a few variants. This would be usable as the command truck version, or (with the addition of a radio mast) the radio truck. The rack on top is for stowage.

It's available for sale at http://shpws.me/OSrJ
This is Shapeways' render of what it will look like.
What the actual thing will look like will
remain a mystery until I get one printed.

Wednesday 16 August 2017

Peerless Armoured Car (15mm)

 This is my 3d-printed model of the Peerless armoured car of 1919.

This one is printed in WSF, so the surface texture is very grainy. Now that Shapeways have dropped the price of their FUD and FXD resin prints, I doubt that I'll often bother with WSF any more. The FUD is still more expensive, but the improvement in print quality is worth a couple of dollars extra I think.

It'a available from http://shpws.me/MIvy
2

3

4

5

Monday 14 August 2017

Grand Panjandrum (15mm)

One of these chaps is likely to get himself run over.
This is my 3d-printed 15mm (1:100 scale) model of the experimental Grand Panjandrum.

It's presented in the Bolt Action Operation Sealion supplement as an actual operational weapon, though the original never made it anywhere near the fighting owing to being ludicrously inept and uncontrollable.

You can get one of your own at http://shpws.me/OzSb

Friday 11 August 2017

I Fear Change

I started idly messing around with my Blogger theme, and rapidly realised two things:

  • I really should have backed up my old layout before I started, and
  • Not all themes give you access to the tools you've become accustomed to using for the last decade and more.
The current crop of available themes appear to be heavily oriented towards mobile users, which is not all that surprising I suppose. But it inevitably seems to mean stripping away most of the functionality of the desktop-oriented version, which frankly is a huge pain in the arse.

The most inconvenient change: I can no longer create a new post, or edit an existing post, right from my blog. Now I have to go to the Blogger dashboard and do it all from there.

Bah, humbug.

NOTE:
I've since changed it back to a less cool and snazzy theme that does actually include the tools I want. Take THAT, hipster UI designers!

Zvezda Opel Blitz (15mm)


These are the 1:100 scale Opel Blitz medium trucks from Zvezda. They're cheap and simple, and within certain limits they're reasonably good gaming pieces.

The main issue, visually, is that the planking of the cargo compartment isn't etched, so I've had to draw it on these two with a technical pen. The canopy is OK as far as it goes, but as usual with injection-moulded pieces there's no detail on any of the sides.

I think I may have gone a bit overboard with the chipping and rusting. I got a bit carried away.

Opel Blitz Ambulance (15mm)

 The ambulance conversion fro the Zvezda 1:100 scale model of the Opel Blitz is complete. Or complete-ish. I still haven't found a satisfactory way to add ropes to secure the load on the stowage rack without making them look like they're just lying there, and I don't think there is a way without actually carving the front tarpaulin to make it appear that the ropes are pressing into it. I'll probably end up just leaving it, unless it niggles at me too badly.

Its been an enjoyable project, and good to get back to some almost ground-up modelling after all these years. And now my little toy soldiers have some medical back-up.... though I note, now that this is done, that I still don't have any medics or stretcher bearers.

That grid on the back is a set of foot-steps

The view from above

Thursday 10 August 2017

Opel Blitz ambulance conversion (15mm)

I'm in the process of building some Zvezda 1:100 scale Opel Blitz trucks, and my easily-distracted mind turned to thoughts of other variants even before I'd finished the stock-standard kits. One conversion that would suit 3d printing would be a set of tracks to turn the truck into the half-tracked Maultier variant, but the one I've started working on immediately is an "office" body to turn the standard truck into an ambulance.

I haven't done any plastic card conversion work in decades, so I'm pretty rusty.

I'm building up the shell of the body around the existing kit's truck bed, because that gives me a square base of the right size, and more importantly, because it already has all the mounting points and what-not moulded in place. The plastic card I'm using for the walls is about 1mm thick, so  after the vertical slats have been sanded off and the card walls glued on, any increase in dimension is negligible.

The curved roof was a bit of a problem, because I couldn't find an easy way to evenly and precisely bend the card I have available.

In the end I laminated some light cardboard around a tin can of the right diameter, cut it to size, and then slathered it all in liquid cyanoacrylate to make it sandable — the superglue works a bit like resin in fibreglass.

The door and window frames stand proud on the original vehicle, so I cut them out of paper and glued them down with PVA. Looking at them now, I could have cut them a bit thinner, but it's a bit late now unless I strip them right back and start again.... which I'm becoming more and more tempted to do.

Now I've got the framing applied on the other side — I cut these ones to about half the thickness of the other side, and I think they do look better, though it makes the paper a little bit harder to handle. This sort of thing would be ideal for a laser cutter, or for photo-etching.

With all the surface detailing done, I gave the whole thing a squirt with white primer. This really brings out all the flaws. In general I'm not too displeased, but there are definitely some areas that need attention.

Did I say all the surface detailing? I just realised that I hadn't applied the door hinges. Bugger.

Now the module is mounted on a chassis, and it would be quite usable on the tabletop in this form (assuming I'd finished the painting, of course).

However, for completeness' sake, there are a couple more bits and pieces to be added.

There should be a stowage shelf just above the cab, which would be full of all sorts of clutter, and there should be a set of footsteps that fold up against the rear doors when in transit. They'll be next.

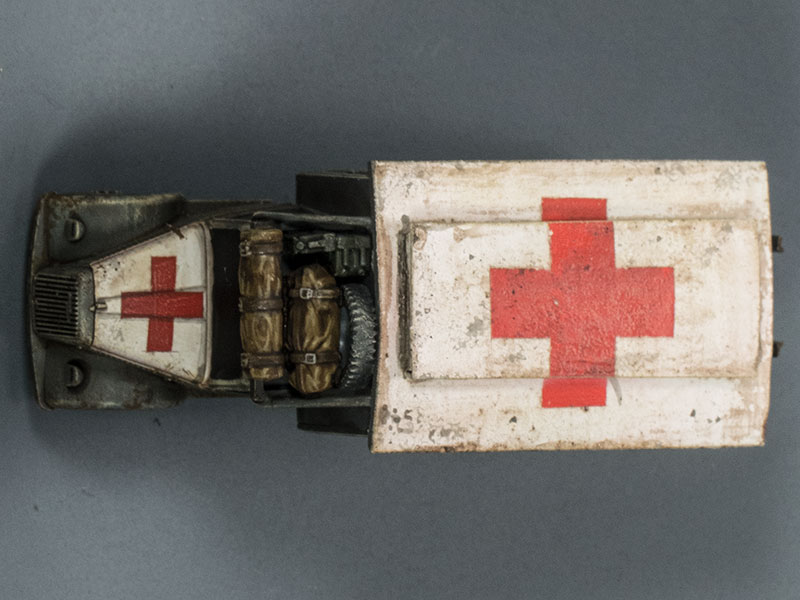
OK, here we have our front stowage shelf with some bits and pieces from PSC's German Stowage & Tank Commanders set.

There really should be some ropes and things holding everything in place, or else it would all go straight over the bonnet the first time they put on the brakes. I'm not quite sure how I'm going to go about that.

Monday 7 August 2017

"Ferdinand" tank-destroyer (15mm)

 Here's another model I bought because I like its goofiness, rather than because I have any immediate wargaming use for it.

It's the "Ferdinand" 88mm tank destroyer, later slightly modified and renamed "Elefant" in 1:100 scale (15mm) by Zvezda.

When I bought this, I forgot that I'd already ordered one from PSC, so now I have another one waiting in the wings in case I should ever need to actually field them.

2

3

4

5

Mud FX

Mud and general filth on model AFVs has always been problematic for me. I usually go little further than adding a bit of dust and grime with paint, because it goes against the grain to cover up all the model's lovely detail.

However, sometime some really enhanced filthiness is called for.

This is a bit of experimental tinkering, using my old Airfix Mk.1 as a test-bed. I thought, what better to use to represent mud than actual mud? So, I went and scooped out a bit from the front lawn.

It's been thoroughly dried and baked to kill off any spores or anything living in there, and then pulverized in a cheap little coffee grinder I bought for exactly that sort of job. It could be ground even finer with a mortar and pestle, but I wanted to keep it slightly clumpy; to represent churned-up grass you could mix in some chopped-strand flock as well.

I mixed it into a loose, muddy slurry using Vallejo acrylic thinner (NOT the airbrush thinner), which is basically just a thin matte acrylic medium as far as I can tell. This binds the "mud" into a fairly tough, water-resistant layer when it dries. Then it was brushed over the tracks and dabbed around the bottom edges of the hull with a ragged old hog-bristle brush. The randomly clumpy consistency of the slurry, and the fact that it's ground much more coarsely than paint pigments are, keeps it from just looking like paint when it dries.

When it goes on wet, the "mud" is a dark brown, but it dries to the opaque colour you see in the dish here. Damp mud is darker in colour than dry, so I sloshed on a layer of my Magic Wash to darken it up again on the hull sides — I left the mud on the tracks untouched, because I wanted to see the difference. When that had dried, I dabbed on a little more of the dirt/thinner slurry further up the hull sides, where the mud would have dried a bit. You could probably do it in reverse — dab on the wash only where you want the damp mud — but the advantage of adding "dry" mud over the top is that it increases the textural effect of the dirt slurry.

Overall, I'm reasonably happy with the outcome, but it would have to be used judiciously I think. It certainly looks like dirt, which is unsurprising because it is dirt. But as I expected, it absolutely swallows any kind of fine detail, and the acrylic thinner is tough enough that it's not really feasible to remove. Possibly, using something like gum arabic as a binder would be a better idea; it could then be modified after it dried with a wet brush or cloth to thin it out or remove it, and then it could be set in place with the thinner only when one was completely satisfied with the effect.

Saturday 5 August 2017

Zvezda StuG IIIB (1:100)

 Here's the 1:100 scale StuG IIIB from Zvezda, coming to me via PSC.

This is the first time I've used a product that is new to me, Vallejo ModelEffects Dry Rust, which is a dark brown, somewhat granular formula. You can paint it on as a liquid, in which case it dries to a somewhat blotchy paint-like finish, or you can let it dry out a bit and apply it as more of a paste, in which case it dries to a crumbly finish and oxidizes to a range of rusty colours.

I've used it here for all the chipping effects, as well as on and around the exhausts and the hull sides in behind the running gear. It's gone on to the tracks too, over a coat of Vallejo ModelColor Oily Steel, and then been slightly burnished off with a stiff brush.

I like the way it works, and I think I'll be using it a lot. I assume that there's a companion "new rust" version as well; I'll be looking out for it.

2

3

4

5