Friday 31 August 2018

Tiger (P)

When the German military put out a call for designs for a new heavy tank in 1942, this is the chassis that Ferdinand Porsche submitted, designated VK 4501 (P). The turret was supplied by Krupp. The chassis was not adopted for use as the tank that became the Tiger I, but it was used for the heavy tank destroyer Ferdinand (later Elefant).

Only one of these went into service, as the command tank for a Ferdinand unit. It was lost in July 1944.

This model has been printed at 0.08mm in black PLA+. The 15mm figures are from Battlefront.

Thursday 30 August 2018

TOG-II

Fresh off the printer in 1:100 scale (15mm) is another in the series of Pointless Stupid Tanks No Wargamer Really Needs, the British TOG-II.

This is the beast's final form, mounting a 17 pounder in a turret quite similar to that of the Cruiser Mk.VII Challenger. It never went into service; by the time it was completed there were other, better tanks available to do the job. Its main function seems to have been to keep a bunch of crusty old WW1 tank designers out of everyone else's hair.

The Tank Museum at Bovington have an example, but I don't believe it runs at all.

Being able to print this sort of thing for a few cents is great. The TOG-II is already available commercially in 15mm from elsewhere, Battlefront make one for about a bajillion monies. However, it's such a stupid thing and so generally useless in a wargaming context that I'd never spend those bajillion monies on it. Getting it for nothing more than a few cents worth of plastic and electricity and some time makes it much more worth while.

Friday 24 August 2018

Blender Doodling

I've been trying to come to grips with Blender's Sculpt mode, and to that end I've been doodling around in it, starting with a simple cube and ending up with this Cthulhu Cube.

I think I'm beginning to get a bit of a handle on it, though it still does the occasional unexpected thing. This has just been built up without any sort of plan, obviously, so there's not much rhyme or reason to it, and I shall have to move on to more considered modelling.

Although I guess it could be possible to build something entirely within the Sculpting interface, I think it would be a lot better to create the initial forms via box-modelling and the like, and just use the sculpting interface to refine the shapes and add surface detail.

Here it is the next day, printed at 0.2mm in grey PLA, along with Sergeant Measureby for scale.

Now I've slapped a bit of paint on it.

Hopefully, this should inspire a certain degree of disquiet amongst the players.

Thursday 23 August 2018

Bad Hangover


This guy just came off my printer, after 22 hours and 22 minutes of printing. I have no immediate use for a hideous rot-riddled chaos-racked three-headed abomination, but they'll always come in handy.

Size is about 100mm tall by 150mm from hand to hand. Printed at 0.12mm in PLA. The file was created by Duncan "Shadow" Louca, it's his Fleshwalker.

The masses of the model are bulky and defined enough that I think it could probably be resized as small as 25% of its base dimensions and still print pretty reliably on an FDM printer, and a SLA or DLP resin printer would be able to take it smaller still. I'm printing another one right now at 50%, which would make it about ogre-sized as compared with my other roleplaying miniatures.

A few hours later...

Here's the new print at 50% scaling, along with Sergeant Measureby and his Spear of 5mm Increments.

I haven't done any cleanup on it other than removing the supports, but as I expected, it's printed pretty well, and I'm quite happy with it. It took about 7 hours at 0.08mm.

Sunday 19 August 2018

Footbridge (terrain WiP)


I've made a start on a new piece of scenery, a foot bridge crossing a narrow stretch of river.

The tile is sized to fit with my other river pieces, but I'd like it to be an attractive little standalone model in its own right. We shall see.

The bridge is one that I 3d-printed from a model I found on Thingiverse; I thought it was bigger when I started printing it, but it will do OK as a foot bridge. The base is 3mm MDF, sealed with black spray primer. The rock formations are DAS air-drying clay, press-moulded into Woodland Scenics rubber rock moulds, and the rest of the groundwork is SculptaMold plaster/paper goop. The steps and flagstones are just pressed and scribed into that once it had firmed up.

Stage 2

All the groundwork and the bridge's stonework has been painted.

Everything is painted in very loose blotches of yellow ochre, burnt sienna, and raw umber. The paint is quite liquid, so it spreads through the plaster of the groundwork and creeps into cracks and things. At this stage it looks pretty lurid and awful, but not to worry.

Next everything is covered in a black wash, which tones down all the colours and ties them together harmoniously. Hints of the original blotches still show through, so you don't get a monotonous grey overall.

Last, everything gets a dry-brushing in pure white, which delineates the highlights, and also gives the effect of stone in the process of being weathered over centuries by water, wind and frost.

Stage 3

The river. That's just painted, with varying shades of green to indicate depth, and then varnished with a high-gloss oil-based polyurethane. I choose that over a gloss acrylic, because it gives a smoother, harder gloss than any acrylic varnish I've found. The down-side is that it takes a very long time to cure, at least 24 hours to be safe.

I wanted the river to look deep and quite fast-flowing, so apart from some areas at the edges where I wanted to suggest shelving rock, it's all in quite dark tones, with bright highlights to suggest patches of white water.

I think that possibly I should have included a bit more blue to the green, but I think it's probably too late now unless I want to repaint it from scratch. I'll live with it for a while and see how much it bugs me.

Stage 4

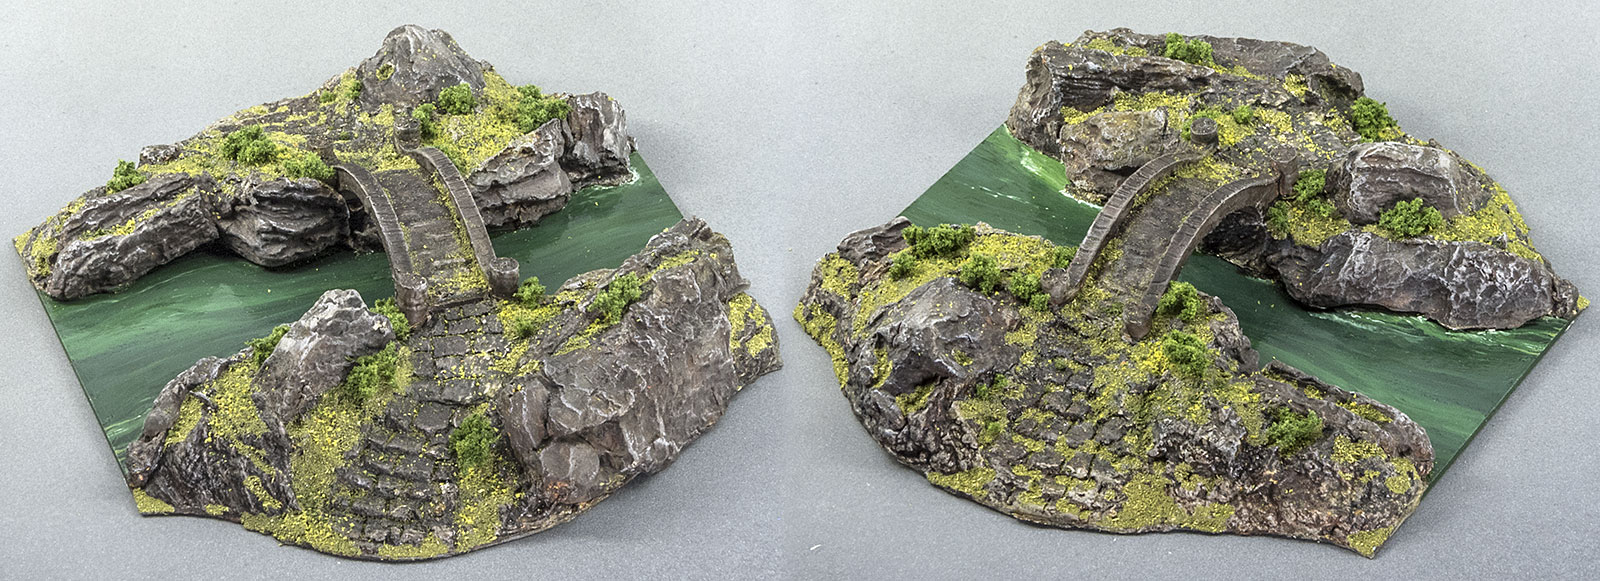
Now it's time for some vegetation to bring the scene to life. The grass is a mixture of several shades of sawdust and foam flock, and the bushes are just bits of clump foam soaked in diluted PVA.

This will probably do as a finished piece now. I may revisit the painting of the river, but probably not.

Saturday 18 August 2018

Gnome Wizard (I think)

Reaper 89023: Balazar, Iconic Summoner by Bobby Jackson
I assume this figure is meant to be a gnome; he's very short for a human, and he's lacking the beard of a dwarf.

I find painting yellows and oranges very difficult. They tend to be colours with very low opacity, and getting an even coverage requires several coats.

Friday 17 August 2018

Monochromish Wraith Thing

Reaper Bones 89031: Whispering Tyrant by Bobby Jackson
From time to time, when I need a very quick miniature that doesn't look completely unpainted, I'll pump out something along these lines.

This has been primed black, and then had a zenithal spray of white applied to give me some very fast basic modelling shading and highlights. Then I've added some washes in various colours — mossy khaki green, sepia, and ochre to emphasise the detail and add just a suggestion of colour.

It's very fast, and at the end of it I have something that looks more like a little statuette than a raw unpainted gaming miniature. It's something I wouldn't be embarrassed to put on the table, and for spooky, ghostly things like this particular figure, it can probably just stay like this forever. However, for other sorts of miniatures, this state can later act as underpainting for a more finished paint-job.

Thursday 16 August 2018

Anonymous Reaper Dwarf

Here's a Dwarf warrior from Reaper. It's one of their plastic Bones miniatures. I don't know what the SKU is; it came with one of their Kickstarters.

I started it as a very quick demo piece just to show a friend how the Citadel washes work, but I decided that since I'd started it I might as well finish it off.

I wanted the armour to look a bit battered, and maybe a bit fresh from the forge, not polished smooth. So the metallic highlighting has been applied in spots and blotches rather than smoothly.

Saturday 11 August 2018

A Very Vulgar Cephalopod

Because sometimes two middle fingers just aren't enough...
I present to you...
The Mighty Fucktopus!


Here it is, painted up, alongside Sergeant Measureby for scale. Each of the divisions on his spear is 5mm.

Duplicate image, renamed to avoid
rude word censorship filters.
Printed in PLA at 0.08mm layer height.

Thursday 9 August 2018

Flak 36

 I printed this 1:100 scale (15mm) Flak 36 88mm AA gun to give my Blitzkrieg-era Germans some heavy anti-tank capability, to fend off those blasted Matildas.

The figures are 15mm German artillery crewmen from Peter Pig. They're not entirely suitable for this gun; they're intended more for something like the PaK 36 or PaK 38. However, they're what I've got so they'll just have to do.

The model is OK, but it's more an 88-lookalike than an accurate scale model. It will do for my wargaming purposes.


This is the model as it came straight off the printer. Those strings are proving to be my 3d printing nemesis; I can't seem to get rid of the bloody things.


Saturday 4 August 2018

Kfz 13-14 (WiP)

I've printed myself a basic 15mm Kfz-13/14 shell. It looks a lot less ragged in real life than in the photo, fortunately.

I want to be able to use this one as a Kfz 13, so I'll have to build a MG-13 pedestal for it, probably cannibalizing one of the MG-34 from the PSC SdKfz 251 kits. I'll print another vehicle body to turn into a Kfz-14, and for that one I'll have to build a frame aerial. My printer would struggle to print either of those add-ons, so traditional scratch-building will have to do the job.

I have a bunch of BF WW1 stormtroopers who will end up crewing them, since they're not of much use to me as footsloggers. I think I'll paint it in the pre-war 3-colour camouflage pattern; it's a bit fancier than the Blitzkrieg-era grey and brown.

I love having a 3d printer.

This is one straight off the printer, before any clean-up at all.

I've been wrestling with this stringing pretty much since I first got the machine, but nothing I've tried has had much effect except to make it worse.

One thing that affects it badly is moisture absorbed by the PLA from the atmosphere; it gets much worse the longer the reel has been exposed. I shall have to figure out a dry-box solution — maybe a tupperware-style plastic cake box and some silica gel?

Friday 3 August 2018

A Karpark full of Kubelwagen

Fresh off the printer and the paint table.

I printed these to give my 15mm Blitzkrieg Jerries a bit of light command and recon transport, and at a pinch they can tow PaK36 door-knockers too.

The figures, included for scale, are 15mm Germans from Battlefront.

Wednesday 1 August 2018

Pz35(t) — 15mm

The Pz35(t) has been missing from my 15mm Blitzkrieg-era German forces. Fortunately, m_bergman includes one amongst his fantastic collection of 1:100 scale WW2 vehicles on Thingiverse, so I printed one for myself.

This one has been slightly remixed by me; I've added some track pins to give the tracks a bit more character, and I modified the turret hole and plug to take a pair of 3x3mm magnets. It's printed in PLA at 0.08mm layer height.


I'm still having trouble with tiny little hairs being left on surface details as the nozzle lifts away from the print, which means a lot of painstaking clean-up with a very sharp scalpel. More fiddling with settings is in order; I might have to design myself a little testing piece with rivets and what-not all over it that I can print quickly to try out various parameters.