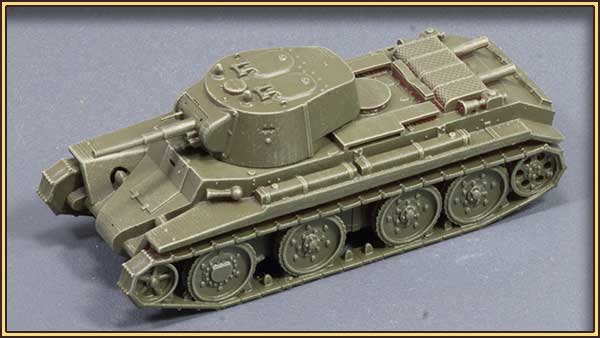
I figured, since I'd already done a bunch of work on the hull for the BT-42, that I might as well re-use all that labour for a BT-7, also remixed from Zac Kuvalich's original work.
Apart from the extra track detail, the main improvement I've made to the hull is in the engine grill.
I don't know enough about Soviet and Finnish stuff to know just how similar the Finnish BT-42 was to its source vehicle, the BT-7. But ignorance, as they say, is bliss, and it will do well enough for me until I find out otherwise.
Next Day...
Right, so here's the first test print. Overall I'm not dissatisfied.
The only real issue was that I neglected to create locating lugs/sockets when I separated the running gear for ease of printing, and I glued the tracks on wonky. Then I broke them, trying to move them into the right position — it's not too apparent from this side, but the other side is a bit worse.
Never mind, I've adjusted the STLs and I've got another test print under way.
I've sprayed the model with Vallejo Soviet 4BO surface primer, and given it a gentle dry-brush with VMC Green Grey to delineate the surface detail. The transparent red resin I'm printing with at the moment is terrible to photograph, though it is admittedly quite pretty.
Later that day...
Test print number two complete, and all issues are dealt with.
The running gear components now fit into place easily and positively; no more guesswork.
Next day...
Naturally, errors were made.
It turns out that the squared cut-off track guards were just a Finnish thing, so I had to do a bit of juggling with another of Zac's files to get them back to the bulbous Soviet style.
I also had to re-do the tracks. The track links I modelled on the BT-42, though taken from a photograph of a surviving vehicle, are more appropriate for a BT-2 or BT-5. The links on a BT-7 were about 20% shorter. It's possible, even likely, that the surviving museum BT-42 was cobbled together from several vehicles, using the tracks from an older tank.
Several days later...
Print successful.
This is printed in a Frankenstein mixture of resins: the very last drops of transparent red left in the vat, the last dregs of some opaque tan resin, and some transparent green to take the vat level up to a safe depth. They're all the same type of water-washable resin though, and all from eSun, so they're perfectly intermixable.
The only issue is that the inert fillers in the opaque resin mean that you have to be very diligent about washing the print, and it's a good idea to blow off any water with compressed air before curing — I didn't do that this time, which is why I got that white crufty buildup in some of the seams. The transparent resins are much more forgiving in this respect, and in using them I've got a bit lazy.
Compare with this one, in exactly the same resin, that I blow-dried with my airbrush before curing.
You could use canned compressed air I guess, if you don't have access to an airbrush; I have no idea what those cost as I've never used it for anything.


Looks great.
ReplyDelete