Tuesday, 28 April 2020

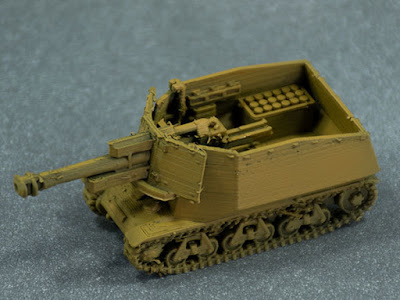
Geschutzwagen H-39


I've painted up my 1:100 3d printed Hotchkiss Geschutzwagen H-39, and added a couple of crewmen from PSC plastic 15mm late-war German infantry packs.

The STLs are available at https://www.wargaming3d.com/product/hotchkiss-geschutzwagen-h-39/

[EDIT] I've now added the 75mm SPAT version of this vehicle as well. No crew as yet.


Monday, 27 April 2020

Hotchkiss Geschutzwagen H-39 (1:100)

This is one of the vehicles based on captured French equipment, used by the 21st Panzer in Normandy in 1944. This particular on was a 105mm self-propelled gun, based on the chassis of a Hotchkiss H-39 tank.

The zip file contains two versions of the model: one single-piece model, and another with the gun separated out for separate printing and assembly. It's available at https://www.wargaming3d.com/product/hotchkiss-geschutzwagen-h-39/

The model is designed at 1:100 scale for 15mm gaming.


I've added the 75mm gun now as well, to make the SPAT version of this vehicle. If you've already bought it, you should be able to just re-download the zip file to get the new components.

Friday, 24 April 2020

Chieftain 5 (1:150 scale, remix)

The remixed model


Some time ago, I downloaded a 1:100 scale Chieftain 5 model from Thingiverse that was intended for printing at 1/300 (6mm) scale.

Unfortunately, I don't recall who was the original designer.

I rescaled it to 1:150 for my BG:NORTHAG British army.

It was fine, as far as it went: the proportions were good, but it was quite simplified in several areas to make it printable in very small scale.

I decided to tinker with it a bit — not a lot, but just enough to refine some of its details.

I gave it a new gun barrel, and refined the curves of the cast turret front. I added sockets so that I could magnetize the turret. And I thinned down the tracks, and added a bit of track detail.

I also split the hull in half, fore and aft, and printed it in two pieces. This gave me much smoother printing of the very shallow curves of the hull front.

As I said, it was OK before, but I like it better now.

The original model


Wednesday, 22 April 2020

Munitionsschlepper auf Pz1A

I've put together a remix of a couple of models (TigerAce's Pz1A, and Bergman's ammo trailer) into a pair of Munitionsschlepper auf Pz1A in 1:100 scale (15mm)

You can download the STLs (free) at https://www.wargaming3d.com/product/munitionsschlepper-auf-panzer-1a/

I'm in the process of doing a test print right now. (Done it – see below) The tracks, though nicely detailed, are quite thin, so I make no guarantees about its printability in FDM. Resin shouldn't have any problems though.

Pz1A with ammo trailer


Pz1A with cargo box

First test prints. As expected, the tracks didn't print especially well, but at least they're there and I can disguise the worst of the ugliness with mud and gunge.

More Monsters in (Disappointing) Book Form

I just received a copy of Volo's Guide to Monsters that I ordered from the Book Depository some time ago.

It's a D&D 5e bestiary. I forget now how much it cost; it was about standard for these 5e harcovers, so not particularly cheap.

It's 224 pages, but that's not really a very good indication of its contents, as about half of that is taken up with detailed fluff about certain traditional types of monsters like Beholders and Mind Flayers. The second half is made up of much shorter descriptions of monsters, but these too are padded out with fluff — and there are no new creatures in the book at all, as far as I can see; they're all monsters that have appeared over and over in previous editions of D&D. Originality is in short supply in this book, and if you have any of the Monster Manuals for any previous D&D editions, you can probably safely save your money and just use those.

Overall, the book reads like somebody's notes on the creatures appearing in their own campaign, with extensive campaign-specific filler that is, in my opinion, largely unnecessary and serves no real purpose except to inflate the page count. It might be good for a GM who is entirely lacking in imagination or inspiration for their own campaign, or one who is very new to world-building, but for most GMs with any experience, it's not that useful at all.

Unless you're not comfortable with converting monsters from older books for use with D&D5e, or you're brand new to D&D and want some help with monster "colour", I'd say that you probably don't need this book.

Tuesday, 21 April 2020

Churchill 3" Gun Carrier – repaint

 This is my 1:100 scale 3d-printed Churchill 3" Gun Carrier (model design by M. Bergman) which I've repainted in SCC2 and SCC14.

I airbrushed on the SCC14 "foliage" disruptive pattern, so the edges are really a lot softer than they should be. Also, I tried out a new technique for adding dust and dirt with which I'm not really all that happy, but overall it will do.

Rear view

Port view
— the lights make the 3d printer ringing a lot more prominent
than it appears in real life.

Sunday, 19 April 2020

S.C.C. 2

1:100 scale Churchill 3" Gun Carrier (3d printed)

In 1941-42, the British army adopted the Standard Camouflage Colours (S.C.C.s) to come into use alongside, and eventually supplant the older greens and Dark Tarmac that had previously been used.

The base colour was changed from Khaki Green No.3 to S.C.C. 2 (brown), with disruptive patterning in S.C.C. 1a (dark brown) or S.C.C. 14 (black) over it, initially in the old striped pattern, and later in the "Foliage" and unofficial "Mickey Mouse" patterns. This change was, in part at least, due to a severe shortage of chromium oxide green pigment needed to produce strong green colours.

This Vallejo ModelAir shade, VMA 71.038 Camouflage Medium Brown was recommended to me as a decent match for S.C.C. 2, and I do like the look of it a lot better than the reddish milk-chocolate shades I've seen before. I don't have any direct experience of S.C.C. 2 (or any of the S.C.C. colours, really) so I'm going entirely with my gut feeling.

Friday, 17 April 2020

It's My Party, And I'll Roll If I Want To

I can't say I particularly like D&D5e, but it's very far from being my least favourite version of the system.

4e was a fucking dumpster fire as an expression of D&D, regardless of its merits as a tabletop fantasy skirmish wargame.

3e arrived with good intentions, but it introduced a whole lot of needlessly byzantine munchkinish complication and tipped the game more and more towards being a kind of wire-fu superhero game.

2e introduced some reasonable fixes for some of the more egregious idiosyncrasies of 1e, but in the process it made everything terribly, terribly bland.

AD&D1e was an eye-watering mish-mash of differing and competing systems all rolled up into one steaming manure pile, but at least it did have panache. A weird googly-eyed panache maybe, but it was there. It had an identity of its own.

Of them all though, I think my favourite version is one I've never actually played as a player: the BECMI series, as published in the 1991 Rules Cyclopaedia. It provides a good framework into which one can pour one's own personality in the form of house-rules, and is robust enough not to founder under the weight of them. It's easy to run on the fly, without constant reference to specific use-cases. I like it a lot.
NOTE: The Rules Cyclopaedia is available again as a (scanned) reprint POD from DriveThruRPG, in soft or hard covers. So is the Creature Catalogue; I don't know about any other BECMI stuff.


I have spent a ridiculous amount of money on D&D stuff, and RPG and wargaming stuff in general. There are more shelves full of it in the library. No doubt it will all end up in a skip after I shuffle off.

Thursday, 16 April 2020

Very Tiny Toy Soldiers


Since the Royal Mail has not been delivering anything to New Zealand, and I have the Battlegroup: NORTHAG rules to try out but no access to 1:150 – 1:144 scale infantry, I thought that perhaps I should try making some of my own.

And here (right) is the first test print, a four-man 1980s BAOR fire team, alongside a pair of gigantic towering PSC 15mm WWII Soviets, for comparison.

My Ender 3 with its 0.4mm nozzle isn't capable of rendering all the detail present in the model, but it does a good enough job for wargaming purposes.


Here they are alongside a 1:150 scale FV432

This was the first attempt. They printed better, but were about 25% too large.


Single

Team base


Next day...

Now I've added a Carl Gustav team. Haven't printed this one yet, but I don't anticipate any particular issues after printing the fire team base.

Tuesday, 14 April 2020

Centurion and Chieftain (1:150)


It's a bit out of the period for Battlegroup NORTHAG (which is nominally set in 1983) but I really like Centurions so I made some anyway.

This is 3d printed on my Ender 3 from a model by M. Bergman. It's 1:150 scale, which I chose for all my BG-NORTHAG stuff because it's close enough to 1:144 to play on the same table, and because it makes for easier scaling.

I'm not sure exactly what sort of markings British armour would have had in the mid-'80s, but from the photos I've seen, any markings there were seem to be pretty small and low-viz, so I probably won't bother with any at all.


I have some Chieftains as well, of course. This is also 1:150 scale, and it's printed from a much less refined model than the Centurion, as it was intended for printing at 1:285 - 1:300 scale. However, it is Chieftain shaped, and it will do the job for me at tabletop distances.

I do have a more detailed model of a Chieftain in my collection, but its proportions are a bit out of whack, so I actually prefer the lower-detailed one.

I don't recall who it was who designed this model, unfortunately, and the .STL file format doesn't store useful metadata like author name at all.


Jumping back in time a bit, here's the Conqueror. It was intended as a long range heavy gun tank (with a massive, for the time, 120mm gun) to support the Centurions against the Soviets' JS-III, which had really put the shits up the allies when it appeared just after WWII.

I've elected to paint it in plain overall green (but not the dark Deep Bronze Green of peacetime). The plan was, at the time, to repaint everything in their battlefield disruptive livery, if and when it all kicked off. Assuming there was time, of course. Later on, in the late 1960s – early '70s, somebody decided that was a silly idea, and they started keeping everything in battle-ready paint all the time.


Leaping back ahead, this one is a Challenger 1, which only just squeaks in to BG-NORTHAG's 1983 setting.

It was supposed to be the replacement for Chieftain, but as it turned out it never made up more than a third of the British tank strength before it was superseded by the Challenger II.

Sunday, 12 April 2020

Unfinished Giant


This is a very old metal Grenadier figure of a Storm Giant that I've had in the unfinished pile for decades, since about the mid to late eighties. I don't know who the sculptor was.

It stands about 75mm tall, and it used to have an excrescence coming off its left hand — I think it was supposed to represent a lightning bolt, that being a thing that D&D storm giants do, but it looked to me more like a long turd, so I cut it off and resculpted the hand a bit.

I also (badly) remodeled the hair some, to cover the terrible botched job I did of pinning and gluing his left arm.

All in all, I really don't like this figure very much at all. That, and the fact that it's quite heavy and difficult to manipulate, means that it's remained unfinished all this time, and realistically it's pretty unlikely ever to be completed now.

Friday, 10 April 2020

Voroshilovets — Painted

I've finally got my 3d-printed 15mm (1:100 scale) model of the Voroshilovets (see this earlier post) painted up and ready for the wargames table.

Rear-quarter view

The tilt is detachable, in the event that you prefer your tractors in the nude.

Tuesday, 7 April 2020

Portable Photo Background

How it works from the front

How it works from the back
Here's a very useful thing for still-life photography: a pair of clamps which will hold a piece of paper or card to create a seamless background sweep.

The files are available free from https://www.thingiverse.com/thing:3638751

With this, you can quickly and easily swap out different colours, gradients, background images and what-not.

You will need access to a 3d printer though.


And here is mine, fresh off the printer.

This is a test shot, just using my standard work-table lights
and a card I sprayed with grey primer and dusted with white.

Vickers Medium Mk.III (revisited)

I've been redesigning my old model of the Vickers Medium Mk.III to make it suitable for home FDM 3d printing. This is a job that I've been putting off for quite a while, mainly because I don't personally have a need for the physical model any more, so it hasn't been a very high priority for me.

Unfortunately, wargaming3d.com (where I put my STL files up for sale) is having issues at the moment, and I can't add any new products to my catalogue. Hopefully the problems will be resolved soon, but until then it will have to remain accessible to me alone.

Wargaming3d.com is back up (-ish) again, and the STLs for this model are at https://www.wargaming3d.com/product/vickers-medium-mk-iii/


Saturday, 4 April 2020

Easy Colour Correction for Photographing Miniatures

If your photographic lighting resources are limited, it's quite likely that you don't have access to daylight bulbs, and your photos will have a pronounced colour cast. The exact colour will depend on the lighting — most bulbs used in the home are quite yellowish, while fluorescents can be greenish. This process for correcting that colour cast will work for either.

I've taken this picture of two figures on a sheet of plain copier paper, and I've added a box of pure white in one corner so that you can see the exact effect.

The software I'm using for this is Photoshop, but there are equivalents in GIMP or Affinity Photo that do the exact same thing.

Step 1:

Using the Colour Sampler tool (the eyedropper) sample an area of the photo that you know is pure white. I've taken my sample from the paper between the two figures.

Step 2:

Create a new layer, and fill it with the colour you've sampled with the eyedropper.

In Photoshop, the shortcut to fill an area with the foreground colour is Alt-Delete
(Option-Delete on a Mac).

Step 3:

Invert that colour.

In Photoshop, the command for this is Control-I
(or Command-I on a Mac).

Step 4:

In the Layers palette, set the Mode for the layer to Colour Dodge.

The layer will now neutralize the colour cast on the photograph.
In this photo, I've taken my colour sample from the tone card in front of the two miniatures, instead of from the paper they're standing on. As you can see, this has created a slightly different tonal range in the image; the slight vignetting apparent above has disappeared and the whole background is pure white.

Friday, 3 April 2020

Photo Stage Setup

This is the setup I use for photographing my models.

The shell of the stage is a cheap translucent plastic storage bin, lined inside with white cardboard.

I use three cool-white LED lamps, two from above and a lower-powered one providing some frontal fill lighting. The LED lamps are excellent for my purposes, as they're very bright but emit very little heat, so I can have the bulbs sitting right on the plastic bin without melting it or setting anything on fire — they do get a little bit warm, but not very, and the lights are never on long enough to cause an issue. They're not true daylight lamps, but they're fairly close in tone, close enough for digital editing in any case.

I have a pair of mirror tiles leaning against either side of the stage to bounce around a bit more of the light coming from overhead. The cards in front and at the back of the stage are for colour and tone calibration when I'm editing the images on my computer; they get cropped out of the final images.

I prefer to use a neutral grey backdrop most of the time, but I also use a white or black one. Occasionally I'll use a more decorative stage setup, but not often.

I always use the tripod. My camera these days is a Nikon D3500 DSLR with an 18 to 140 mm zoom lense. I don't yet have a flash for it, apart from the built-in one; my old Nikon TTL Speedlight turns out to be precisely the wrong model to be compatible with any modern camera. Hey-ho.

Ancient Ruin – Now With Added Moss


I've added some foam-flock moss to the Ancient Ruin, which I think helps to make it look a lot more ancient and ruinous.

The figure is another one from Reaper, a lich of some sort. He's a lot closer to regular person size than the gigantic warrior in the last post.

Side view

...and from behind.